
Jan's Working with Databases
Forms & Reports: Exercise Access 4-1
You need to use what you just learned and what you learned in the previous project, and maybe learn a little more. The exercises with databases will require more steps than in the other lessons!
Complete all parts of the following exercises. Don't forget to backup your Class disk when you have completed the exercises or whenever you stop for the day and saved a document along the way.
Exercise Access 4-1: Scouts
| What you will do: | Create data entry form Create a query to use as row source for form Create form based on Crosstab query Create form for printing Create form with subform Create report with groups Edit an existing report to show different data Create a report with Totals Create a chart report Create a report with a subreport |
Some years ago when I was the Service Unit Manager (head local volunteer), I created a database for managing the Girl Scout troops and leaders in our service unit. I have reduced the number of records and objects and have somewhat normalized the database for use here. I have learned more over the years about how this should have been done to start with!
You will create forms and reports that use the tables and queries that you previously imported to create a new database (Exercise Access 3-3).
Disclaimer:
All of the names, phone numbers, and addresses are fictional and any
correspondence to actual persons is coincidental. Girl Scouts of the
USA has not approved this database in any way.
Start with: ex3-3-scouts-Lastname-Firstname.accdb from your Class disk
Data Entry Form:
 Open ex3-3-scouts-FirsnameLastname.accdb from the databases project3 folder of your Class disk.
- Save As ex4-1-scouts-Lastname-Firstname.accdb to the databases project4 folder of your Class disk.
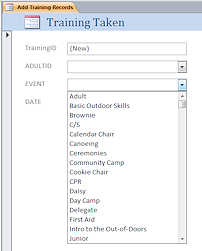
- Use the Form button to create a simple autoform for the Training Taken table with which to add records when new training
is given.
- Make it a Data Entry type (so that it opens directly to a
blank record and does not show existing records). (Hint: Data Entry property on the Data tab for the form)
- Name the form Add Training Records.
- Resize the controls to be about 2.5" wide.
- Drag the right edge of the form to the left to about the 3.75" grid line.
- Create a combo box control:
-
 Change the ADULTID control to a combo box:
Right click on the control. Choose Change To > Combo Box.
The Combo Box Wizard does not start! You will have to set some properties yourself.
- In the Property Sheet for the combo box, on the Data tab, click the ellipsis button for the property Row Source.
The Query Builder opens.- Show the Adult Info table.
- Drag the fields AdultID, LastName, and FirstName to the grid.
- Create a calculated AdultName field, which combines the last name and first name of the person, like "Smith, Jan".
- Sort Ascending the Last Name and First Name fields, but do not show them in the query results.
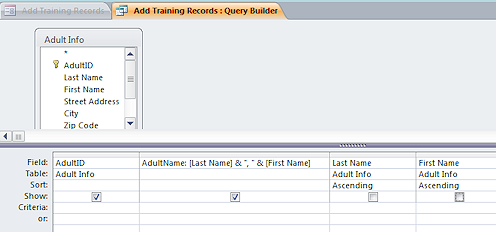
Run the query to make sure your expression creates the full names. Note that the Adult Info table puts a space between words in field names!
- Save As QAdultName and close the Query Builder.
 On the Format tab for the ADULTID control, change the property Column Count to 2 and the Column Widths to 0";1".
This hides the ID number in the combo box drop list and shows only the person's name from the calculated control.The AdultID control is now a drop list. The Event control was already a drop list because it is a Lookup field in the table's design.
- The Tab Order includes the AutoNumber field TraningID. Change the Tab Stop property for that control to No.
-
Add records:
-
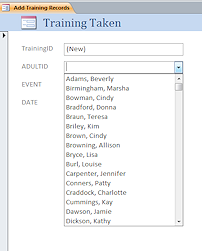
Use your new form to add a set of records for a First Aid training on 11/18/2006, attended by Jan Smith, Cindy Brown, Carolyn Roberts, Lillian Felton, Jan O'Flannery, and Karen Trapp.
 Tip 1: AutoFill
The combo box controls will autofill as you type. (Names are listed with the last name first in ADULTID). Just type the first letter of the last name that you want and then the next letter... until you see the correct name. Then press the ENTER key to accept that name and move the focus to the next field.Tip 2: Duplicate values
with key combo
When a sequence of new records shares some of the same data, like the Date and Event for this exercise, you must actually enter all of the values only for the first new record. For the remaining records, where data is the same as the previous record, just click in the text box and use the key combo CTRL + ' (That is, hold the CTRL key down and press the apostrophe key). The data from the preceding record is copied into the control.
 Save and close the form.
Form for Viewing Data only:
- Open the Query Design View of the Crosstab
query QLeaders Trained In?
This query needed a lot of fixing in the previous exercise. Three of the tables involved in the query were imported and broke down. You fixed it in Exercise 3-3.
-
Inspect and run this query.
What does it do? It shows us the most recent date (Max function) that a leader or coleader took a training course. (Position Code less than 990 means the person is still active). Rows show the leader's last and first name. Columns show the training event. The cells in the middle show the latest date that the person took that kind of training.
If your query shows Expr1 or similar, you can delete those characters, leaving the original field names. If your tables show _1 at the end of the name, that is not a problem. That happens when you have two or more copies of the same table in the grid.
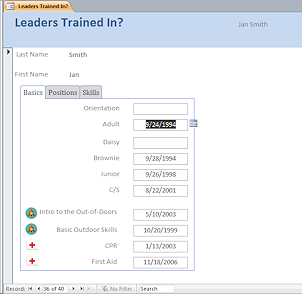
- Use the Form Wizard to create a form named Leaders Trained In? to view the
results of the Crosstab query. This form cannot be used to change the
records since it is based on a crosstab query. Your formatting should make this clear.
 Access 2010: Title: Add a title to the Form Header, Leaders Trained In?.
- Resize: Revise the label and text box sizes so that all of the label text shows and there is room for the widest
possible dates (2 digit
month, 2 digit day, 4 digit year). [The default date style is different in different versions of Access]
Remember - the more wide characters that may show, the wider the control must be.
-
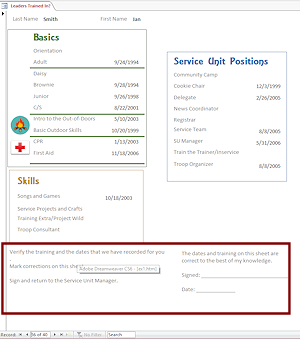
Layout: Remove the Stacked Layout (if the control are in this layout). Rearrange the controls in a layout of your own choice to put the trainings into 3 groups - Basics, Skills, Positions. Label your groups.
Basics: (usually taken in the following order) Orientation, Adult, age-level trainings (Daisy, Brownie, Junior, C/S), Intro to the Outdoors, Basic Outdoor Skills, CPR, and First Aid.
Positions: Training for particular adult-level jobs.
Skills: Training for particular kinds of activities like Service Projects and Crafts, Songs and Games, Project Wild.
- Change the Border Style for all controls to Transparent.
This should keep the form from looking like one where you enter data.
- Tab Order: Adjust the tab order so that a user can tab through
the controls in a logical order for your new arrangement of controls. Why would you want to tab to a control that you cannot edit? To copy the date to use elsewhere.
- Images: Add the images fire.png and redcross.png from your resource files to your form. Position the fire beside the two outdoor training items. Position the red cross beside the First Aid and CPR items.
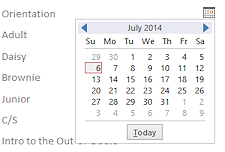 Date Picker: When the focus is in a date field, the Date Picker pops up. Click on it and a calendar opens. Since this form cannot edit data, select all of the date controls and set the Show Date Picker property to Never in the Property Sheet.
- Make any formatting changes you wish to make your form more usable or attractive.
- Add a label with your name to the right in the Form Header.
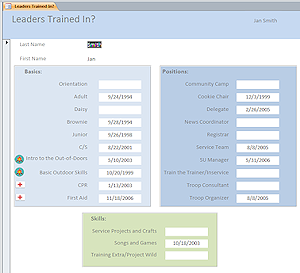
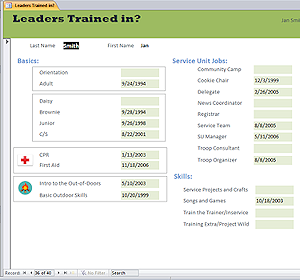
Below are some example layouts. Your form is allowed to look different from the illustrations but should include the same kinds of groups. How pretty do you want to get??
The first form below is a rearrangement of what the Form Wizard produced with some rectangles in the back to group controls together more clearly.
The second version includes a calculated control at the top which pulls the person's name together. So much easier to read than the two separate controls at the top. Lines divide the trainings into groups. The vertical line is actually a narrow rectangle.
Examples of formatted form:

- Save and close the form.
[Leaders Trained In?]
Printable Form
You will now revise the form to print a copy of the results to give to leaders for them to use to verify the training taken. You need each record to print on a separate page.
- Copy the Leaders Trained In? form and name the
copy Leaders Trained In? - printable.
-
Make changes to the new form as needed so that it will print neatly, without any backgrounds for the sections. Set the background color for the small fire and red cross images to the same as whatever background they are on. Even though those images have a transparent color, when printed, Access may put a white background in that area. Not what is supposed to happen!
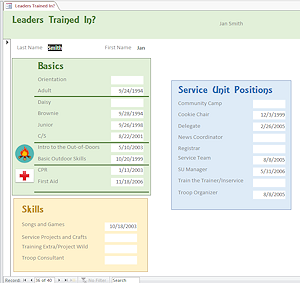
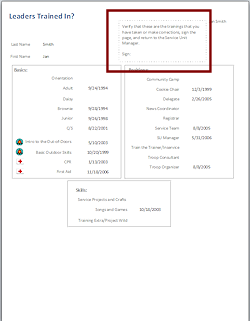
(Your form may look quite different from the illustration!)The Form Header prints only once, so you should move the title and the label with your name to another section, either the Page Header or at the top of the Detail section for the new form, if your layout prints with one record on each page.
-
Add directions and a place somewhere on the form to sign. The directions should say to verify the training taken or make corrections and then to sign the form and return it to the Service Unit Manager.
Examples:
- Save the form.
[Leaders Trained In? - printable]
 Print record #36 - Jan Smith. (1 page)
Form with Tab Control
The three groups of training events could be put on tab pages to save a lot of space. For some purposes a tabbed control would make the form more awkward to use. For example, it won't print well at all!
-
 Copy the Leaders Trained In? form and name the
copy Leaders Trained In? - tabbed.
Copy the Leaders Trained In? form and name the
copy Leaders Trained In? - tabbed.
- Add a tab control with 3 tab pages, named Basics, Positions, Skills.
-
Cut and Paste the training controls to the appropriate tab page.
(Your form may look different from the illustration!)Be careful that you move the controls to the tab page and not UNDER the tab page! Remember that you have to select the page by clicking near the edge but not the tab control itself.
-
Save the form.
[Leaders Trained In? - tabbed]
Form with Subform
- Copy and paste the query QAdultName to the Navigation Pane with the new name QAdultInfo.
The original query sorts names and create a full name field, AdultName. - Open the new query in Design View and add the rest of the fields from the Adult Info table.
Make sure no fields will show twice in the results. - Save the edited query, QAdultInfo.
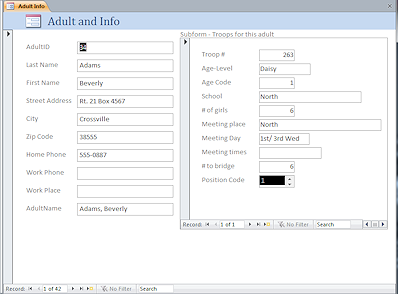
- Use the Form button to create a new form based on the query QAdultInfo.
- Name the form Adult Info and change the title in the Form Header to match.
- Select all of the controls (but not the labels) and change the Width to 2".
- If some controls are taller than others, click the Size/Space button on the ribbon tab and pick Size > To Shortest.
The controls are resized in height and moved close together. - Create a new query to use for a subform, which must include all of the fields from the table Troop Info and the fields AdultID and Position
Code from the table Leaders.
(The AdultID field will link the subform to the main form.)
- Name the
query QTroops with Leaders.
-
Add a subform based on your new query to show the Troop Info for that person's troop(s).
The field AdultID does not really need to be on the subform, but the Position Code does.
(If you use the Troop Info table instead of the query, you will see all troops, not just the ones that match the leader.)
- Save the form with the name Subform-Troops for this adult
 Make the following changes to the subform:
- Default View = Single Form View
- Navigation bar at
the bottom shows when in Form View.
That's the only way you will know if a leader works with more than one troop. - Delete the AdultID control and its label.
- Resize the Position Code control to show just the current choice instead of a list and to match the width of the control above it. The persons position code for the current troop will show in the box as highlighted.
- Make changes to spacing and sizes to get the form and subform within 8" on the ruler.
The illustration shows the form what the Form button produces, with the default subform changed to show form view, to show only the current position code instead of a list, and to remove AdultID from the subform.
- Navigate through all the records.
Which adults work with more than one troop?
- Save and close the form.
[Adult Info] - Your Own Design: Rearrange and format the form to make it more attractive or easier to use.
Be sure to adjust the tab order for the form and the subform if you move controls into a different order.
- Save the revised form as Adult Info -FirstName LastName
Save your revised subform as Subform-Troops for this adult -Firstname Lastname, using your own first and last names, of course.
Make sure your new form uses your new subform!
Report with Groups
New leaders must take several trainings before starting to work with the girls. You will create a report that lists who has taken a training, grouped by date. This amounts to an attendance list of the event.
- Create a new blank report.
- Use Query Builder to build a query that
picks out just Orientation training from the Training Taken table. The query should use AdultInfo fields to sort the attendees names
alphabetically. Include the AdultName field from the query QAdultName to show the person's full name.
Do NOT save the query separately.
- Group the report on DATE and sort from oldest to newest. Keep
the group header with the First Detail.
In the group header, add a control for the field DATE, which is the date of the training..
-
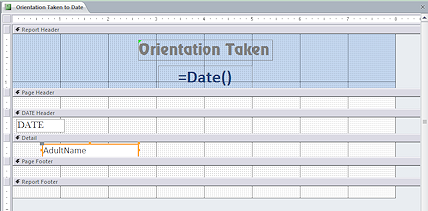 In
the Report Header, add the title "Orientation Taken" and
the current date, centered on the 4" grid line. Center both inside their controls.
In
the Report Header, add the title "Orientation Taken" and
the current date, centered on the 4" grid line. Center both inside their controls.Showing the date on which the list was printed can keep you from using a stale report.
Format with the font, font size (at least 26 pt), color, and background of your choice. (The illustration uses the font Renfrew, which is not a font included with Windows or Office.)
- Add your name in a label in the Page Footer at the left. Also show the page number, like Page 1 of 2 in the center of the footer.
- Resize the report's Width to 6".
Center the controls again in the Report Header and the Page Footer.
- In the Detail section include the full name of each
attendee, using the field AdultName.
Be sure that the control is wide enough for the longest name to fit on one line. - Set the Alternate Back Color to No color for both the Detail and Group sections.
 Increase the font size for the group header and the names in the Detail section to 14 pts. Align the date to the left.
- Set the all four margins to 1" in Page Setup.
- Change the column in Page Setup to 2 columns that are 3" wide.
- Check Print Preview.
(Yours probably does not look like the illustration.)
If your preview does not show two columns, then make changes to the font size or Detail section height to make this report use two columns.
(Yes, this is backwards from what we usually want to do!)
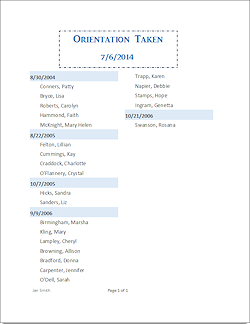
- Save the report as Orientation Taken to Date
- Print this one page report.
If you have a 'blank' second page, then you need to adjust the design until there is only one page. - Close the report.
 Modify
Report
Modify
Report
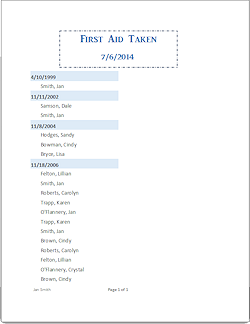
You can change the existing report to show another training list. You just have to change the source and the title. The formatting and layout are all done! be sure that the new records you entered for 11/18/2006 show up!
- Copy and paste your report Orientation Taken to
Date to the Navigation Pane with a new name, First Aid Taken to
Date.
- Make changes to the report so that it will list the First Aid
training instead of Orientation.
- Change the title to match.
- Save your changes.
- Print this one page report.
- Close the report.
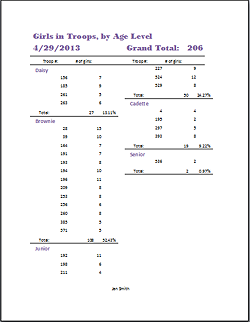
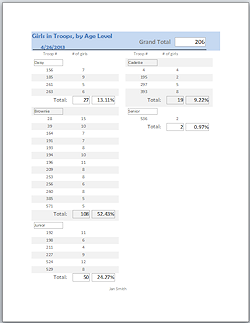
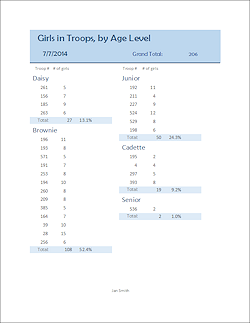
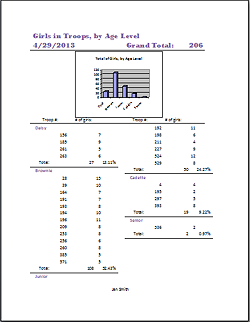
Report with Totals
One question asked every year is "How many girls do we have in troops?" A related question is "What percentage of the girls are in each age-level?" You will create a report to answer both of these questions at once.
- Inspect the datasheet and design for the query QGirls in Troop. You imported this
one.
What table is it based on? Are there criteria? Does the query sort?
- Add criteria so that results will not include zero as a Troop #.
You can use Not 0 or <>0. Be sure to use a zero and not the letter O.
Zero is used as the troop number for adults who do not work with a specific troop but who have a job at the Service Unit level, like Cookie Sale Manager or Service Unit Manager. - Save and close the query.
- Start a new report in Design View and set the Record Source as the query QGirls in Troop.
Use the illustration as you work as a guide for where to put the fields.
- Group the records on the Age Code field and sort ascending on Troop #.
Include a group header and footer for the Age Code group.
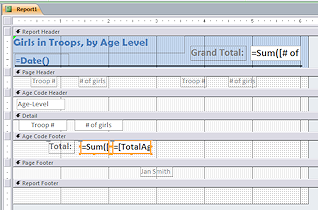 In
the Report Header, create a title label, Girls in
Troops, by Age Level and a control for the current date at the left.
In
the Report Header, create a title label, Girls in
Troops, by Age Level and a control for the current date at the left. - Add a divider
line of 2 pts border width, running across the bottom of the Report Header.
- In the Report Header, add a control that calculates a grand total for # of girls.
- Hide the Report Footer.
-
In the Age Code Header, add a control for Age-Level.
This will work since there is exactly one Age-Level for each Age Code. Keep whole group together.Note: By using codes in addition to the names of the age levels, we can set up the sort order that we want. Daisies are the youngest. Then Brownies, Juniors, Cadettes, and Seniors. Not regular alphabetical order!
- In the Detail section, include controls with no labels for Troop # and # of girls.
- In
the Age Code footer, add a control that calculates the SUM of # of girls for the group.
- Also add a control that calculates the percentage of the
grand total each age level's SUM is.
You will need to divide the group total by the grand total (Use the names for the controls) and then format the control as Percentage (in the Property Sheet). Show the % without decimals.
- To create column headings, in the Page Header add labels for Troop # and
# of girls.
- Create two columns for the Detail section while letting the
Report Header extend across the whole page.
- Add your name to the center of the Page Footer.
-
Make changes to the formatting as you wish to make this report easy to read. Make sure it is easy to tell the totals from the the other numbers.
Examples:
Your report does not have to duplicate the example illustrations.
- Save the report as Total Girls in Troops, by Age Level.
- Print this one page report.
If you have an extra page that is blank except for the Page Header, you forgot to hide the Report Footer or the width of the whole report is too wide to fit. You may need to revise the width of the line in the Report Header to resize the width of the report. - Close the report.
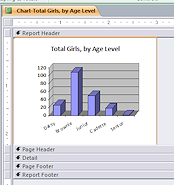
Report with Chart
- Create a new blank report.
- Set the Record Source to the table Troop Info.
- Show the Report Header.
- If necessary, change the Report Header background to white.
- Set the Height of the all sections except the Report Header to zero.
- Use the Chart tool to add a chart to the Report Header.
- In the Chart Wizard, select the table Troop Info and pick the fields Age Code, Age-Level, and # of girls as Fields for Chart.
You will need the Age Code field to change the sorting from alphabetical to from youngest to oldest later.
- Choose a 3-D column chart as the type.
- In the chart layout, make the horizontal axis Age-Level, which is the default choice.
The vertical axis should be SumOf# of girls, not SumOfAgeCode.
Do no choose fields to link the report and chart together.
- Enter for the title of the chart Total Girls,
by Age Level.
Do not display the legend.  In Report Design View, resize the chart to be about 3" wide and
2.25"
tall.
In Report Design View, resize the chart to be about 3" wide and
2.25"
tall.
Why so small? You are going to include this chart in another report shortly.- Revise chart:
 Select the chart and open the Query Builder for the chart's
Row Source.
Select the chart and open the Query Builder for the chart's
Row Source.- Add the field Age Code to the design grid on the Total row to Group by and sort it Ascending.
- Do not have this column display in the results of the query.
- Add criteria to the Age Code column ensure that values must be
less than 7.
This will remove the SU column from the chart. There are no girls in that category but Access would leave space for a column even though the sum was zero. 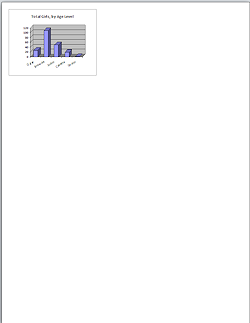 Save the changed query to the report, not as a separate query.
- Format the horizontal axis to angle the labels to 45 degrees.
- Change the font for the horizontal axis to Regular instead of Bold.
- Resize the Report Header and width of the report so that only the chart shows.
- Save the report as Chart: Total Girls, by Age
Level
- Print this one page report.
Report with Subreport
Now you can put the chart into the report header for the report Total Girls in Troops, by Age Level. Because we carefully managed the columns and size of the chart, all should still fit on 1 page.
(Yes, we did not have to use a subreport at all. But having this chart available in a subreport gives you the option of including it in other report, without having to create it every time.)
- Open the report Total Girls in Troops, by Age Level in Report Design View.
- Drag the chart report from the Navigation Pane and drop it at the
bottom edge of the Report Header for Total Girls in Troops, by Age Level.
-
Delete the label for the subreport and center the subreport in the enlarged Report Header.
With the chart added, the report may get a second page, depending on your spacing and font sizes.
-
If necessary, edit the report font sizes and spacing to get all of the report onto one page. The Report Footer should already have height of 0". Do not change the size of the chart. Keep the report width 6.5" and all of the margins 1".
If necessary, adjust the position of the original chart in its report to leave no space around it. Adjust the size and borders of the chart control in the master report so that there is only one border around the chart and no extra white space.
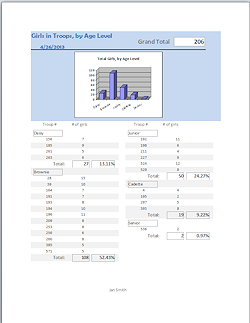
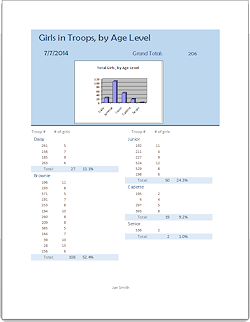
- Save the revised report as Total Girls in Troops, by Age Level,
with chart.
- Print this one page report.
Remember - you were given a freer hand in creating the forms and reports for this exercise. Yours should not be exactly like those of other members of your class or the illustrations!
|
|
| © 1997-2017 Jan Smith All Rights Reserved |
Site Map What's New |
Privacy Policy Terms of Service Copyright Acknowledgements |
~~ 1 Cor. 10:31 ...whatever you do, do it all for the glory of God. ~~
Last updated: March 27, 2017