
Jan's Working with Databases
Tables & Queries: Tables: Export
When a program cannot view Access database tables/queries directly, you can share data by exporting it from Access. You must choose another file format that both understand, like csv (comma separated values), which is a text format, or perhaps XML format.
Choice for What to Export
- A complete table with its data
- Just the structure of a table
- Results of a query
- Form or Report in various formats
- To another Access database: Any database object
Methods of Exporting
There are a number of ways to get data out of Access into a file that another program can use.
- Make-Table query:
Choose to create the table in another Access database instead of the current one. The destination database must already exist.
-
Export buttons on External Data ribbon tab:
Select object to export in the Navigation Pane. Click the button for the format you want to export with - Excel spreadsheet, text file, PDF, Access, Word Merge, XML, etc. Some formats may not be available for a particular object. A database must already exist before you can export to it.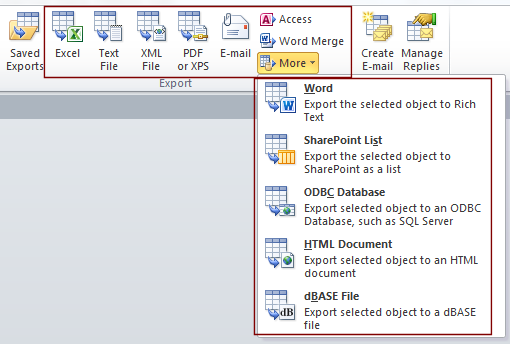
Exporting a form or report to another Access database just puts a copy of the design in the database. Exporting a form or report to other format will copy the data shown by the form or report.
Using the button Email will export your object as an attachment. You must have an email account like Outlook that can handle MAPI protocol to use this feature.
- Copy and Paste:
Select data in a datasheet. Copy. Switch to your destination file and paste. The results may not be quite what you want. It depends on the data and the program you are pasting into.
Common Export Issues
It is tricky to get everything you want to export to show up in the new file. Access gives you some options for certain formats but not for all. Some 'problems' are just a result of the way things work. Some things will not export at all. Some things can be exported with difficulty.
- OLE Objects and Attachments will not export at all.
- Expressions used to calculate values will not export, even to Excel. Only the current results export.
- Graphs will not export.
- Null values may cause data to shift into the wrong columns after export.
- Dates earlier than Jan. 1, 1900 will export as a Null value.
- Subforms, subreports, and subdatasheets will not export. You must export them separately.
- Sometimes formatting does not export.
- "#" value may replace a Yes/No value if you export directly from a form or Navigation Pane. You should export from the form's datasheet instead.
- Cells with error codes will export as Null.
| |
Step-by-Step: Export Table from Access |
|
| What you will learn: | to export as text file to export as text file without formatting to export as a formatted Excel file to export to another Access database |
Start with: ![]() , resource files, worldtravel-Lastname-Firstname.accdb
, resource files, worldtravel-Lastname-Firstname.accdb
World Travel Inc. needs to share its Staff table with some of its offices that have not yet started using Access. The table needs to exported as a comma-delimited text file (csv) and also as an Excel spreadsheet (xls) since different offices have been using different software. (It is a BAD PLAN for different parts of a company to use different software, but is not unusual in the real world!)
Once you have other kinds of objects in Access, you can export them similarly.
Export Table as Formatted Text File
You have a number of choices to make when exporting data as a text file. Some parts do not export unless you choose to export the formatting and layout. Some parts won't export at all, like attachments or images. First let's look at what happens when you export a table as formatted text.
- If necessary, open the database worldtravel-Lastname-Firstname.accdb which you created earlier and have been
modifying.
- Select the table Staff in the Navigation Pane.
-
From the External Data ribbon tab in the Export tab group (NOT the Import and Link tab group!),
click the button Text File .
.
The Export -Text File dialog appears. Problem: The Export buttons are grayed out (not available)
You did not select an object to export in the Navigation Pane.
Solution: Select the Staff table. Then the Export buttons will be available. 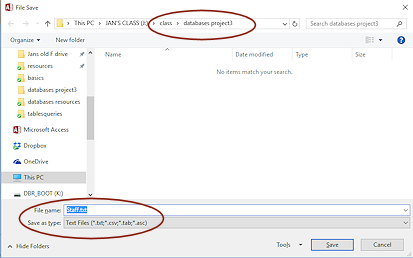
Click the Browse button
The File Save dialog opens.- If necessary, navigate to the folder databases project3 on your Class disk.
- For the file name use: Staff.txt
- For the file format, the Save as type box should show:
Text files (*.txt, *.csv, *.tab, *.asc)
Problem:
File name is not Staff
You selected the wrong table in the Navigation Pane.
Solution: Cancel this dialog and the Export - Text File dialog and start over. - Click the Save button.
The File name text box now shows the path that will be used to save the text file.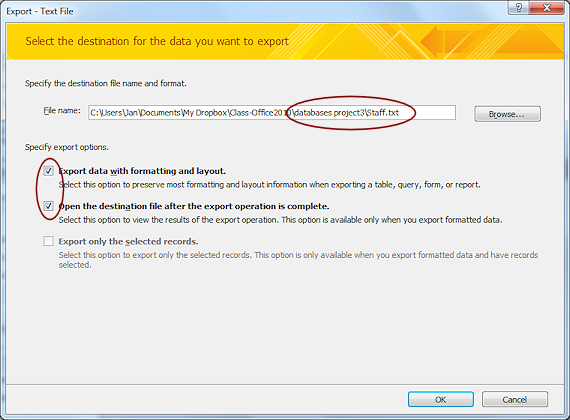
- Check the boxes for 'Export data with formatting and layout' and 'Open the destination file after the Export operation is complete'.
-
 Click on OK.
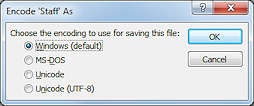
A dialog opens about how to encode the file. - Leave the default selection in place, Windows, and click on OK.
Two things happen:-
 The Export dialog changes to the last page, Save Export Steps
 - The file Staff.txt opens in your text editor, which is Notepad for most people.
The dialog Export - Text File offers you the chance to save these steps. That is a good idea only if you will be doing this same export regularly.
-
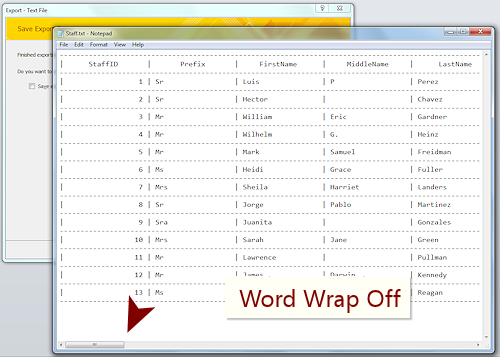
- In Notepad, if necessary, turn off Word Wrap so you can see how the columns line up nicely when you export with formatting and layout. (Format > Word Wrap)
-
Scroll to the right to see all of the columns.
What did not export happily?- Only the first 18 characters show. This chops off text in the Memo and Long Text fields like Notes but also affects the EmailExtension and Address fields.
- Some records have an apostrophe ' character in front of the EmailExtension value. That is not because of the export. Excel uses this character to make a cell treat a value as text. So that is a problem with the original data!
If there are only a few errors, you can hand edit the text file to make corrections. We won't bother at this time.
- Close your text editor.
- Click on Close in the Export dialog in Access.
Export Table as Text File Without Formatting
When you choose NOT to export with formatting, you must tell Access more about what you want to see in the text file. The choices are similar to the ones for importing a text file. Let's try this export again.
- Select the table Staff in the Navigation Pane.
-
From the External Data ribbon tab in the Export tab group (NOT the Import and Link tab group!),
click the button Text File.
The Export -Text File dialog appears, still set to the databases project3 folder. -
Change the name of the file to Staff-notformatted.txt.
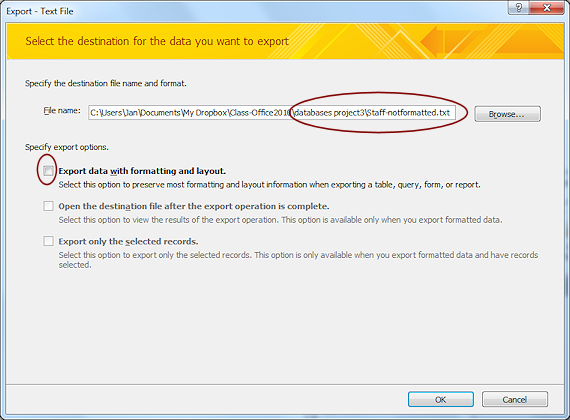
- Verify that none of the check boxes are checked.
- Click on OK.
The Export Text Wizard opens.
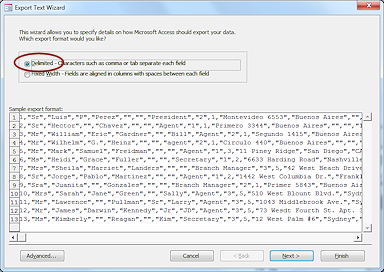 Select Delimited.
- Click on Next >.
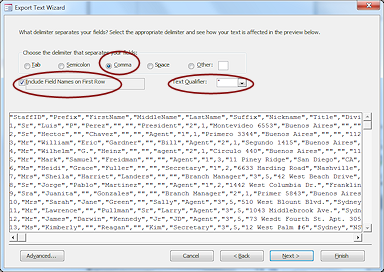 Check the box "Include Field Names on First Row".
- Verify that Comma is selected and the Text Qualifier is a double quote,".
- Click on Next >.
-
 Verify that the path is to the folder databases3 on your Class disk and that the file name is Staff-notformatted.txt.
There is no Browse button here. If the path is not correct, you will have to type in the correct path yourself!
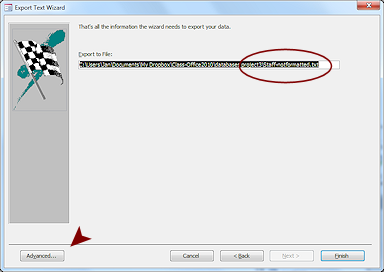
 Click the button Advanced... at the bottom left of the dialog.
A dialog of options appears.
You could change some of the defaults for the export here. Especially useful is the list of field names. You can delete fields here!- Click on Cancel to close the dialog without making changes.
- Click on Finish.
The final step of the wizard appears, offering you the option to save this export sequence.
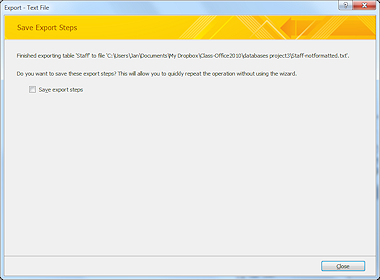 Click on Close to close the dialog without saving the export steps.
The text file you just exported did not open automatically.
-
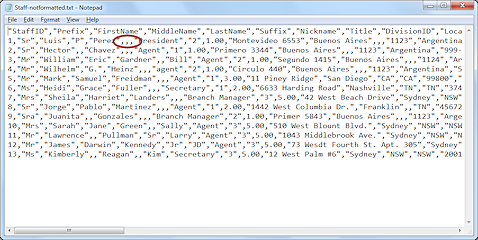 In a Windows Explorer window, navigate to your Class disk and open the file Staff-notformatted.txt in Notepad.
Word Wrap should still be off.
-
Scroll horizontally to see if any data got cut off.
Success!
Looks like those longer fields came through correctly this time. This is a serious advantage to this method of export!Null or blank values show just the comma separators.
This file is not easy to read for people. Without formatting, the field names do not line up with the values. But computers can read this very well and can match the correct parts.
-
Close your text editor.
Export as Excel Spreadsheet with Formatting
A spreadsheet is often a good choice for export. The columns make it easy to see the data laid out like it showed in an Access datasheet.
- Again, select the table Staff in the Navigation Pane.
-
From the External Data ribbon tab in the Export tab group (NOT the Import and Link tab group!),
click the button Excel .
.
The Export -Excel Spreadsheet dialog appears. 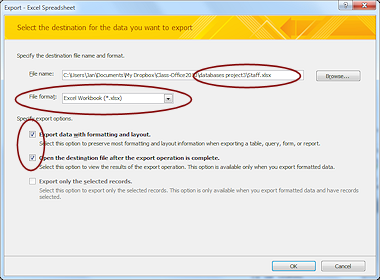 Verify that the path for the exported file is to your Class disk in the databases project3 folder, the file name is Staff.xlsx, and the file format is Excel Workbook.
- Check the boxes "Export data with formatting and layout." and "Open the destination file after the export operation is complete."
 Know
which software version will be used:
Know
which software version will be used:
Versions of Excel before 2007 will not be able to open a file in the format you just chose unless the computer has a special viewer installed. Some features of the new format will not work in older programs. Those are really old programs now, but there are many old programs still in use. When in doubt, ASK the users!
- Click on the OK button.
Again you are offered the opportunity to save the export steps. 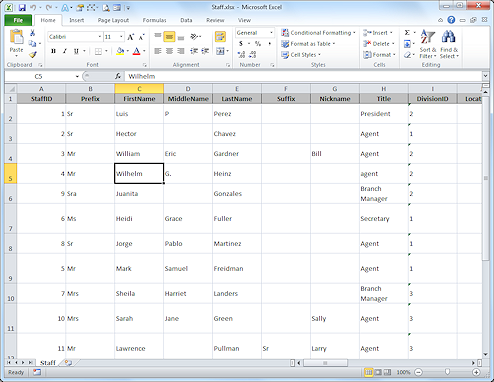 Click on OK to close the export dialog.
This time no wizard is needed. Access quietly creates the file and returns you to the Access window.
The file automatically opens in Excel (assuming you have Excel installed!). If Excel was already open, the window does NOT pop up on top. You will have to click on it in the Task Bar to see the results.- Scroll the spreadsheet horizontally and inspect the data.
The columns are all the same size but all data seems to have exported nicely! - Close Excel.
Export to Access Database
Sometimes it is convenient to export to another Access database instead of importing from that other database. It's easy to do from either direction.
- Again, select the table Staff in the Navigation Pane.
-
From the External Data ribbon tab in the Export tab group (NOT the Import and Link tab group!),
click the button Access .
.
The Export - Access dialog appears. 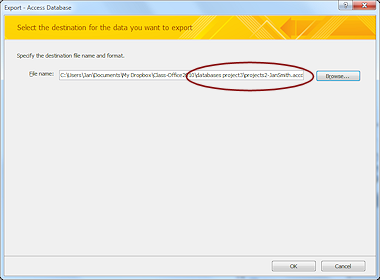 Click the Browse button and navigate, if necessary, to your Class disk to the databases3 folder.
- Select Projects2-Lastname-Firstname.accdb
- Click on Save.
- Click on OK in the Export -Access Database dialog.
The Export dialog appears.
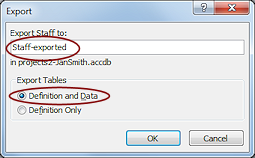 Change the table name to Staff-exported.
There is already a table in the Projects database with the name Staff.- Verify that " Definition and Data" is selected.
- Click on OK.
The Export - Access Database appears to offer you the chance to save these steps. - Click on Close to close the Export dialog.
- Open Projects2-Lastname-Firstname.accdb and verify that the new table is there.
- Open the table Staff-exported and verify that the data was exported correctly to the correct fields and no data was lost.
Success! - Close the Projects database.
|
|
| © 1997-2017 Jan Smith All Rights Reserved |
Site Map What's New |
Privacy Policy Terms of Service Copyright Acknowledgements |
~~ 1 Cor. 10:31 ...whatever you do, do it all for the glory of God. ~~
Last updated: March 27, 2017