
Jan's Working with Databases
Tables & Queries: Tables: Format Fields
There are many properties of a table's fields that you have not looked at yet. You will not need to use all of them on every field, of course. But there are some very useful features tucked away among the Properties.
Properties you have seen so far:
- Data Type = Sets many features of a field
- Primary key = Unique in the table for each record
- Caption = What shows as a column heading in a datasheet or as a label in a form or report.
- Lookup = Enables you to choose a value from a list.
Format a Field
How do you want to see the data in your fields? Do you want dates to show like 1/4/2014 or January 4, 2014? Do you want a phone number to look like 123-555-6789 or 1235556789 or 123.456.7890 or something else? Does a text field need to look like abcd or ABCD?
You can make choices like these in the Table Design View. There are two properties that you can use to control how a field's values are displayed, Format and Input Mask.
![]() Inherited Properties: The Format and Input Mask properties also apply to the field when it is
part of a query, form, or report. You can make a different choice for formatting in the
Design View for the query, form, or report. The rules are applied in order: table, query based on the table, form or report based on the table or query. What you see in the final product depends how these combine. Remember this when the formatting you see is not what you expected!
Inherited Properties: The Format and Input Mask properties also apply to the field when it is
part of a query, form, or report. You can make a different choice for formatting in the
Design View for the query, form, or report. The rules are applied in order: table, query based on the table, form or report based on the table or query. What you see in the final product depends how these combine. Remember this when the formatting you see is not what you expected!
Format Property
Format: Controls how the value is displayed, but does not affect what is actually stored in the database.
The formatting is applied only after the value has been saved.
What are your choices? It depends on the field's type. Many types have a drop list in the Format property box.
| Date/Time | 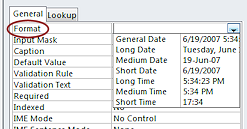 |
Yes/No | 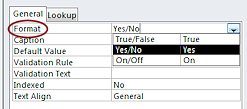 |
|---|---|---|---|
| Number or Currency | 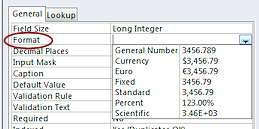
The currency and decimal symbols used are set in Regional & Language Options in the Control Panel. |
Text, Short Text, Memo, or Long Text |
There is no drop list for Text and Memo field types. You can create your own formats, using symbols. Phone numbers, ID numbers, and postal codes are examples of text fields that are often formatted to display with hyphens or parentheses that were not typed in. Examples |
Input Mask Property
Input Mask: Controls how you enter or edit the data.
You can use certain symbols to restrict what kinds of characters are allowed and to show how many are allowed. You can save or not save the literal characters in the mask as part of the value, like hyphens, spaces, parentheses, and periods.
Input Masks are used mostly with Text and Date/Time fields, but can also be used in Number or Currency fields.
After the data is saved, the Format property controls what you see. Plan carefully so that setting both Format and Input Mask properties gives a good result.
Parts of an Input Mask: An input mask has 3 sections, separated by a semi-colon (;).
<the mask> ; <save literals? 0 or 1> ; <placeholder symbol>
Example: Phone number !999(999)000-0000;0;_ for a phone number with country code and area code.
Let's analyze the parts of the mask.
Part 1: Mask itself = !999(999)000-0000 in the example above for a phone number.
Once you click in the field, you would see the literal characters and some underscores: (___)___-____
What the symbols mean:
! = Accept typing starting from the right instead of from the left
Very useful for phone numbers when you might not want to enter all of the digits for local numbers.0 = You must enter a digit for each 0 in the mask.
9 = You can enter a digit in where you see a 9 in the mask, but you do not have to.
Part 2: Save literal characters in the mask? (like the parentheses and hyphen in the example)
0 = Yes, store characters with the data.
1 = No, do NOT store characters with the data.
Part 3: Placeholder: The character to use to show how many characters to enter.
The example above uses an underscore. You can use any character as a placeholder. The underscore is common but there is no gap between the symbols. That makes it hard to see how many characters you need. To not show a placeholder at all, use two double quote marks like "" in the third position.
 Input
Mask Wizard: The wizard offers masks for
common fields like US phone numbers, postal codes, social security numbers.
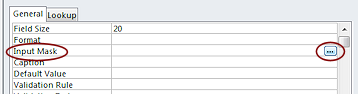
You open this wizard from the Ellipsis button with three dots
Input
Mask Wizard: The wizard offers masks for
common fields like US phone numbers, postal codes, social security numbers.
You open this wizard from the Ellipsis button with three dots ![]() , which appears when you
select the Input Mask box for the field.
, which appears when you
select the Input Mask box for the field.
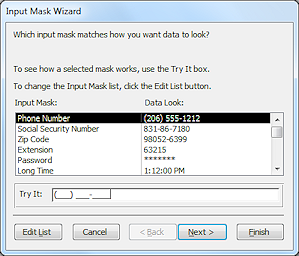 Once you select a mask, click in the Try It box to see the mask in action. Enter an example value to see if this mask will work
well for the values you expect. To use a mask, you must know what to
expect!!
Once you select a mask, click in the Try It box to see the mask in action. Enter an example value to see if this mask will work
well for the values you expect. To use a mask, you must know what to
expect!!
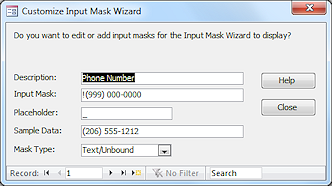 Customize
the list: The Edit List button opens another dialog that shows the
definition of the selected mask. You can enter a new Description and
change the mask. Clicking the Close button adds it to the list.
Customize
the list: The Edit List button opens another dialog that shows the
definition of the selected mask. You can enter a new Description and
change the mask. Clicking the Close button adds it to the list.
Symbols for
custom Input Masks ![]()
![]() Using
both Format and Input Mask: If you define an input mask, you probably want to define the Format property also. You
see the Input Mask in action only when you are entering or editing data. The Format property is
applied only after the record is saved. Be sure that they work well with each other!
Using
both Format and Input Mask: If you define an input mask, you probably want to define the Format property also. You
see the Input Mask in action only when you are entering or editing data. The Format property is
applied only after the record is saved. Be sure that they work well with each other!
Your database user will have enough opportunities to get confused without seeing (123) 456-7890 when entering a phone number but seeing 1234567890 after the record is saved.
| |
Step-by-Step: Formatting Fields |
|
| What you will learn: | to create a table to create a relationship between tables to enter data to set the Format property for a field - lower case to create an input mask - date to edit data in a field with an Input Mask to create a custom Input Mask for a field to add Format to field definition |
Start with: ![]() ,
Projects database from previous lesson open.
,
Projects database from previous lesson open.
The story so far:
World Travel Inc. wants to include in their database some information
about various projects and which staff members are involved with which
projects. You designed two tables in the last lesson but now see that you
need a Staff table also.
You will create a Staff table and then look at Format and Input Mask properties.
Create Staff Table
In previous versions of Access the Table Wizard created fields for phone numbers and zip codes with input masks. But in Access 2007, 2010, 2013, and 2016, the table templates do NOT include input masks. So we will create the new table manually.
 Back up the database now so you will have a good copy to use if you need to start over. This works well while the database is small.
 Access 2007:
  > Manage > Back Up Database
 Access 2010: File > Save and Publish > Back Up Database > Save As button
 Access 2013, 2016: File > Save As > Back Up Database > Save As button
 On the Create ribbon tab, click the Table Design button
  .
.
A blank table opens in Table Design View.- Create the fields in the list below:
Field Name Data Type Field Name Data Type EmployeeID AutoNumber,
set as primary keyPostalCode Text or Short Text SocialSecurityNumber Text or Short Text Country/Region Text or Short Text NationalEmplNumber Text or Short Text HomePhone Text or Short Text FirstName Text or Short Text WorkPhone Text or Short Text MiddleName Text or Short Text WorkExtension Text or Short Text LastName Text or Short Text MobilePhone Text or Short Text Title Text or Short Text BirthDate Date/Time EmailAddress Text or Short Text SpouseName Text or Short Text Address Text or Short Text EmrcyContactName Text or Short Text City Text or Short Text EmrcyContactPhone Text or Short Text StateOrProvince Text or Short Text Notes Memo or Long Text Region Text or Short Text We usually use the Text or Short Text data type for values that look like numbers but which cannot be used in arithmetic, like a Social Security number or a phone number. Remember that text and numbers have different default alignment in a datasheet, form, or report.
-
 Save the table with the name Staff.
Create Relationship
 Click on the button Relationships in the Database Tools ribbon tab.
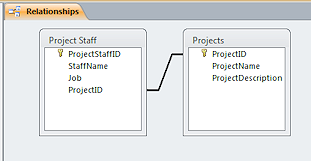
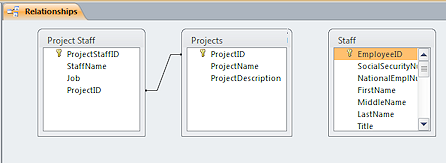
The Relationships window opens, showing the relationship that was already created between Project Staff and Projects.
- Click the button Show Table
 .
.
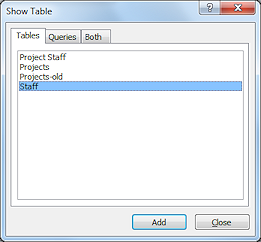 A dialog appears that lists all of the tables.
 - Click on the table Staff and then on the Add button.
The table appears in the Relationships window.
-
 Click on Close to close the dialog.
The Relationships window shows three tables but only one join line.We need to join the tables Project Staff and Staff using the EmployeeID field. But Project Staff does not have a matching field. You will have to add one.
- Open the Project Staff table in Design View.
- Add a field EmployeeID as a Number data type.
-
Save the table.
[Project Staff] 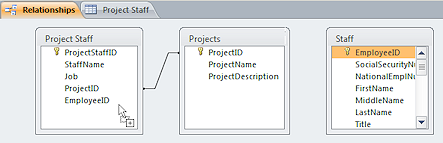 Switch back to the Relationships window.
The list of fields for the Project Staff table was updated! Sweet!- Drag the EmployeeID field from the table Staff and drop on the field EmployeeID in the table
Project Staff.
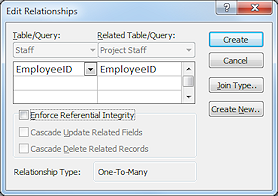 When you drop, the Edit Relationship dialog opens.
 Click on the button Create.
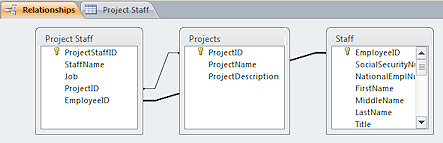
The dialog closes and the Relationships window has a new join line.
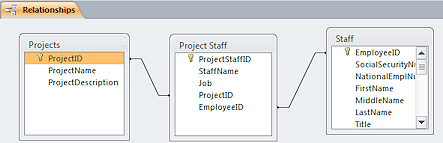 Drag the tables in the Relationships window to put the Project Staff table in between the other two tables.
The join lines move around, too.
Enter Data
To see how field properties work, you first need a record!
-
 Open the table Staff in Datasheet View.
-
Enter the following as the first record, exactly as shown:
(Leave the other fields blank for now.)First Name Luis Middle Name P Last Name Perez Title President EmailAddress LuisPerez@ViajesMundiales.net Address Montevideo 6553 City Buenos Aires Postal Code 1123 Country/Region Argentina Home Phone +54 (1) 555-1234 Spouse Name Rosa Perez Emrgcy Contact Name Rosa Perez Emrgcy Contact Phone +54 (1) 555-1234  Beware of Undo! The Undo command will wipe out
the whole record if it has not been saved! After saving, Undo
removes all of the changes that you made since saving the record.
Beware of Undo! The Undo command will wipe out
the whole record if it has not been saved! After saving, Undo
removes all of the changes that you made since saving the record.  To save a
record:
To save a
record: -
Just change to a different record.
-
Home ribbon tab > Save Record

 Key combo: SHIFT + ENTER.
 -
Quick Access Toolbar: Save button
Get rid of typing in current field: Before
leaving a field, press the ESC key to return a field to its previous
value.Divided data: The person's name is in three fields. Other information is often divided up into separate fields, like an address which is split into fields for street address, city, state/province, country, postal code. Another example, an email address can be split into the name part and the extension.
Where in the world is your data? It makes a difference!
For example, the phone numbers in Argentina have a different form than in the USA, like +54 (1) 555-1234 instead of 1-123-456-7890. Street addresses in some place have the street number after the street name. In the USA the number is almost always before the street name. Some countries have postal codes that contain letters and have more or fewer characters than the USA's zip codes which have 5 numbers or 9. States in the USA have a two letter postal abbreviation, but other countries use more letters or do not abbreviate at all. You truly must know ahead of time whether you need to allow for other ways of doing things or not. -
-
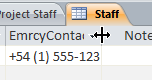 Widen
columns: Double click the right edge of the heading for any fields that are too
narrow to show all of the characters.
Widen
columns: Double click the right edge of the heading for any fields that are too
narrow to show all of the characters.
The column widens to show the widest item showing in the datasheet in that column.
- Click the Save button to save the record.
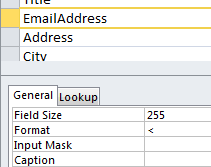
Format Property: < (forcing lower case)
Since this table will have records involving several countries, you cannot easily apply formatting to postal codes or phone numbers or even addresses. You can use formatting to make sure that the email address is all in lower case.
-
 Switch to Design View for the table Staff.
- Select the field EmailAddress.
- In the Format box, type < .
- Save the table.
[Staff]
 Switch back to Datasheet View.
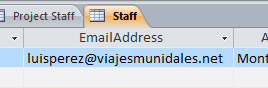
The field is now in all lower case letters.
(Did you widen the field to see all of the characters?)
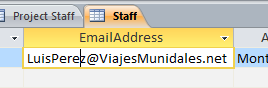 Click in the cell for the email address for Luis Perez.
The address shows as you typed it!-
 Experiment: Format forcing lower case
Type various combinations of lower case and upper case letters in the email address field and then change to a different field. The value is shown in lower case only after you leave the field.
The Format Property does not change what is stored in the
field, only the way it is shown.When you are ready to continue, you may reset the email address to the original formatting if you wish.
Input Mask: Date
The Format and Input Mask Properties for a field can sometimes conflict with each other, or at
least be confusing.
Next you will enter a date into the Birthdate field to see how an input mask works. After you save the date, the Format
property displays the date in Short Date format.
![]() Remember: Using the Undo command will wipe out the whole record if it has not been saved!
Remember: Using the Undo command will wipe out the whole record if it has not been saved!
- Switch to Design View for the table Staff.
-
 Click in the Birthdate field.
 -
In the Input Mask property at the bottom of the Design View, click the ellipsis button.
A wizard dialog opens. -
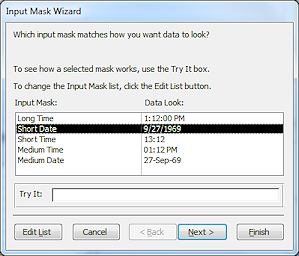
Select Short Date.
-
Click on the Next > button.
The dialog shows what the mask code looks like. The mask is different in different versions.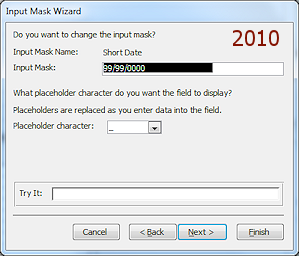
Explanation of the mask
Where you see 9 in the mask, you may type a digit or a space but you do not HAVE to type in anything at all in that position.Where you see a 0, you must type a digit, and can not type a space.
Older versions of Access were very picky about where the spaces went in an input mask, but Access 2007, 2010, 2013, and 2016 are friendlier abou this.
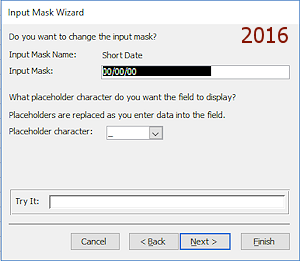
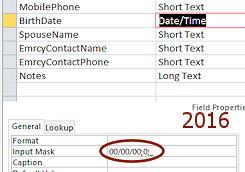
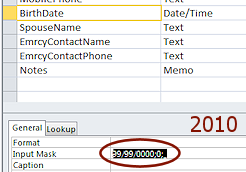
For Access 2007 and 2010 the Short Date input mask is 99/99/0000;0;_ but for Access 2013 and 2016 it is 00/00/00;0;_
Details on custom Input Masks
So the older two versions require a 4-digit year but do not require a month and day. The newer two versions use a two digit year and do require both the month and day. Unexpected!
- Click in the Try It box.
The cursor is a thick black bar, showing where the character will go when you type. This is different from the way most cursors work these days! The mask uses an underscore to show where a character goes, but the underscores run together. <sigh> - Experiment by entering various dates and editing dates. Get familiar with how the mask works.
-
Click on Finish.
 The Design View now shows the mask that the wizard created. It looks a little bit different from what showed in the wizard dialog.
 The 0 that follows the mask itself tells Access to store the symbols with the data. So the slashes are stored, too. The last character is the underscore character. Whatever is in this position is what Access will use as a place holder.
-
Switch back to Datasheet View and click in the Birthdate field.
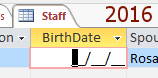
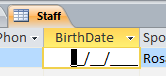 A mask appears - underscores for the positions to type characters and slash characters. The cursor is a thick black bar,
showing where the next character that you type will go.
A mask appears - underscores for the positions to type characters and slash characters. The cursor is a thick black bar,
showing where the next character that you type will go. The mask is a bit different in the different versions, so the underscores are different in the cell.
 Problem:
Mask does not appear
Problem:
Mask does not appear
Did you click in the field or did you use TAB or arrow keys to get into the field?
Solution: Start typing anyway. Once you start typing the mask appears.
-
In the Birthdate field type February 14, 1954 instead of just numbers.
Ding goes the error sound! Letters are not allowed by the input mask. -
 Click in
the Birthdate field again and type 2141954.
Click in
the Birthdate field again and type 2141954.
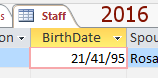
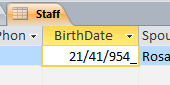
Before you leave the field, the mask displays what you typed as 21/41/954_ for Access 2007 and 2010 or 21/41/95 for Access 2013 and 2016 (with an error ding when you tried to type 4). What is the 21st month? Do any months have 41 days?The problem is that February's month number is 2 and we did not include a leading space or a zero. Access does not know what to do.
-
Press the TAB key to move out of the field.
Access won't accept what you typed. Your date is not a real date and Access recognized that when it tried to save it. How smart... and helpful!In the next steps, versions are different.
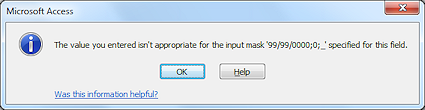 Access 2007, 2010: A message appears that says your value is not appropriate.
 - Select the date and press the Delete key to erase the value.
-
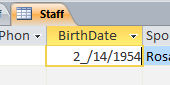 In
the Birthdate field type 2/14/1954, including the slashes, starting from
the left. Watch the mask as you type!
In
the Birthdate field type 2/14/1954, including the slashes, starting from
the left. Watch the mask as you type!
This looks good so far. Typing the slash moved the typing to the next section of the date. 
Press the right arrow key or TAB key to move to the next field.
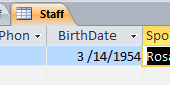
The field is reformatted using the default Date/Time format, instead of the Input Mask. The default format is Short Date. Access 2007 and 2010 do not show a leading zero and show a 4-digit year.
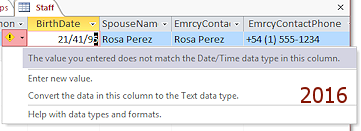 Access 2013, 2016: An Error Options button appears and opens to the message - The value does not match the Date/Time data type. This menu has options - Enter a new value or Convert to Text data type.
- Click on 'Enter new value'.
The current value is highlighted, ready for your typing. - Type 2/14/54, including the slashes, starting from
the left. Watch the mask as you type!
This looks good so far. Typing the slash moved the typing to the next section of the date. 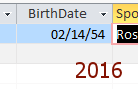 Press the right arrow key or TAB key to move to the
next field.
Press the right arrow key or TAB key to move to the
next field.
Access 2013 and 2016 show a leading zero but only a two digit year.
All of these versions understand that 2_ is supposed to be 02. This is a big improvement over earlier versions.
 Point of Confusion: Older versions of Access were VERY picky about putting in leading spaces. But with Access 2007, 2010, 2013, and 2016 you can now relax a bit about spaces. 02 and 2_ and _2 are treated the same once you leave the field and the Short Date format is applied by the Format property.
Using an Input Mask: Edit a Value (Date)
To Edit a Value: Click on the spot in cell where you want to start editing. If you use TAB or an arrow key to move the focus into a cell, the whole value is selected. Once you start typing, the previous value is completely gone.
Cursor Location: When you click on a cell, the cursor shows up where you clicked, which might not be at the beginning of the value.
Cursor Behavior in a Mask: The cursor is actually selecting a character. It is not a line between characters like it is in normal text. You can get a normal cursor at the right end of a mask.
Drag in value with an Input Mask: If the focus is outside the cell and you drag in a cell to select in a value and there is an input mask, what is selected may not be what you thought you selected. Input masks can show characters and spaces that do not show when you leave the cell.
-
While still in Datasheet View, drag across the 2 in the Birthdate to select it.
The mask shows up again. Did you get the 2 selected or is the cursor on the blank space? You have to look carefully after you select to see what you really caught. -
Type a 3 and then click in another field.
- Drag to select the last 4 and then press the DELETE key.
-
TAB to the next field.
Error! You get a message that your value is not appropriate.
The mask requires the digit that you deleted. For Access 2007 and 2010, the year must have four digits. For Access 2013, 2016, the year must have two digits.
- Click OK to close the dialog.
- Click in the date again, on the 5.
- Type 4.
This replaces the existing characters instead of inserting them in front or behind. Did you expect that? 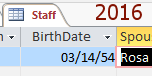
 Correct your typing to return the year to the original form, either 1954 or 54, depending on your version of Access.
Create a Custom Input Mask
Access provides a wizard for creating some common input masks or you can create a custom mask using symbols. Your mask can demand a certain number of characters or allow for fewer. Your mask can require only numbers or only letters or it can allow any kind of character.
Now you will see the effect of an input mask when the data does not match the mask.
Input Mask Vs. Existing Data: Creating an input mask does not cause an error if data that is already in the table does not match the mask. Only when you enter new data or try to edit data will a mismatch error occur.
-
Switch to the Design view of the Staff table.
-
Click on the field StateOrProvince and then in the box for the property Input Mask.
-
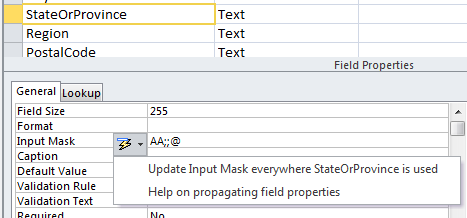 Type AA;;@ in the box as the mask definition.
The AA means that the user is required to enter exactly two letters, instead of a number or another character. There are no literal characters in this mask like slashes in a date or parentheses and hyphens in a phone number, so the second section of the definition is blank. The third section of the mask says that the @ symbol will be the placeholder. This symbol is easier to see than an underscore, but might be confusing to a new user.
Caption: The value in the Caption property could be State/Province
instead of the name of the field (StateOrProvince).
With a caption you can use characters that are not allowed or are not wise to use in the name of
a field, like the slash /character.
-
Save the table.
[Staff] -
Switch back to the Datasheet view.
-
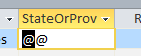 In
the first record, click in the left side of the field State/Province, but not on the divider line.
In
the first record, click in the left side of the field State/Province, but not on the divider line.
The first placeholder @ is selected.
Is it obvious to you that you are to type only two characters? Probably.
Is it obvious that they must be letters and not numbers or other characters? Probably not! Problem: Whole cell was selected and the mask does not show.
What happened: You caught the border of the cell when you clicked.
Solution: Click out of the cell to deselect it and try again.
Problem: The second placeholder was selected instead.
Solution: Press the left arrow key to move left one character.
Problem: No @ symbols show.
Solution: Check the Design View again for the Input Mask property.
-
 Type Tenn, which is a common abbreviation for the
state of Tennessee, USA.
Type Tenn, which is a common abbreviation for the
state of Tennessee, USA.
(Yes, I know that the address in this record is in Argentina. We are experimenting here!)Only the first two characters were kept. Did you hear error dings? You won't if the computer's sounds are turned off, which is common in computer labs.
-
Delete the "Te"
-
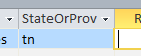 Type tn, which is the actual postal abbreviation for
Tennessee, and press TAB to exit the cell.
Type tn, which is the actual postal abbreviation for
Tennessee, and press TAB to exit the cell.
The two letters remain in lower case even though the mask used a capital A.That capital A does not tell the mask anything about the capitalization of what you type. It means that a letter or digit is required in this position. A lower case a would mean that a letter or digit is acceptable but is not required.
Add Format
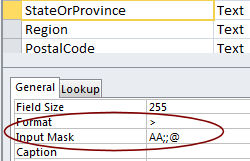 Switch back to Table Design view.
-
In the Format box for the field StateOrProvince, type > to force upper case for this field.
-
Save the table.
[Staff]
-
 Switch back to Datasheet view.
The text is now in upper case, all capital letters, like the postal service wants. A Format rule will be applied to existing data but an Input Mask will not be applied.
Of course since there is no state TN in Argentina, we have created a little problem to deal with! Unhappily, there is no neat way to use an input mask for this field if you will have addresses from different countries. The same issue keeps us from using an input mask for telephone numbers and postal codes also. The joys of international business! <sigh>
- Click in the field StateOrProvince again.
The letters return to the way you typed them in, lower case. -
Delete the tn.
The Input Mask shows again. -
Switch back to Design view and delete the Format and the Input Mask for the field StateOrProvince.
You will just have to type carefully. - Save the table.
[Staff]
Format Fields
|
|
| © 1997-2017 Jan Smith All Rights Reserved |
Site Map What's New |
Privacy Policy Terms of Service Copyright Acknowledgements |
~~ 1 Cor. 10:31 ...whatever you do, do it all for the glory of God. ~~
Last updated: March 27, 2017