|
Changing Existing Fields
It is easy and usually painless to add or delete records
from a table. But, changing the design of a table that already has records
can be more of a problem. It depends on what kinds of changes you make.
Let's look at some of the complications.
Changing Field Size
-
Increasing Field Size can create a problem for large databases.
Each record will need more storage space, even if the field is blank. That
can add up to more than you expect.
-
Reducing Field Size can save storage space but can cause loss of
data if you are not careful.
Example 1: Reduce field size safely-
In the Star Wars Collectibles table, the field size for the field
Condition allows up to 50 characters. The values in
this field come from a Lookup list: Mint, Excellent, Good,
Fair, Poor. The longest value you can chose is the word "Excellent,
which has 9 characters. You could safely change the length of the
Condition field to 9. You would not lose any data. If you decided later
to add other values to the list, you might need to increase the field's size.
Example 2: Reduce field size and lose data-
The field HowAcquired also allows up to 50
characters. The longest entry for this field that is actually used in the
records is "Bought retail", which has 13
characters. (You must count spaces also.) If you reduce the field size to
9, some entries will lose those last 4 characters. That's a "whoops!" You
really want to avoid throwing away your data! Example 3:
Available but not used-
You must look carefully at what the choices are, not just what you
see in the records. For the field
HowAcquired,
one of the choices is "Bought at auction", which
has 17 characters. No record is using this value yet. Looking at the
records, you would not know that you need at least 17 characters. You
cannot reduce the field size to the 13 needed for the existing data after
all. Example 4: Predicting the future
The field ItemName allows 50 characters but does
not have a list to choose from. How many characters do you really need??
The longest entry now has 27 characters. But what about the future? You
have to know how long future entries might be. You must be a prophet!
Better to leave this kind of field with lots of space. Changing a
Field's Type
Sometimes changing a field's type is no problem. Sometimes it is
disastrous. The data for that field may be cut short or even completely
lost. Designing your tables right the first time works better!
Things to consider about changing Field Type:
- Number Type: Calculations can be done only with a Number type.
- Memo to Text: Will keep only enough characters to fit in the
Field Size. Extra characters are lost.
- Text to Number, Currency, Date/Time, or Yes/No:
Inappropriate
values are lost. Be sure that all values in the field make sense in the
new type.
- Currency to Text: Currency symbols like $ are lost.
- Currency or AutoNumber to Number: Inappropriate values
are lost. Check the Number field size first!
 Problem: Not allowed to
change a field's type: Problem: Not allowed to
change a field's type:
Cause: The field is part of a relationship with another table.
Solution: Delete the relationship first, make your changes, then
recreate the relationship.
Lookup Wizard
It is always easier to pick from a list than to remember what the choices
are! In the Table Design View, in the bottom section, each field has a
Lookup tab. For some data types, like AutoNumber and Memo, the tab is blank
because they cannot use a Lookup list.
The easiest way to create a Lookup list is to use the Lookup Wizard.
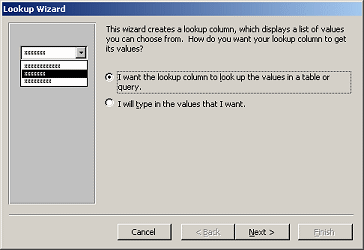
 Click to
see the wizard steps: Click to
see the wizard steps:
 Step 1 >
Step 2 >
Step 3 >
Step 4 >
Step 5 >
Step 6 Step 1 >
Step 2 >
Step 3 >
Step 4 >
Step 5 >
Step 6
Access 2002 does not include step 4, Sorting.
When you create a Lookup list for a field, the list is available to you in a
both the datasheet and form views.
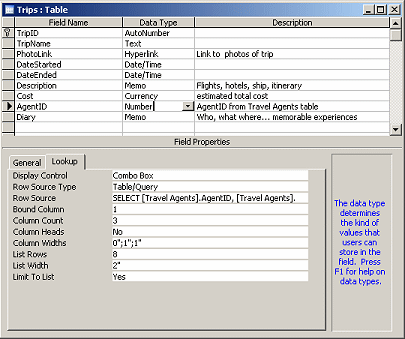
Lookup Properties
The properties of the Lookup list are on the field's Lookup tab. You can
set these properties
yourself without going through the wizard, once you know what they are all
about.
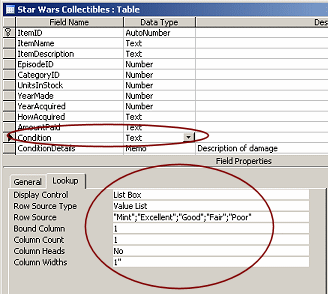 Display
Control: Display
Control:
Text Box, List Box, or Combo Box
With a Combo Box control the table's designer can choose whether to
allow new items or whether to require the user to choose only from the
list. A Combo Box has more properties on the Lookup tab than a List Box.
The List Box will accept only items from the source. Automatically adding
new items requires some programming.
A Text Box does not offer a list at all.
Row Source = Value List:
The illustration shows that the Row Source for the field
Condition is a simple list. You can edit the
list here to add or remove any of the choices. Note the punctuation that is
required!
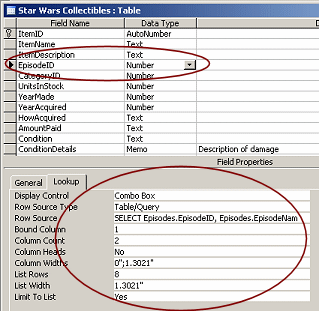 Row
Source = Table or Query: Row
Source = Table or Query:
The illustration shows that the Row Source for the field
EpisodeID is a query that is saved as part of
the definition of this table. The row source could have been another table
or a query that is saved outside the table.
Bound Column: The data in the bound column of the row source is
what is stored in this field in this table. Often you are storing the AutoNumber for a record in a different table.
Column Count: The number of columns from the row source to display
in the drop list.
Column Heads: If it is not obvious what the values in the columns
mean, you can show the field names as column heads.
Column Widths: You can set how much space to allow for each column
in the drop list. You can save space in the list's display if you know what the
widest item is.
List Rows: The number of rows from the row source to show at one
time. A vertical scrollbar will appear if there are more items in the list.
List Width: Usually this is the same as the sum of the column
widths.
Limit to List: For a combo box you can choose to allow entries
that are not on the list. To automatically add such items to the list
requires some programming code.
 |
Step-by-Step: Lookup Wizard |
|
What you will learn: |
to change the data type for a field
to create a Lookup field with Lookup wizard
to view the Row Source query
to add data using a Lookup column
|
Start with:
mytrips.mdb from previous lesson
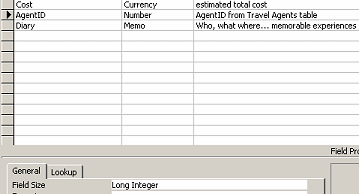
Change Data Type
Why do you need to change a data type? To create a relationship between the tables
Trips and Travel
Agents, you need a shared field. Right now there is not one. By making a
couple of changes you can make it possible to match fields from the two tables.
In the
table Trips, you have a field called
Travel Agent that is a memo field. You originally put agents'
names, phone numbers, email addresses and other contact information in that
field. That is the kind of information that is in the table Travel
Agents. You are going to rename the field and change the field's type so that the tables can
be related. All of the data
in that field will be lost for all records! (In real life you would want
to be sure you had a copy of all that was going to be lost!)
-
Open the table Trips
in Design View.
-
 Edit the name of the field to read
AgentID to match the field in the Travel Agent table. Edit the name of the field to read
AgentID to match the field in the Travel Agent table.
-
Change
the data type for the Travel Agent field from memo
to Number. The field size is set to Long Integer by default. That's what we
want this time.
-
Edit the description to read
AgentID from Travel
Agents table.
-
Click on
 the Save
button on the toolbar to save the changed table. the Save
button on the toolbar to save the changed table.
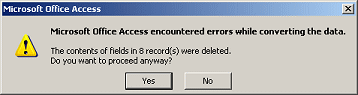 A
message appears, warning you that data has been lost from fields in 8 records. A
message appears, warning you that data has been lost from fields in 8 records.
 Which fields lose data?
Unhappily, the message does not tell you from which field or if
there are several that will lose data. In this
exercise we touched just one field before saving. In real life you could easily
make several changes to several fields, which would make this message very
confusing. Which fields lose data?
Unhappily, the message does not tell you from which field or if
there are several that will lose data. In this
exercise we touched just one field before saving. In real life you could easily
make several changes to several fields, which would make this message very
confusing.
-
Click on Yes to continue.
-
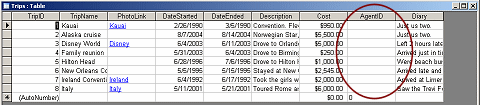
Click on the View button
 to switch to Datasheet
View. The renamed field AgentID has no values any
more. to switch to Datasheet
View. The renamed field AgentID has no values any
more.
Most of the trips did not use a travel agent and should remain blank. Three
trips did have information about the travel agent. Those agents are listed in
the Travel Agents table. You will need the
AgentID for each of them. No one wants to try to
remember such ID numbers! You will make changes
to the field to allow you to pick from a list instead.
Use the Lookup Wizard
In this section you will use the Travel Agents table as the source for the
choices for a Lookup list. The Lookup Wizard makes it easy to create such a
list.
-
Open the table Trips in Design View.
-
Click in the data type Number for the field AgentID.
An arrow appears at the right of the cell.
-
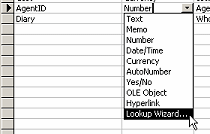 Click
the arrow to expand the list for data types. Click
the arrow to expand the list for data types.
-
Click on Lookup Wizard... at the bottom of the list.
The wizard opens.
-
 In the first
step, choose the first radio button,
I want the lookup column to look up the values
in a table or query. In the first
step, choose the first radio button,
I want the lookup column to look up the values
in a table or query.
If you had a short list that would not be needed for other tables, queries,
forms, or reports, you could
type in the list values instead.
-
Click on Next to advance to the next step.
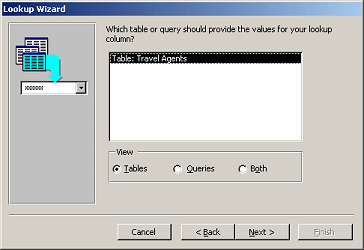 Since there is only one other table in the database, it is already chosen for
you. You are allowed to choose any table or query that is in the database, or a
combination! Since there is only one other table in the database, it is already chosen for
you. You are allowed to choose any table or query that is in the database, or a
combination!
-
In the second
step, Click on Next to advance to the next step.
-
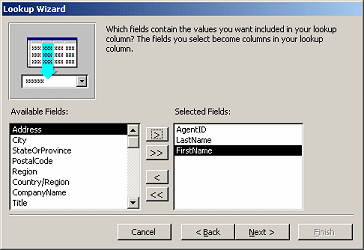 In the third
step, select AgentID and click the
> button In the third
step, select AgentID and click the
> button
 in the middle
to move that field to the list of "Selected Fields" on the right.
in the middle
to move that field to the list of "Selected Fields" on the right.
-
Repeat to move
LastName and then FirstName into the list on the right.
(Yes, the order you do this is important!)
-
Click on Next to advance to the next step.
-
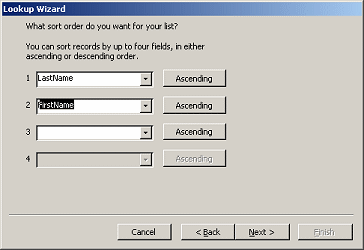 In the fourth
step (which is not available in Access 2002), choose to sort first on LastName
and then on FirstName, both in Ascending order. In the fourth
step (which is not available in Access 2002), choose to sort first on LastName
and then on FirstName, both in Ascending order.
This will sort the names in the usual alphabetical order.
-
Click on Next to advance to the next step.
 Without
the sorting, the names appear in the same order as they are in the Travel
Agents table. It would have been nice if we had alphabetized before we entered
the records. But then, if we added a new record later, the list would be no
longer alphabetized anyway. Access 2003 added a nice feature when it added
sorting in this wizard! Without
the sorting, the names appear in the same order as they are in the Travel
Agents table. It would have been nice if we had alphabetized before we entered
the records. But then, if we added a new record later, the list would be no
longer alphabetized anyway. Access 2003 added a nice feature when it added
sorting in this wizard!
-
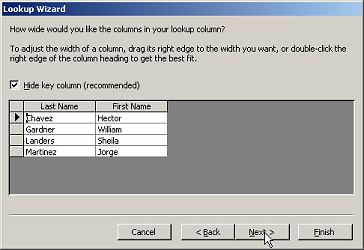 In the fifth
step, leave the box checked for Hide key
column. In the fifth
step, leave the box checked for Hide key
column.
This hides the AutoNumber field from the Travel Agents table.
It's a boring number, but it is the value that is stored in the field you are creating, even
though what you see is a name. A bit confusing but useful!
You can drag the columns wider or narrower in this window. We do not know how
long the other agents' names are. You can leave the widths at the
default size.
-
Click on Next to advance to the next step.
-
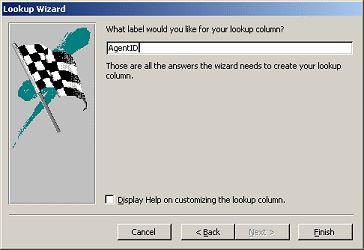 In step 6, type the label
AgentID. In step 6, type the label
AgentID.
-
Click the Finish button.
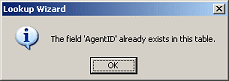 Problem: AgentID
already exists: An error message appears if you used the menu Insert |
Lookup Wizard... , which tries to create a new field instead of modifying an
existing field. Since there is already a field with this name, you would have to use a different name.
You could then delete the previous field and rename the new one. You may have
to close up the database before Access will let go of the deleted field's name
and allow the name change.
Annoying! Problem: AgentID
already exists: An error message appears if you used the menu Insert |
Lookup Wizard... , which tries to create a new field instead of modifying an
existing field. Since there is already a field with this name, you would have to use a different name.
You could then delete the previous field and rename the new one. You may have
to close up the database before Access will let go of the deleted field's name
and allow the name change.
Annoying!
-
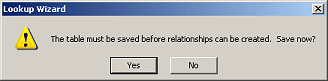 Click the Finish button again. A message appears. This is not an error.
Part of the process of creating the Lookup list is to create a relationship
between the table and the source you chose for the Lookup column. Click the Finish button again. A message appears. This is not an error.
Part of the process of creating the Lookup list is to create a relationship
between the table and the source you chose for the Lookup column.
-
Click on Yes.
The
field AgentID looks the same. Where are the changes?
On the Lookup tab!
View
Row Source Query
The Lookup tab shows that the Lookup Wizard made a lot of choices for you.
 The Row Source that the Lookup Wizard created is an
SQL query, which will be saved in the Table Design itself. It will not show in the list
of Queries in the Database Window. The Row Source that the Lookup Wizard created is an
SQL query, which will be saved in the Table Design itself. It will not show in the list
of Queries in the Database Window.
-
 Click on the Lookup tab and inspect the settings. The wizard did a lot of work for
you! Click on the Lookup tab and inspect the settings. The wizard did a lot of work for
you!
-
Click in the Row Source. The 3 dots button
 appears at the
right. appears at the
right.
-
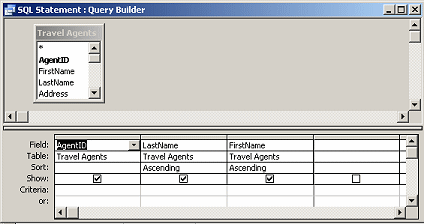 Click
the dots button . Click
the dots button .
A Query Builder window opens, showing the Design View for this SQL statement.
This query selects the 3 fields to show in the Lookup list and sorts the
list alphabetically.
Without the sorting, the agents would be listed in the order that they were entered into the database. The more items in
the list, the more annoying this would be since they are not likely to be in
alphabetical order!
-
 From
the menu select |
. From
the menu select |
.
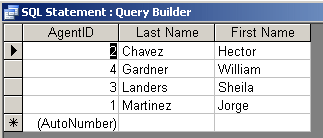
The SQL statement is executed and you can see a datasheet of what it picks out
for your new Lookup list.
-
Close the query window.
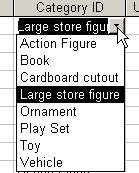
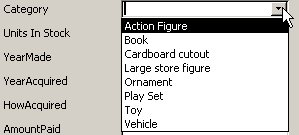
Use a Lookup List
Now you can use the Lookup list to pick the travel agents for the trips.
Finally!
-
Switch to Datasheet View. Save the table again when you are
prompted to do so.
-
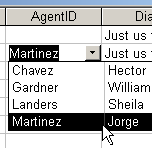 Click
in the AgentID field of record #2, the Alaska
trip. An arrow appears at the right of the cell. Click
in the AgentID field of record #2, the Alaska
trip. An arrow appears at the right of the cell.
-
Click the arrow to open the list of choices. This is so cool!
-
While still in the AgentID field for the Alaska trip,
click on the choice Martinez, Jorge.
The AgentID field now shows Martinez, which is the
LastName value from the Travel Agents table.
Showing just the LastName will
be confusing if there are two agents with the same last name. A different query
could solve this problem, but for now, we will accept what the wizard did.
 Point of Confusion: What you
see is not quite what you get with Lookup fields. Point of Confusion: What you
see is not quite what you get with Lookup fields.
-
Lookup list shows several columns, but the datasheet can show only 1 column:
The first column with a width greater than 0" will show in the datasheet. This
is why the order was important when you selected the fields in the Lookup
Wizard.
- What is displayed in a
datasheet or form may not be what is actually stored in the
table!
The Bound column is column 1,
AgentID. That is the value that is stored in the record.
Since column 1 has a width of 0", the boring ID number is hidden from the list
and display of the datasheet or form. The next column in the list shows
instead,
LastName.
This can be confusing if you try to make some changes directly in the
datasheet. Usually the table designer is showing you something that is more
user-friendly than the usual ID number. If the field has a Lookup list, you
really do need to use it and not type in values yourself.
To hide a
column in a Lookup list:
Set the column's width to 0". Check the Lookup tab for this field. This
method is how the AgentID number was hidden in the
Lookup list.
Avoid scrollbar in Lookup list:
The List Width should be at least as
wide as the total of the column widths. Otherwise you will see a horizontal
scrollbar.
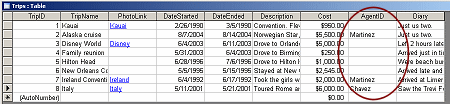
-
Similarly, select Martinez, Jorge as the travel agent for the
Ireland trip.
Select Chavez, Hector as the travel agent for the Italy
trip.
- Close the Trips table.
|