
Jan's Working with Numbers
Excel Basics: Exercise Excel 2-1
 You
will edit a start-up sheet and write formulas for the City Theater ticket
sales. No fancy formatting for this one.
You
will edit a start-up sheet and write formulas for the City Theater ticket
sales. No fancy formatting for this one.
Exercise Excel 2-1: |
Theater Tickets -
|
| What you will do: | Enter data Use AutoFit to size rows and columns Use AutoFill to complete data entry Create formula Use AutoSum to add columns Format numbers as currency Add new text Create new formula Create formula using absolute reference Show formulas Create a header Print data and print formulas |
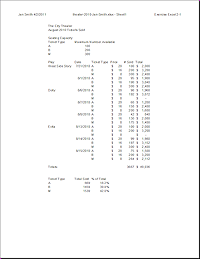
Start with: ![]() , theater-2010.xlsx from resource files
, theater-2010.xlsx from resource files
The City Theater ran three plays on three weekends in August, 2010. You will construct a spreadsheet that presents information on the number of seats sold at each of three ticket prices.
At an evening performance the best seats are type A tickets and the rest of the seats are type B tickets. M type tickets are for afternoon matinees on Saturdays and Sundays. At a matinee the price is the same for all seats.
This version will be plain. We will work on it later to make it more readable and prettier.
- Open file: Open the file theater-2010.xls from your
resource files or download and open it now.
-
 Save
As: to your Class disk in the folder excel project2 with the
name
Save
As: to your Class disk in the folder excel project2 with the
name
ex2-1-theatertickets-Lastname-Firstname.xlsx
- Resize columns: Drag Column A wide enough to read all
of "West Side Story" in cell A11.
You don't want to double-click the column edge to widen it for Best Fit because the sheet subtitle in A2 is the widest item. That would make the column too wide.
- AutoFit: Use AutoFit to set column width for C, D, and E.
- Data Entry: Enter the date of the opening performance for the
other two plays:
B17 = 8-6-10
B26 = 8-13-10 .
These two dates are Fridays, but West Side Story started on a Saturday, July 31.
- AutoFill - Date Series: Select the first date cell and two blank cells
below (B11:B13) and drag down the column to the end of the cells
for that particular play to B16. Repeat for B17:B19 to B25 and B26:B28 to B34. This gives you 3 rows for each
date, for the 3 types of tickets.
- AutoFill - Copy: Copy the ticket types and prices, which are the
same for every play by selecting C11:D13, holding the CTRL
key down and dragging down the column to row 34. (If you
do not hold down the CTRL key, the numbers for prices will not be copied
correctly.)
Alternate method: Right drag C11:D13 down the colum to row 34. Choose Copy Cells from the popup menu that appears when you release the mouse button.
- Formula: Select cell F11 in the Total column. Enter a formula in this cell that will multiply the ticket price by the
number sold. (Don't forget the =)
- AutoFill: Copy the formula in cell F11 down the column
through F34.
- AutoSum: In cell A36 type Totals: Use AutoSum in cell E36 to add up the number of tickets sold for all
three plays. You must change the range because of the blanks in the
column.
- AutoSum: Use AutoSum in cell F36 to add up the amount
of money for all of the tickets.
- Numbers: Select range D11:D34, range F11:F34,
and cell F36. Format as Currency. Decrease Decimals twice. (If
you see cells change to ####### as you work,
this just means that the column is not wide enough to show the whole
number.)
- Add new text: Starting in cell A39,
Ticket Type Total Sold % of Total A B M - Formula to add non-adjacent cells: In cell B40,
create a formula to add the values in the cells for type A tickets. =E11+E14+E17+E20+E23+E26+E29+E32 The easiest
way is to type = then click on E11, type +, click on E14, etc.
Use AutoFill to copy this formula down for type B and M tickets. Since the sheet was carefully designed (!), this will work.
Check each formula by clicking in it in the Formula bar. Color coding show you which cell matches the cell reference in the formula. So pretty... and useful, too!
- Formula using absolute reference: In cell C40,
create a formula to divide the total in B40 by the total number of
tickets sold in E36, using an absolute reference for E36. Use AutoFill
to copy your formula down the column. Format these cells as percentages with 1 decimal place.
- Header: Create a header with your name and the date on
the left, the file and sheet names in the middle, and Exercise Excel 2-1
on the right.
- Prepare to Print: Show formulas and check that all are working correctly and then hide the formulas again.
Spell Check. Arrange for the sheet to print with no
gridlines, no headings showing, and centered horizontally across the page, but not vertically. (Hint: Page Setup)
Check the Print Preview and make corrections if
necessary. All should fit on one page.
 Print.
- Save.
[ex2-1-theatertickekts-Lastname-Firstname.xlsx]
- Prepare to print formulas: Show formulas. Adjust column widths to show all of the
formulas. (Watch column B especially.) Print. It will take 2 pages. Your printed pages may look a bit different from the illustrations below, depending on exactly what the columns widths and page margins are.
- Close the workbook without saving changes!
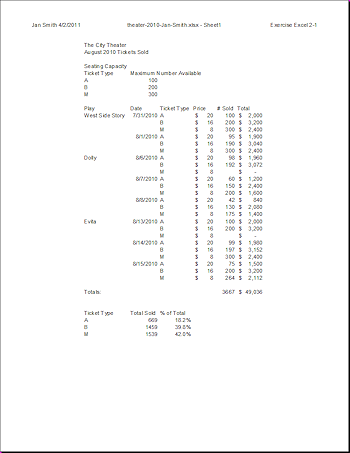
Original sheet - 1 page
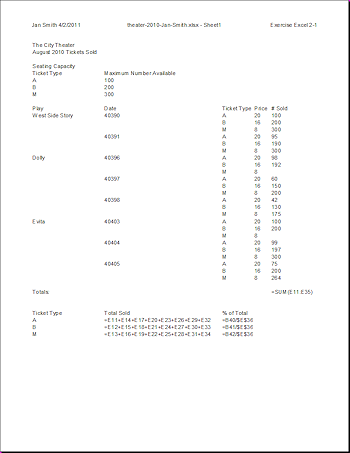
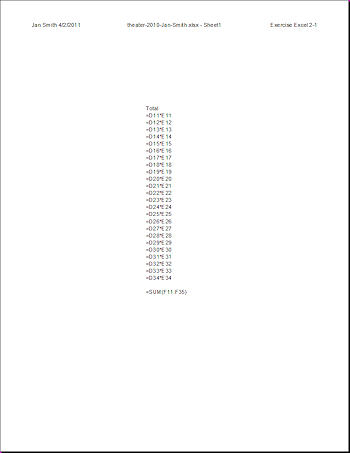
Formulas showing - 2 pages
|
|
| © 1997-2017 Jan Smith All Rights Reserved |
Site Map What's New |
Privacy Policy Terms of Service Copyright Acknowledgements |
~~ 1 Cor. 10:31 ...whatever you do, do it all for the glory of God. ~~
Last updated: March 22, 2017
These exercises use files from the numbers resource files. The default location for these files is c:\My Documents\complit101\numbers\ You cannot make changes to these files and save them in the same place. Save the changed documents to your Class disk. This keeps the original resource files intact in case you need to start over or another student will be using this same computer.