
Jan's Working with Numbers
Excel Basics: Finish: Print Options
The default print settings do not always give you the result you want. Happily you have many ways to adjust what will print and on how many pages.
You can choose what cells to print, to repeat the title rows on all pages, to print grid lines, to print row and column headings, to squeeze all onto a particular number of pages, to break pages at particular spots. Choice, choices, choices
| |
Step-by-Step: Print Options |
|
| What you will learn: | to print grid lines and headings to center sheet on page to change page breaks to print titles to print selection to show formulas to print on one page |
Start with: ![]() , trips9-Lastname-Firstname.xlsx (saved in previous lesson)
, trips9-Lastname-Firstname.xlsx (saved in previous lesson)
Print: Grid lines, Headings, Centered
- Make Sheet1 active, if necessary, by clicking on its tab.
- Open Page Setup and make some choices.
Page Layout tab > Page Setup dialog box launcher -
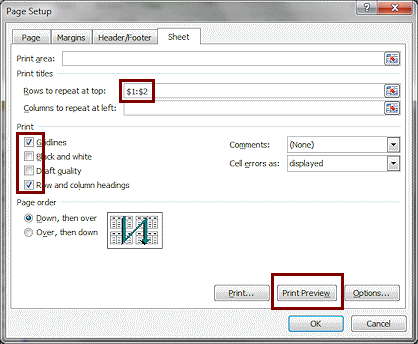
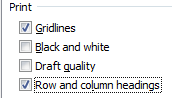 On the Sheet tab, in the Print section, check Grid lines and Row and column headings.
-
 On the Margins tab, in the Center on page section check both Horizontally and Vertically.
- Click OK to close the dialog.
- Open Print Preview and check the new layout.
 Print.
Print: Break Pages, Print Titles
-
 From
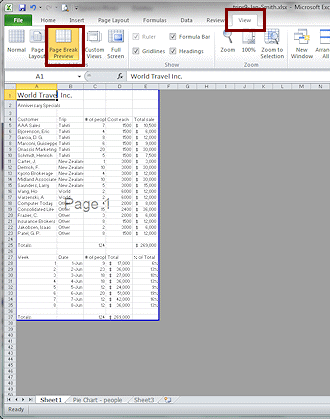
the View ribbon tab, click on the Page Break Preview button.
From
the View ribbon tab, click on the Page Break Preview button. - Click on the row heading for Row 26, the blank row between the two tables.
The row is selected.
-
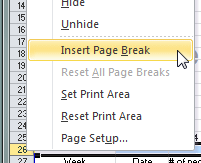 Right
click on the selection.
Right
click on the selection.
The context menu appears. - Click on Insert Page Break .
 A new blue line appears at the top edge of Row 26. The sheet is now divided into two parts, which will print separately. Note the gray
'Page
1' and 'Page 2' in the center of each part. That text will not print.
A new blue line appears at the top edge of Row 26. The sheet is now divided into two parts, which will print separately. Note the gray
'Page
1' and 'Page 2' in the center of each part. That text will not print.
 Open Page Setup again to the Sheet tab.
-
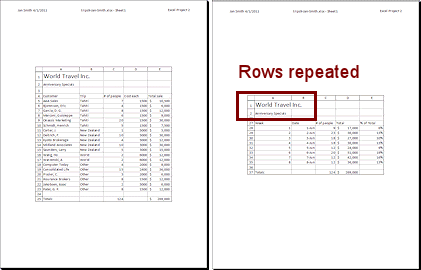
In the Print Titles box, type in $1:$2 so that the first two rows will print on all pages.
Alternate Method: Click in the box and then drag on the spreadsheet to select these rows.
- Click on the Print Preview button
 in this dialog.
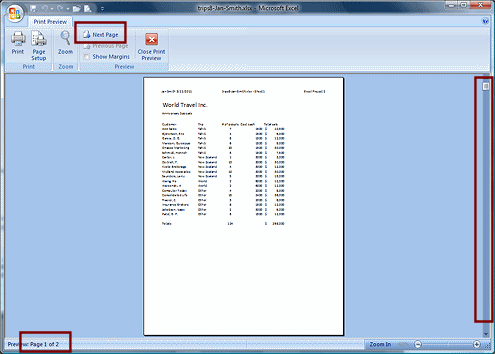
How does Print Preview show you that two pages will print?
-
 Excel 2007: Next Page button on the ribbon.
- The Status bar shows 1 of 2.
- The scrollbar length shows there must be another page.
-
-
 Use the method of your choice to show the preview of the second page.
Rows 1 and 2 (the titles) show above what was after the page break. Neat!
- Print.
Print: Selection
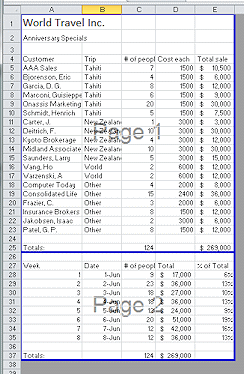
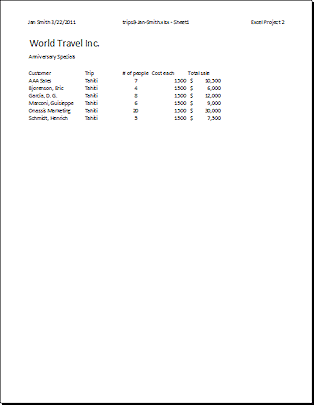
- In Normal view select cells A1:E10.
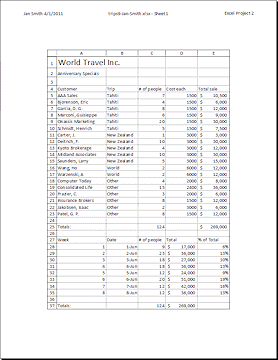
This is the information about just the Tahiti trips. - Open Page Setup to the Margins tab.
Uncheck the two boxes for Center on page. - Click on the Sheet tab.
Uncheck the two boxes for Grid lines and Row and column headings. - Click on OK to close Page Setup.
- Open Print Preview.
- Edit options:
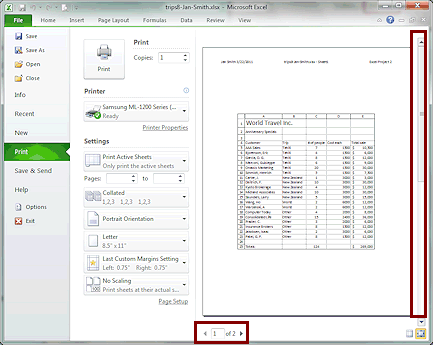
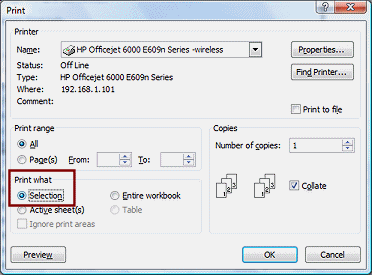 Excel 2007: Click the Print button on the ribbon to open the Print
dialog. Click on Selection in the dialog.
Excel 2007: Click the Print button on the ribbon to open the Print
dialog. Click on Selection in the dialog.
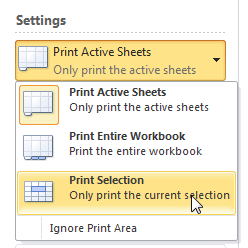


 Excel 2010, 2013, 2016: Under Settings, drop the list and change Print Active Sheets to Print
Selection.
Excel 2010, 2013, 2016: Under Settings, drop the list and change Print Active Sheets to Print
Selection.
-
 Print.
You do not need to save again unless you want to save the Page Setup settings.
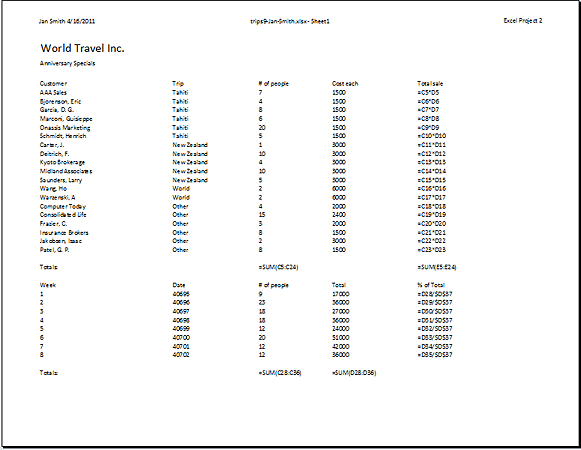
Show Formulas and Print on One Page
Sometimes you want to see those formulas on paper. It can be easier to track down a strange error this way. You make the formulas show with a key combo but you must look at the Print Preview carefully to see what orientation or other features might need to be changed.
- In Normal view, hold the CTRL key down and press the ` key, which is
usually to the left of the number 1 on an English keyboard. This is the
grave accent.
The columns expand to show their full contents, including formulas.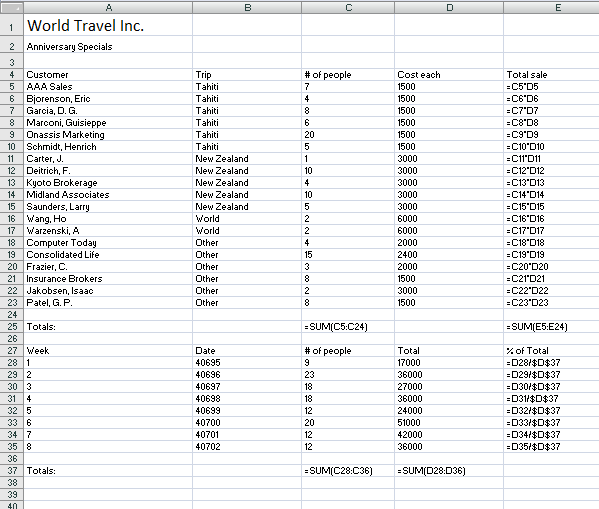
- On the Page Layout tab open Page Setup with the dialog box launcher.
- On the Page tab, select Landscape orientation and Fit to 1 page wide by 1 page tall.
- If necesssary, on the Margins tab, clear the check boxes for Horizontal and Vertical
centering.
- If necesssary, on the Sheet tab clear the check boxes.
- Click the Print Preview button in the dialog.
Verify that all is correct. Change the print choice to:
Excel 2007: Active sheet(s) Excel 2010, 2013, 2016: Print Active Sheet
- Print.
-
Close the workbook without saving these printing changes.
|
|
| © 1997-2017 Jan Smith All Rights Reserved |
Site Map What's New |
Privacy Policy Terms of Service Copyright Acknowledgements |
~~ 1 Cor. 10:31 ...whatever you do, do it all for the glory of God. ~~
Last updated: March 22, 2017