Standard Toolbar
  Button: New Button: New

The New
button creates a new blank document using the default template.
The | command on the menu opens
the New dialog, which gives you a choice of templates.
|
Button: Print

Will print all rows and columns that it thinks contain data.
 Sometimes Excel gets confused if you delete data or format blank
cells. Always preview before you print a spreadsheet. Sometimes Excel gets confused if you delete data or format blank
cells. Always preview before you print a spreadsheet.
Suggestion: Use | to open the Print dialog, where you
can choose to print only part of the sheet or
workbook.
|
Buttons:
Cut. Copy, & Paste

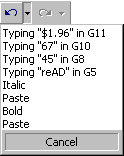
The
Cut, Copy, and Paste buttons work as usual.
Cut removes the selected text to the Windows Clipboard.
Copy places a copy of selected text on the Windows Clipboard.
Paste places a copy
of what was on the Windows Clipboard at the cursor location. (Do you see the tiny
clipboard in the Paste button's picture?)
When you want to paste a range of cells that you have copied or
cut, just select the cell you want to be at the upper left of the pasted
data and Paste.
When
you paste data in Excel, it remains on the Windows Clipboard only until you
execute a different command rather than until you copy something new. So
you can paste the same data several times in a row to different places,
but once you do something else, the data is cleared from the
Clipboard.
|
Button: Format Painter

Format Painter copies the formatting from one cell to another.
How it works: First select the cell with the formatting you want
to use. Click on the Format Painter button. The mouse pointer changes to
 the Format Painter shape. Click on the cell that you want to have that same formatting. The mouse pointer changes back and you are done. the Format Painter shape. Click on the cell that you want to have that same formatting. The mouse pointer changes back and you are done.
You can apply Format Painter to more than one location if you double-click the button.
The mouse pointer will remain in the Format Painter shape until you click the button again.
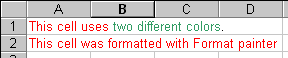
Format Painter works with whole cells only. You cannot use it to format only part of the text in a cell.
Format Painter will use the first formatting it finds. For example, if the cell's text uses 2 different colors, Format Painter uses the first
color used in the cell it is copying from.
|
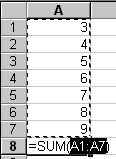
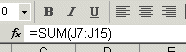
Button: AutoSum

AutoSum will intelligently add up the numbers in
the column above or the row to the left of the active cell. Once you
leave the cell that contains the formula, you will see the total in the
cell, instead of the formula.

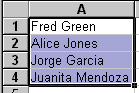
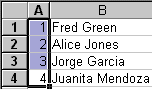
Buttons: Sort

The
Sort Ascending and Sort Descending buttons will rearrange the selected cells in a column in numerical or
alphabetical order.
Numerical |
 |
|
 |
|
Before |
|
After |
Alphabetical |
 |
|
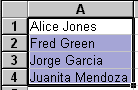 |
Before |
|
After |
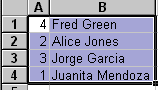
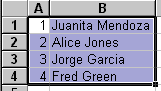
If you select cells in rows and sort, the
rows will be rearranged based on what is in the first cell of
each row. To sort on a different column you must use the Sort dialog from
the menu
command |
Selecting cells
in two columns |
Sorted based
on first column |
|
 |
 |
|
Before |
After |
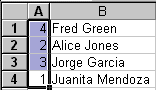
Be careful when sorting in a spreadsheet. You can
get your data mixed up if you do not select all of the cells that
should remain together.
| Error: Sorting cells in a column leaves the cells beside in place |
 |
 |
|
Before |
After |
Note: In Word these buttons are on the Tables and
Borders bar.
|
Button: Help
The Help button opens up either
a Help window or the Office Assistant dialog.
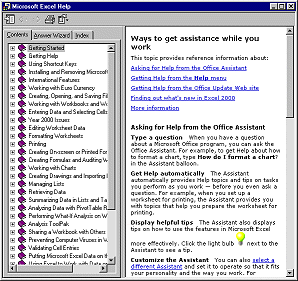

The Office
Assistant can use any of a number of "actors" to make its advice more
fun.

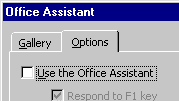
To turn off Office Assistant you must first open the Assistant and then
click on the Options button in the popup yellow dialog. The Office
Assistant dialog appears. On the Options tab, uncheck the box for Use
Office Assistant.
|
Close this window
~~ 1 Cor. 10:31 ...whatever you do, do
it all for the glory of God. ~~
|
 T
T