
Jan's Working with Presentations
Format: Templates & Themes:
Modify Master
 The Master for your presentation is not locked
in stone. You can make changes to it that will automatically be applied to
everything that uses that master. This means masters for slides, handouts, and notes
pages, too. This is very powerful! You can also apply more than one Master
for your slides.
The Master for your presentation is not locked
in stone. You can make changes to it that will automatically be applied to
everything that uses that master. This means masters for slides, handouts, and notes
pages, too. This is very powerful! You can also apply more than one Master
for your slides.
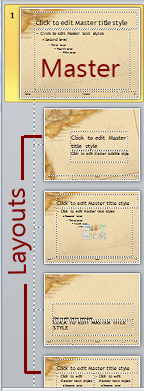
You can edit the Master Slide (the first one in the list) or just an individual layout that goes with that Master Slide. You can create your own layouts, too.
If your presentation uses more than one Master, the additional Master Slides will appear in the order in which they were applied. The layouts for each master will be directly below the master. Sometimes that creates a LOT of scrolling.
Master: What You Can Change
- Background - picture, color
- Fonts - font, size, style, color
- Placeholder - type, size, border, position
- Motion - transitions, animations
- Add text boxes that will show on all slides using that master or layout, like company name and logo
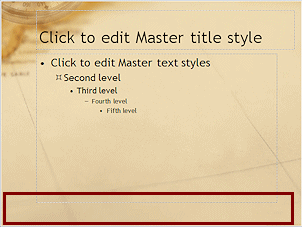
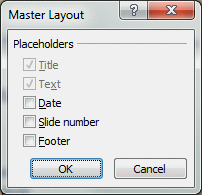
Master Layout for Placeholders
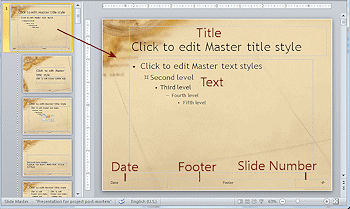
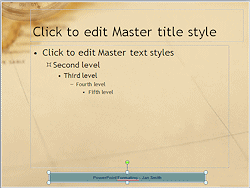
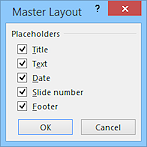 The Master Slide shows the default locations for placeholders for a standard slide with title and tex when you choose to display them. You can still move these around or delete them on individual layouts or even on slides themselves.
The Master Layout dialog shows a check mark for the default placeholders that are already included on the current Master Slide. Check the boxes for the ones you want to show all or most of the time. In PowerPoint 2013 and 2016 you can uncheck previously checked boxes but not in PowerPoint 2007 and 2010.
![]() The Master Layout button on the Master View ribbon tab opens the dialog. The button is active for the top level
Master Slide, but not for the layouts based on that master.
The Master Layout button on the Master View ribbon tab opens the dialog. The button is active for the top level
Master Slide, but not for the layouts based on that master.
You can delete any of the default placeholders from individual slides if you wish. That will not affect the Master Slide at all.
Default Placeholders:
- Title
- Text
- Date/time
- Slide number
- Footer (which will contain the text you type in)
Master Slide from Post-Mortem template
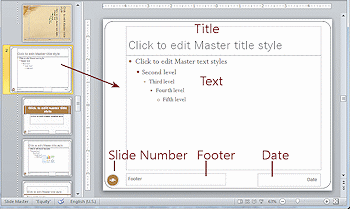
Master Slide from Equity theme
Placeholders are in different spots.
 Point of Confusion:
Header/Footer Items
Point of Confusion:
Header/Footer Items
 For the placeholders for Date/Time, Slide
number, or Footer to actually show on the slides two things must happen:
For the placeholders for Date/Time, Slide
number, or Footer to actually show on the slides two things must happen:
- Placeholders must be included in the layout for the slide in Slide Master view.
-
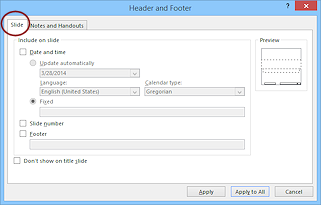
You must use the Insert Header/Footer dialog from the Insert ribbon tab to select and configure the placeholders on the Slide tab.
 Dialog choices not actually used: In the Header and Footer dialog, the placeholder choices appear to be available even when they do not exist on the layout. No warning or explanation will
appear to explain why your choices did not show up!
Dialog choices not actually used: In the Header and Footer dialog, the placeholder choices appear to be available even when they do not exist on the layout. No warning or explanation will
appear to explain why your choices did not show up!
| |
Step-by-Step: Modify Masters |
|
| What you will learn: | to modify a Slide Master: fonts bullets to remove and restore placeholders on Slide Master to format a placeholder with ribbon and with dialog to copy placeholder formatting with Format Painter to format text size for a placeholder |
Start with: ![]() AnniversaryTripsOffer2-Lastname-Firstname.pptx from the previous lesson
AnniversaryTripsOffer2-Lastname-Firstname.pptx from the previous lesson
Master: Change Fonts
In the last lesson you applied a pre-designed Fonts theme. This time you will manually change the fonts in the Slide Master. This will automatically change all of the slides that use that master. Very slick feature!
- If necessary, open Anniversary Trips Offer2-Lastname-Firstname.pptx from your Class disk.
-
 Save
As, with the name AnniversaryTripsOffer3-Lastname-Firstname.pptx as a new file on your Class
disk in the folder powerpoint project2.
Save
As, with the name AnniversaryTripsOffer3-Lastname-Firstname.pptx as a new file on your Class
disk in the folder powerpoint project2. 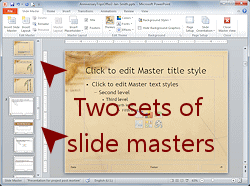 On the View ribbon tab, open the Slide Master view.
At the left are thumbnails for two sets of slide masters - the original project post-mortem plus the Equity or Banded masters used on the Title slides.
- Scroll up and down to see all of the thumbnails.
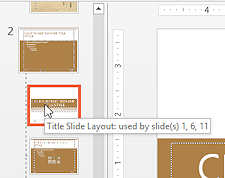
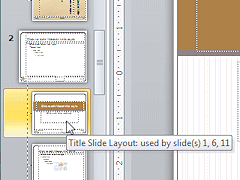 Hover over the second thumbnail in the second set of
masters.
Hover over the second thumbnail in the second set of
masters.
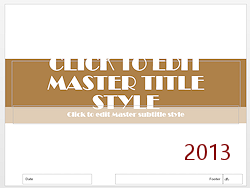
A screen tip shows that this is the master used on your title slides.
- Click on this master to select it.
- Click the border of the Title placeholder in the right pane to select it.
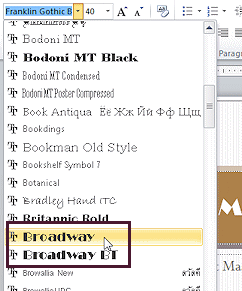 On the Home ribbon tab, change the font to Broadway BT.
 Problem:
Broadway BT font is not in list
Problem:
Broadway BT font is not in list
Solution: Choose a font with a wide stroke, like Broadway, Britannic Bold, or Cooper Black.
-
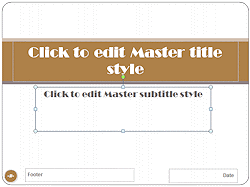 Similarly, change the font for the Subtitle placeholder to Broadway.
If that font is not available, use what you used in the previous step.
-
Save.
[AnniversaryTripsOffer3-Lastname-Firstname.pptx]
Master: Bullets
You are not stuck with the choices of bullets for the different bullet levels in the template. You can change any of them to any symbol or picture that you have access to. So many choices!
 Click in the Slide Master at the top of the list, which
is used by the slides besides #1, 6, and 11.
Click in the Slide Master at the top of the list, which
is used by the slides besides #1, 6, and 11.
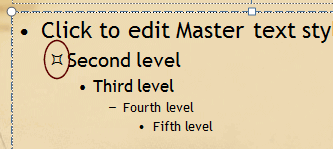
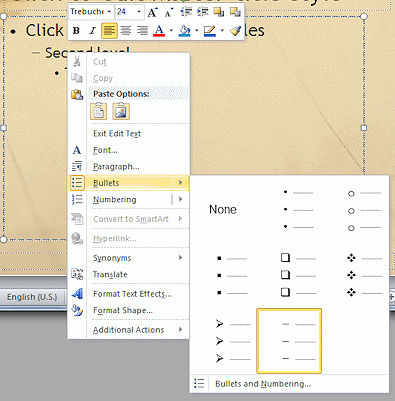 Right click on the second level of bullets, which has a dash as its
bullet shape.
Right click on the second level of bullets, which has a dash as its
bullet shape.
A context menu appears.
- Select Bullets
A palette of standard and recently used bullets appears.
- Click on Bullets and Numbering... at the bottom of the palette.
The Bullets and Numbering dialog opens.
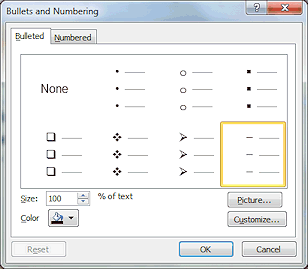 If necessary, click on the tab Bulleted.
-
 Click on
  the Customize button at the bottom right
of the dialog.
the Customize button at the bottom right
of the dialog.
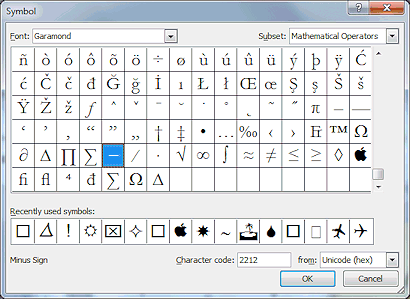
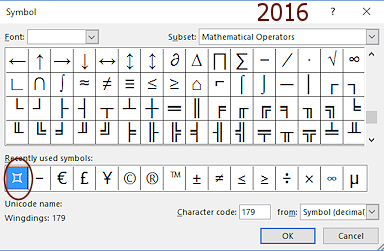
The Symbol dialog appears. It shows the font for the current bullet symbol is Garamond. That was the original font for body text in the template. -
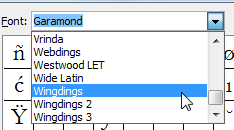 Scroll the Font list and select Wingdings.
This font is installed with Windows.
The characters in this font appear in the dialog.
Problem:  No fonts are listed
 [March 2016] In PowerPoint 2016 the Customize Bullets process currently fails to show any of the installed fonts in the Symbol dialog.
 Workaround: Until this issue is fixed... Close the Symbol dialog. On a layout or slide, switch to the Insert ribbon tab. Click on the Symbol button. Change the font to Wingdings. Select the square symbol as in the step below. Click on OK. Delete the symbol from the slide or layout. Repeat the steps above to open the Bullets and Numbering dialog and then Customize. The symbol you want (square with curved sides) shows in the 'Recently used symbols row'. Click on it and then on OK.
-
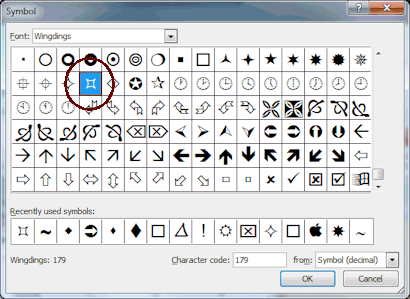 Scroll the display of characters
and select the square with curved sides.
Scroll the display of characters
and select the square with curved sides.
Problem:
Can't find the symbol
Your dialog may be smaller or larger so that the symbol appears in a different row and column.
Solution: Be sure that the font is Wingdings. Scroll and look carefully. The symbol is close to the bottom of the chart near the various star shapes.
-
 Click on OK to close the Symbols dialog and on OK again to close the Customize dialog.
Your new symbol is now what you will see for all second level bulleted text on all slides that use this first set of masters. So cool!
- Save.
[AnniversaryTripsOffer3-Lastname-Firstname.pptx]
Master: Remove Placeholders
- If necessary, open the Slide Master ribbon tab again from
the View ribbon tab.
- Select the Slide Master at the top of the thumbnails.
-
Click in the Date/Time placeholder at the bottom left of the Master and press the DELETE key. The placeholder vanishes. So simple!
- Repeat for the Footer and Slide Number placeholders.
- Save.
[AnniversaryTripsOffer3-Lastname-Firstname.pptx]
Master: Restore and Show Placeholder
Let's change our minds and return the Footer, but this time you will put some text into it. Once a placeholder has been deleted, you can get it back from the Master Layout dialog. The question then becomes how to make it show up on the slides. It is not as easy as you might expect.
-
 From the Slide Master ribbon tab, click on Master Layout
  .
.
The Master Layout dialog appears. The gray boxes are already being displayed.Problem:
The Master Layout button is unavailable.
You do not have the Slide Master at the top selected.
Solution: Click on the first thumbnail in the Navigation pane while in Slide Master View. 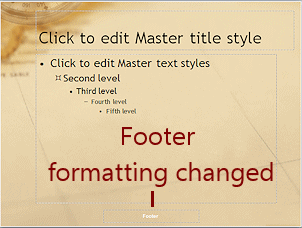 Click in the check box for Footer and click on OK.
The footer placeholder reappears but its formatting changed to white. Unexpected. Apparently, this has to do with the original formatting when the template was created.
-
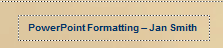
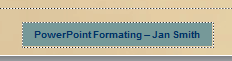
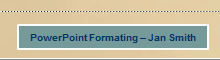
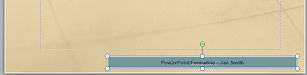
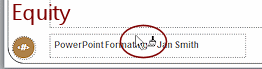
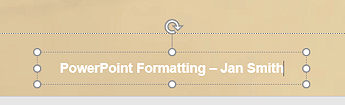 Click in the Footer area and type PowerPoint Formatting - and then type your name.
The text may wrap since the placeholder is not wide enough unless your name is short like mine!
- If the text wrapped, resize the text box so that text does not wrap.
- Select the Footer placeholder.
-
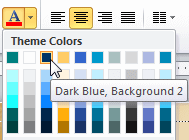 Switch to the Home ribbon tab and change the font color to Dark Blue, Background 2.
Scroll the layouts in the right pane for this master.
(Thumbnails do not update until you leave Slide Master view and return to that view!)None of the layouts are showing your new footer text but the color did change. Unexpected!
You must 'insert' the footer as well as set it up in the Slide Master to have it show up on a slide.
-
 While the layout is still selected, switch to the Insert ribbon tab and click on Insert Header & Footer
  .
.
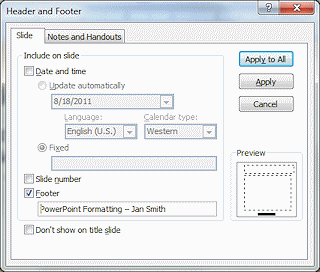
The dialog Header and Footer appears.
- If necessary, click on the Slide tab.
The Footer on this tab shows your new text, but it is not checked yet!
- Click on the Footer box to check it and then click on Apply.
- Scroll the master layouts in the right pane.
None of the layouts show the new footer text. Not fun!
- Open the Header & Footer dialog again.
 With the Footer box checked, click on Apply to All.
- Scroll the layouts again.
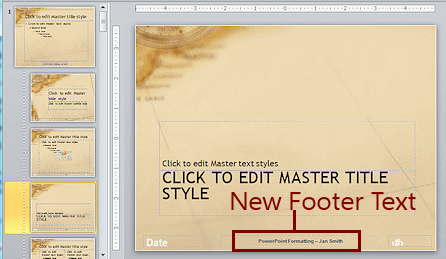
Finally, they all show the new footer text for both sets of layouts. The formatting (font color) changed for layouts using the first Slide Master but the color did not change for the layouts based on the second Slide Master.
(The thumbnails do not update automatically yet.) - On the Views bar, click on Normal view
 .
.
The Slide Master tab vanishes and your window returns to Normal view.
- Scroll through your slides.
Now they all are showing your footer, including the Title slides that use a different Master! But those Title slides do not use the new font color.
- Save.
[AnniversaryTripsOffer3-Lastname-Firstname.pptx]
![]() Point of Confusion:
Inheritance from Slide Master
Point of Confusion:
Inheritance from Slide Master
Clearly things are not clear
about these placeholders on the Slide Master!
- Your changes for formatting carry over to the different layouts for a Slide Master automatically.
- Use Apply to All to get the contents of the Footer placeholder put on every layout, including other Slide Masters.
- If you don't want all layouts to use your changes, select the layouts you want first and then use Apply instead of Apply to All.
Master: Format Placeholder with Ribbon
Placeholders are a special type of text box, so they can be formatted with fill color, lines, and effects like shadow and bevel. Their length and width can be changed, too. You can change characteristics from the ribbon or from the Format Shape dialog or pane.
- Return to Slide Master view.
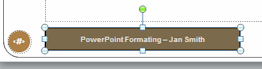
 Select the Footer placeholder on the first Slide Master, which uses the Post-Mortem template.
- Switch to the Drawing Tools: Format ribbon tab.
-
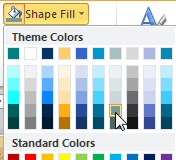
 Open the Shape Fill palette and choose the Aqua, Accent 3, Darker 25%.
The background color of the Footer placeholder changes color.
-
 On
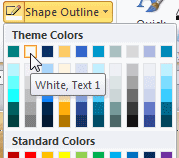
the Drawing Tools: Format ribbon tab, open the Shape Outlinepalette and select White.
On
the Drawing Tools: Format ribbon tab, open the Shape Outlinepalette and select White.
The border of the placeholder changes color.
-
 Click off the placeholder to see the whole border.
-
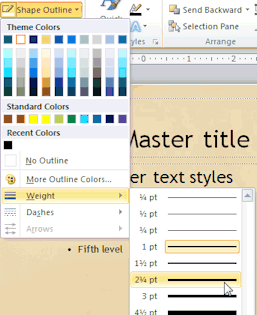 On
the Drawing Tools: Format ribbon tab,
click the Shape Outline arrow again.
On
the Drawing Tools: Format ribbon tab,
click the Shape Outline arrow again.
 Hover over Weight to open the list and click on 2 ¼ pt.
The border gets wider.- Save.
[AnniversaryTripsOffer3-Lastname-Firstname.pptx]
Master: Format Placeholder with Dialog
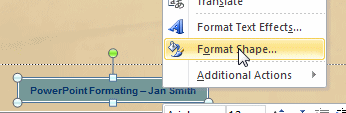 Right click on the Footer placeholder and choose Format Shape from
the context menu.
Right click on the Footer placeholder and choose Format Shape from
the context menu.
 The Format Shape dialog or pane appears with a number of pages
and choices. Some of these settings you
could also do from the ribbon or manually.
The Format Shape dialog or pane appears with a number of pages
and choices. Some of these settings you
could also do from the ribbon or manually.
-
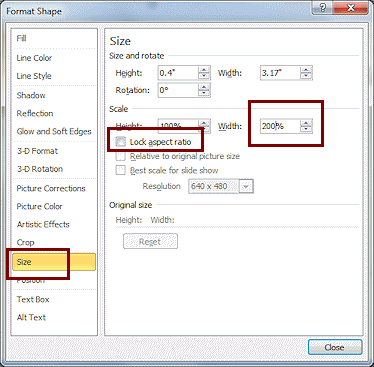 Click on the Size page.
-
With the Lock aspect ratio box not checked, change the width only to 200%.
Live Preview shows the change. (You may need to move the dialog to see.)The placeholder stretches out to the right, but is no longer centered. There is no automatic way to center a text box on the slide!
Lock aspect ratio means to change the length and width by the same percentage so that the proportions of the object do not change.
 Click on OK to close the dialog and apply the change.
-
 Drag the placeholder back to the left until it seems centered again.
Is it easy to get the wide placeholder centered this way? -
Save.
[AnniversaryTripsOffer3-Lastname-Firstname.pptx]

 How to
check centering
of
a placeholder with ruler
How to
check centering
of
a placeholder with ruler
When the ruler is showing at the top [View ribbon tab > check box for Ruler], a dotted line on the ruler shows where the mouse is. Position your object and then put your mouse pointer over the
top center handle of the selected object. Look at the ruler to see if the dotted
line on the ruler is near the zero. Unfortunately you cannot drag the object while the mouse is over a handle. It resizes the object instead.
Position your object and then put your mouse pointer over the
top center handle of the selected object. Look at the ruler to see if the dotted
line on the ruler is near the zero. Unfortunately you cannot drag the object while the mouse is over a handle. It resizes the object instead. -
 PowerPoint 2013, 2016: On the Drawing Tools: Format tab, click the Align button to open the list of choices. Click on Align Center.
The placeholder jumps to center itself on the slide. How to
check alignment
of
a placeholder with guides
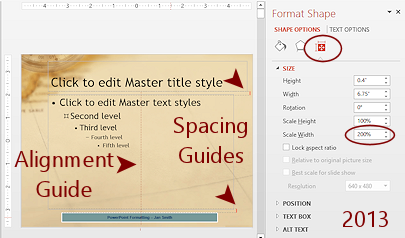 A dashed red alignment guide line appears over the slide when the center of the placeholder that you are dragging is aligned with the center of another object, like the title placeholder or the text placeholder.
Spacing guides show as dashed red lines with arrows on both ends. These appear when three or more objects are equally spaced. In this lesson the space is too small to show more than a red line.
These guides are new and can be quite helpful. But they do NOT tell you if an object is centered on the slide. Use the ruler if the alignment guides are not helpful.
Format Painter: Placeholder
Format Painter can copy formatting from one text box or placeholder to another. A great time-saver when you need to do the same formatting on different slides or masters!
 Select the Footer placeholder on your Slide Master.
(The border should show as solid.)
- On the Home ribbon tab, click

 the Format Painter button.
The mouse pointer changes to the Format Painter shape while the pointer is over the slide but shows the normal arrow pointer when over the Navigation pane.
 Scroll the Navigation pane down and click on the second Slide Master - based on the Equity or Banded template.
 This master puts the placeholders across the bottom like the first master but has different formatting and placement.
-
 Click on the Footer placeholder.
The placeholder formatting is applied. But
wait! The colors are different than in the first slide master!
But
wait! The colors are different than in the first slide master!You originally picked colors from the template's theme colors. Format Painter applied the matching colors from the theme colors for the current slide master, Accent 3, Darker 25% and Background 2. It does make sense!
It is still a bit of a surprise that the shape size did not get copied.
- Close the Slide Master View.
- Run the slide show using the Slide Show button

 in the Views bar.
 Evaluate: Does this new background color
for the Footer placeholder blend
well with the title slides and the other slides? Do the fonts and font sizes work well? How
does the new bullet shape do? Do you like the footer? Is it in the best position? Is it annoying? What
would you change about this presentation to improve it? You should have several suggestions!
Evaluate: Does this new background color
for the Footer placeholder blend
well with the title slides and the other slides? Do the fonts and font sizes work well? How
does the new bullet shape do? Do you like the footer? Is it in the best position? Is it annoying? What
would you change about this presentation to improve it? You should have several suggestions!
- Save.
[AnniversaryTripsOffer3-Lastname-Firstname.pptx]
Final Edits on Slide Master
I think we can all agree that this presentation still needs work.
- The footer is unattractive! Let's hide it.
- Font sizes for the bullet points are still small. Let's enlarge them.
- On the Insert ribbon tab, click on Header and Footer .
-
Uncheck the box for the Footer and then click Apply to all.
Now the footer will not show on the slides, but it is still part of the Master.
- Switch to Slide Master view and select the first
Slide Master in the Navigation pane.
This is from the Project Post-Mortem template.
- Click on the border of the Text placeholder to select it.
(It has the bullet points.)
- Switch to the Home ribbon tab and click on the button Increase Font Size once.
- Close the Slide Master view.
- Scroll to view all of the slides.
Evaluate: Is this font size big enough? Is it too big for some slides?
Do you like the bullets?
What changes would you recommend?
- Save.
[AnniversaryTripsOffer3-Lastname-Firstname.pptx]
|
|
| © 1997-2017 Jan Smith All Rights Reserved |
Site Map What's New |
Privacy Policy Terms of Service Copyright Acknowledgements |
~~ 1 Cor. 10:31 ...whatever you do, do it all for the glory of God. ~~
Last updated: March 22, 2017
To remove a placeholder from the Master Slide in these versions, you must select it on the Master Slide and delete it. The next time you open the Master Layout, the box will be unchecked for the placeholder you deleted.