
Jan's Working with Presentations
Format: Transitions & Animations:
Transitions
A slide transition reveals the next slide with some sort of motion or gradual process. The new slide might move in from one side or gradually fade into view. It could be revealed in parts like blinds opening or in strips or wheel spokes.
Why use a transition?
When you advance to a new slide in your presentation, you would like for the audience to notice!
Sometimes neighboring slides look a lot alike, like the Goals slides in the Anniversary presentation. A person who wasn't looking at the screen when you changed the slides might miss the change. Confusing! Using a transition will make it easier to notice that something has changed.
Transition Choices
Which transitions you have available depends on your version of PowerPoint.
PowerPoint 2010 and later combine variations of a transition into one icon in the palette and add an Effects Options button to the ribbon. So there are actually more transitions available in the later versions than in PowerPoint 2007, even though there are fewer icons.
Transitions Gallery:
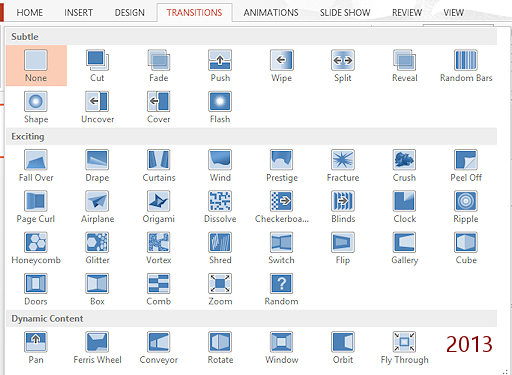
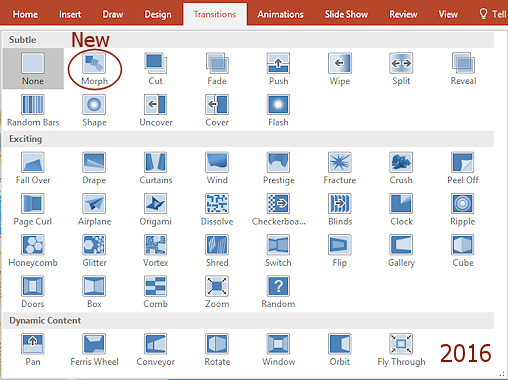
In the gallery of transitions, PowerPoint 2007 shows an icon for each option, like Wipe Up, Wipe Down, Wipe Left, and Wipe Right. PowerPoint 2010, 2013, and 2016 have one icon for each type of transition. The icon will set the transition with its default options. The Effect Options button presents all of the choices for the current transition.
For example, the Wipe transition's default direction is Wipe Left. To use Wipe Down instead, you must change the Effect Options.
![]() Unwritten rule about upgrading: The new
version has more and fancier tricks to play but leaves out your favorite
tricks from the older version! For example, PowerPoint 2010 leaves out the
Newsflash transition from earlier versions that is used in the archived lessons on
PowerPoint 97 - 2003.
Unwritten rule about upgrading: The new
version has more and fancier tricks to play but leaves out your favorite
tricks from the older version! For example, PowerPoint 2010 leaves out the
Newsflash transition from earlier versions that is used in the archived lessons on
PowerPoint 97 - 2003. ![]()
![]() Compatibility
View: If you are working in Compatibility View with a presentation
created in an older version of PowerPoint, you will have fewer transitions to choose from.
Compatibility
View: If you are working in Compatibility View with a presentation
created in an older version of PowerPoint, you will have fewer transitions to choose from.
Adjust an Effect:
You can change most transitions:
- Effects Options - mostly direction
- Speed/Duration
- Play a sound with the transition
- Advance slide on click or automatically after so many seconds
- Apply to just the selected slide(s) or to All Slides or to the Slide Master
| |
Step-by-Step: Transitions |
|
| What you will learn: | to apply slide transition to selected slides to configure a transition with Effect Options to apply slide transition to Slide Master to run a show automatically |
Start with: ![]() AnniversaryTripsOffer3-Lastname-Firstname.pptx from your Class disk
AnniversaryTripsOffer3-Lastname-Firstname.pptx from your Class disk
-
 If necessary, open AnniversaryTrips
Offer3.ppt from your Class disk and show the first slide
in the Slide pane.
If necessary, open AnniversaryTrips
Offer3.ppt from your Class disk and show the first slide
in the Slide pane.
-
Save As AnniversaryTripsOffer4-Lastname-Firstname.pptx on your Class disk
in the powerpoint project 2 folder.
Apply Transition to a Slide
It's simple to apply a transition. Select a slide. Click on a transition.
![]() PowerPoint 2007
uses Live Preview when you hover over a transition in the ribbon, but
PowerPoint 2007
uses Live Preview when you hover over a transition in the ribbon, but ![]()
![]() PowerPoint 2010 and 2013 do not. You have to click the transition and then the Slide Pane will
run the transition on the selected slide.
PowerPoint 2010 and 2013 do not. You have to click the transition and then the Slide Pane will
run the transition on the selected slide.
-
Select Slide #1.
-
 Experiment: Transitions
 On the Transitions ribbon tab, click on a transition in the Transition to this Slide control.
The Slide Pane runs the effect with its default options.


 PowerPoint 2010, 2013, 2016:
The thumbnail now shows
PowerPoint 2010, 2013, 2016:
The thumbnail now shows 
 the animation icon. There is not a separate
icon for transitions.
the animation icon. There is not a separate
icon for transitions.
 Some
transitions do not show well in this preview. They show better when you run the
complete slide Show.
Some
transitions do not show well in this preview. They show better when you run the
complete slide Show.
- Click the Effect Options button to open a list of choices.
- Try out each of the Effect Options to see what difference they make.
Do not expand the palette to pick a transition. The palette can hide too much of your slide to see the effect. Instead, click the scroll arrow at the right end of the gallery on the ribbon. The next row of icons shows in the ribbon.
- On the Transitions ribbon tab,
for effects that go by too fast:
 PowerPoint 2007:
Set the speed to Medium or Slow instead of Fast.
PowerPoint 2007:
Set the speed to Medium or Slow instead of Fast.
 PowerPoint 2010, 2013, 2016:
Set the Duration longer than the default.
PowerPoint 2010, 2013, 2016:
Set the Duration longer than the default.

- Repeat for each transition in the visible row on the ribbon.
- Scroll to the next row on the ribbon and repeat.
Apply Transition to Multiple Slides
You can apply transitions to several slides at once by selecting their thumbnails and then clicking on the transition you want. Now you can check out those transitions that looked alike.
-
Select all slides in the Navigation pane.
(Hint: Click on a slide thumbnail and use the key combo CTRL + A.) - Select transition:
 PowerPoint 2007: On the Animations ribbon tab, select the transition Push Right.
 PowerPoint 2010, 2013, 2016: On the Transitions ribbon tab, select the transition Push. Then open Effect Options and select From
Left.
PowerPoint 2010, 2013, 2016: On the Transitions ribbon tab, select the transition Push. Then open Effect Options and select From
Left.
-
Select the title slides, 1, 6, & 11, in the Navigation pane.
(Hint: Click on slide 1, hold the CTRL key down while you scroll and click on slides 6 and 11.)
- Choose a transition:
PowerPoint 2007: Select the transition Push Right.
PowerPoint 2010, 2013, 2016: Select the transition Push. Then open Effect Options and select From
Bottom.
- Select slide 1 and then click the Slide Show View button


 in the Views bar to
start the slide show.
in the Views bar to
start the slide show.
-
Click to advance each slide.
Always play your presentation
to check that your transitions and animations are doing what you
expected. It is very easy to get caught up in the process and forget a
step along the way. - Save.
[AnniversaryTripsOffer4-Lastname-Firstname.pptx]
Apply Transition to Master
If you want to use the same transition on all slides or on at least most of them, it makes sense to apply the transition to the Master for the slides. There is a way to apply a different transition to an individual slide or to selected slides.
- Select all slides and change the transition to No Transition/None.
(This is the first choice in the palette.)
- Open the Slide Master View.
View > Slide Master
- If necessary, select any thumbnails that have an animation
icon and change the Transition to No
Transition/None.
-
 Select the layout for the title
slides in the list of Equity or Banded layouts.
Select the layout for the title
slides in the list of Equity or Banded layouts.
- Apply the transition Uncover
Down/Uncover - From Top.
-
 Select the layout for the bullet point
slides in the Post-Mortem layouts - tan background.
Select the layout for the bullet point
slides in the Post-Mortem layouts - tan background.
(It's the second layout below the Slide Master.)
- Apply the transition Cover Left/Cover - From Right.
- Close the Master view.
- Click on Slide 1 and play the Slide Show all the way through.
So far, so good.
- Save
As AnniversaryTripsOffer4-auto-Lastname-Firstname.pptx
Run Slide Show Automatically
You can make your slides advance automatically after so many seconds using the ribbon. You get to choose the number of seconds a slide remains before advancing to the next one.
You can set different timings for different slides or set them all the same manually or by setting the timing on the Slide Master. Of course you don't want to use automatic timings when your slides accompany a speech! In Project 3: Advanced PowerPoint, you will learn how to use the Rehearse timings feature.
Automatic advance of slides can be good for slide shows that run as people gather for an event or for some kinds of training or for presentations that are viewed privately on computer screens.
- Open the Slide Master view again
and select the bullet list layout from the tan layouts - presentation for project post-mortem.
 On the Transitions ribbon tab, check the box Automatically after.../After and set the
time to 5 seconds, 00:05.
On the Transitions ribbon tab, check the box Automatically after.../After and set the
time to 5 seconds, 00:05.
- In Slide Master view, select the Title thumbnail in the
white Equity or Banded layouts.
- On the Transitions ribbon tab, set Automatically after.../After to 5
seconds also.
- Close the Master view.
-
Click on Slide 1 and play the Slide Show. Do not click on the slides!
The slide show will run all by itself.
Is this a good time interval for each slide? Can you read all of the text before the slide changes? Should some slides have more time? Less time?Because you left the check box for On mouse click checked, a viewer can still advance the
slides by clicking the slides. This is a user-friendly combination!
- Save.
[AnniversaryTripsOffer4-auto-Lastname-Firstname.pptx]
- Close the presentation.
The bullet lists are showing up all at once. It would be better if the points displayed one at a time so the audience could read them easily. To do that you must apply Animation effects. That's the next lesson!
|
|
| © 1997-2017 Jan Smith All Rights Reserved |
Site Map What's New |
Privacy Policy Terms of Service Copyright Acknowledgements |
~~ 1 Cor. 10:31 ...whatever you do, do it all for the glory of God. ~~
Last updated: March 22, 2017
Several of the transitions look very much the same in preview. You need to actually see the transition between two slides in the Slide Show to see the full effect. That's next!
Some transitions have the same name in different versions of PowerPoint but do not behave quite the same. That certainly keeps confusion alive!