
Jan's Working with Windows:
Removable Media: Use
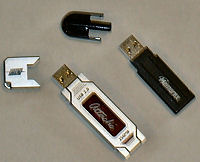
There are many kinds of removable media these days, including:
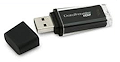
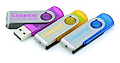
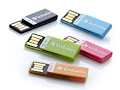
- USB drives with a variety of names and shapes
- Media cards that cameras, laptops, and phones use, in various sizes
with various names

When connected to your computer, these types will usually show in your My Computer/Computer/File Explorer window as a separate drive. Occasionally a removable drive displays as an additional hard disk.
We will walk through some basic steps in how to use such removable media. These small drives are currently the best way to transport your documents between home and school or work.
| |
Step-by-Step: Using a Removable Disk |
|
| What you will learn: | to insert and remove safely a USB flash drive to view the contents to respond correctly to an error message to rename a drive |
These lessons will use an flash disk icon ![]() to mark
steps where you need to save to whatever removable media you are using for your class files. The directions are for a USB flash drive. If you are using a memory card or some other device for storing your files, you may find some of the directions will need adjusting.
to mark
steps where you need to save to whatever removable media you are using for your class files. The directions are for a USB flash drive. If you are using a memory card or some other device for storing your files, you may find some of the directions will need adjusting.
Insert USB Flash Drive
Start with ![]() ,
, ![]() ,
and no removable media inserted.
,
and no removable media inserted.
If you are not currently using a USB device to store your documents, read through this part anyway! You will be using such devices in the future.
-

 Locate the USB ports on your computer.
There may be ports on the front, on the back, on the monitor base or edge, or even on the keyboard. (Keyboard ports may not carry enough power for some devices.) -
 Remove the cap from your USB flash drive, if your device has one, or slide the connector out.
The cap may snap onto the other end. If it will, put it there! It's easy to lose these little caps.
- Insert the USB flash drive into the USB port. Be
careful not to force it in the wrong way!
Windows recognizes that you have connected a USB device.
 Any
of several events
may happen:
Any
of several events
may happen:
- Notification sound plays
- Popup message appears, notifying you of that a new device has been found
- Message tells you that drivers are being installed
- Progress bar appears as Windows looks for an AutoPlay command
- Message from your anti-virus software offers to scan the device or tells you the results of an automatic scan
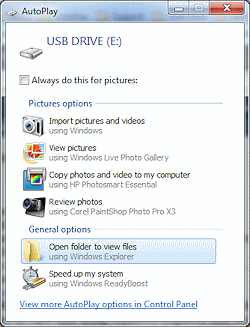
- Dialog offers you several choices of what to do next, including Open folder to view files using Windows Explorer and No Action.
- New icon

 appears
in the notification area of the Taskbar
appears
in the notification area of the Taskbar - New Computer or File Explorer window displays the drive's contents
Safely Remove USB Drive
If you just pull a USB drive out of its port, you may damage the device, the port, or the data on the device. Windows has some housekeeping to do first.
-
 If you do not have the new icon or in the Notification area of the Taskbar, click the up arrow at the left of of the Notification area.
A palette opens that shows icons that would not fit in the Notification area.If the icon for Safely Remove is not there, use one of the alternate methods below.
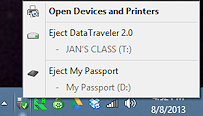
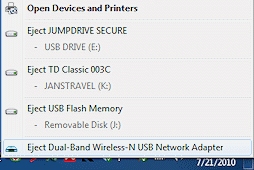 If
you have the new icon,
If
you have the new icon,
or , in the Notification area of the Task Bar, left click it.
A menu appears that lists USB devices that are currently connected, such as flash drives, external hard drives, scanners, wireless network adapters, card reader slots, even some printers.The list uses the name you have given to the device, if you did that. You can rename these devices in the folder tree just like you can folders and files. We will see how to do that shortly.
 USB connections for printers: A printer that is connected
to the computer with a USB cable may or may not show in this list. It probably
will not unless it can read files directly from a camera or if it has a port for
inserting the storage card from a camera.
USB connections for printers: A printer that is connected
to the computer with a USB cable may or may not show in this list. It probably
will not unless it can read files directly from a camera or if it has a port for
inserting the storage card from a camera. -
 Click on the device in the list that you want to remove, that is, on your class disk.
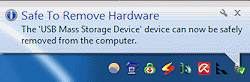
A popup message tells you when you can safely remove the device. The light on the drive turns off for some drives but not for all. The message does NOT repeat the name of the device, only the type of device. Hopefully your memory will hold on to what you are doing long enough to disconnect the correct device! (Also, it would be nice to click on the device that you meant to click on!) Problem:
Message - Cannot remove the device
Problem:
Message - Cannot remove the device
If a file on the device is in use, you can not and should not remove the USB device yet.
Solution: Close any open documents that are on the removable disk and close any Computer or File Explorer windows that display the contents of the drive. Then try again. (Sometime you have to close the program that was working on the file to make it turn loose!)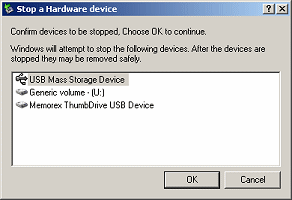 Problem:
  Vista: You don't know which USB device to choose because there are just generic names listed.
Solution: Right click on the Safely Remove Hardware icon. A popup menu appears with only one
command, Safely Remove Hardware. Click on it. A dialog appears that
lists the USB devices. Choose one and click on Stop. Another
dialog, Stop a Hardware device, appears with several names for the same device. Now you should be able
to tell if this is the device that you want to stop. If not, Cancel this
dialog and choose another device in the previous dialog until you find
the right one. Then you can click the Stop button. <Whew!>
- Check to see if the drive light is off. Some
devices turn off the light when it is OK to remove it, and some don't. Confusing! Now you know how
your device behaves.
- Remove the USB drive by pulling it out of the port. Put the cap back on, if it has one, or slide the connector back into the device.
Alternate methods to safely remove USB flash drive:
Method 1: Open a window that shows the drives on the computer (My Computer/Computer/File Explorer) but do not select the USB drive. Right click the drive and select Safely Remove, if it is available, or Eject. Wait for your drive's light to go off, if it will. Then remove the device.
Method 2: Log off the computer without shutting down. Verify that the device's light is off, if your device does that. Then remove the device.
Method 3: Shut down the computer. While it is off, remove the device.
![]() Why
go through these steps? What not just pull a USB flash drive out of
its port?
Why
go through these steps? What not just pull a USB flash drive out of
its port?
- If the device is in the process of writing, you can corrupt your file and even damage the device permanently.
- The computer may not recognize the next device you plug into that port. Rebooting the computer clears up this issue, but logging off and back on again does not.
- The computer may not let go of the drive letter it assigned to the USB drive. There are only so many letters available! Rebooting does not usually clear up this issue. It can be tricky to fix.
View Contents of Removable Drive
Start with ![]() ,
, ![]() ,
and no removable media inserted.
,
and no removable media inserted.
- Without inserting your removable media yet (you just removed it), open a My Computer/Computer/File Explorer window with one of the methods below:
-
 Double-click on

 the
My Computer, Computer, or This PC icon on your Desktop.
the
My Computer, Computer, or This PC icon on your Desktop.  Start menu > My Computer or Computer
 Right click the Win8.1 Start button
  > File Explorer
-
- Look for an icon for your removable media drive.
You will see icons for any permanently attached drives, like a Zip drive or an external hard drive. You may see drives that are empty but permanently attached, like a DVD drive or a panel of slots for removable media cards.
Since you have not connected your USB flash drive, you will not see it in the list yet.The examples below show at least one drive that is not active.
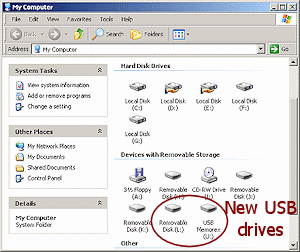
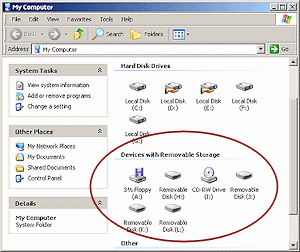 Example 1: Empty drive; Panel of media slots
In the section Devices with Removable Storage, drive H: is an internal zip drive (installed in the computer case) which did not actually have a zip disk in it.Drives J:, K:, and L: are slots on a USB device that has slots for three different kinds of memory cards. Again, there were no cards in place when the screen shot was taken.
 Example 2: No such drive; Empty drive
The floppy disk drive (A:) is not actually installed on the computer, but the computer apparently thinks it is. The DVD drive did not have a disc in it. There are no USB flash drives are showing because no USB drives were connected.
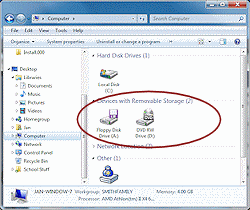
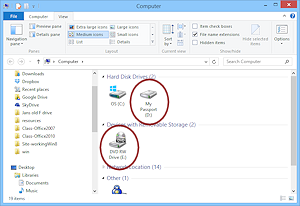 Example 3: External hard drive; Empty drive
The drive My Passport (D:) is an external hard drive that is connected to the computer using a USB cable. The DVD drive does not have a disc in it. There are no removable drives yet. - Insert your removable media and inspect the window showing your drives. Find the icon
for the newly attached drive.
Which drive letter is assigned to the removable drive will depend on how many other drives you have. A USB drive can have a letter assigned permanently.
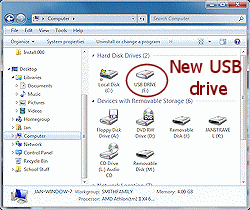
You should hear a sound that indicates that Windows has found a new device. AutoPlay will look for an AutoRun command. In some situations, a window will open automatically to show the contents of the drive.Example 1: One device = Two drives
 The single USB drive shows in the window as TWO new drives! This USB drive has been formatted to make it easier to play
music, drive L:, but it can also hold data as drive M:. Just a bit confusing!
The single USB drive shows in the window as TWO new drives! This USB drive has been formatted to make it easier to play
music, drive L:, but it can also hold data as drive M:. Just a bit confusing!
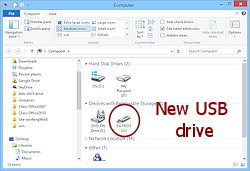
 Example 2: Incorrectly shown as hard drive
The new USB drive shows as an additional hard disk. Unexpected!
Example 3: Custom icon
 The USB drive shows as expected as a Device with Removable Storage, but it has a custom icon
  that looks more like a USB flash drive than the default icon
  does. Some companies use a company logo for the icon.
Problem:
Message - The
drive needs to be formatted
This message is shown when there is a serious problem with your disk, but the problem might be with what you connect it to or insert it into instead.-
Physical problem:
Parts are dirty or broken or bent.What you do:
Clean the parts of the disk and of the drive or port of all dust or particles, try to carefully straighten a bent connector, and try again. Don't use solvents to clean! Be very sparse with water! -
Data problem:
A magnetic or electrical event has scrambled or erased the data on the drive without doing physical damage. This is much harder to do to a USB flash drive or Zip disk than to a floppy disk, but it can still happen.What you do:
Reach for your backup copy! (You did make one, didn't you?) - Computer confusion: If a previous user (certainly
not you!) removed a USB drive improperly, the computer may not realize
that the drive is no longer there.
What you do:
Reboot the computer. That's the fastest, easiest way to fix this issue. BUT... you need to save your work to the hard disk somewhere first! Once the computer recognizes your USB drive, then you can move your file to the removable drive. Whew!
-
![]() Reformatting
a flash drive: Not recommended unless absolutely necessary.
Setting up a high capacity flash drive as a recovery drive for your operating system may including formatting the drive.
Reformatting
a flash drive: Not recommended unless absolutely necessary.
Setting up a high capacity flash drive as a recovery drive for your operating system may including formatting the drive.
Different manufacturers format their drives differently. Sometimes the operating system (Windows) does not use the correct formatting for that brand of flash drive.
![]() False error: Sometimes a computer fails to recognize or read a flash
drive. It may be readable in another computer!
Be SURE your drive is dead before tossing it out or trying to reformat it. Remember, if a
flash drive was removed incorrectly (not with Safely Remove Hardware),
the computer may fail to see any device on that connector until
after the computer has been rebooted.
False error: Sometimes a computer fails to recognize or read a flash
drive. It may be readable in another computer!
Be SURE your drive is dead before tossing it out or trying to reformat it. Remember, if a
flash drive was removed incorrectly (not with Safely Remove Hardware),
the computer may fail to see any device on that connector until
after the computer has been rebooted.
Name the USB Device
If you would like to name your device now:
- Right
click on its name in the Computer/File Explorer window.
- Select the command Rename.
The drive's name is highlighted, ready for you to type a name.  Type a name with 11 or fewer characters,
including spaces, but do not use the following characters:
Type a name with 11 or fewer characters,
including spaces, but do not use the following characters:
\ / : * ? " < > |.- Press the Enter key. Your device has a name!
- Safely Remove your drive.
Memory Cards
We will not practice working with memory cards. You will have to check the instructions for your own device on how to remove and insert the cards or how to connect your device to your computer.
If your computer has slots for memory cards, look for labels that tell what format each slot can handle.
![]() Read
your device's instructions carefully!
Read
your device's instructions carefully!
Never put a memory card or
connector into a
slot that is not quite the right size!! You can damage the card and
the slot. A card that is too small can get lost in there! The slot won't read
a card with the wrong formatting anyway.
|
|
| © 1997-2017 Jan Smith All Rights Reserved |
Site Map What's New |
Privacy Policy Terms of Service Copyright Acknowledgements |
~~ 1 Cor. 10:31 ...whatever you do, do it all for the glory of God. ~~
Last updated: March 22, 2017