
Jan's Working with Words
AutoTools: Format Whole Doc
Word has some pretty cool tools for formatting your whole document at once. They all work best when you have applied paragraph and character styles.
AutoFormat:
 AutoFormat can be applied
to the whole document. This helps keep your document consistent. The command to do this is no longer on the ribbon but can be added to the Quick Access Toolbar.
AutoFormat can be applied
to the whole document. This helps keep your document consistent. The command to do this is no longer on the ribbon but can be added to the Quick Access Toolbar.
The AutoFormat As You Type tab has the same choices. The choices do not have to be the same on both tabs!
The Apply section is about paragraph styles.
The Replace section is about some special character formatting that you might want to use.
Document Themes
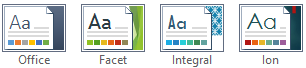
A theme is a collection of colors, fonts, effects for shapes and charts, and slide designs. Switching to a different theme changes the look throughout the document... if you originally chose from the theme colors, theme fonts, and theme effects.
The default set of themes is different for each version of Office. Office 2010 includes 40 themes, which include the 20 found in Office 2007. Office 2013 and 2016 have a different set of themes. Office 2016 has two new themes, Gallery and Parcel.
Other Office programs can use the same theme to keep a whole set of documents looking like they belong together.
You can also have a theme just for colors or fonts or effects. It's mix and match!
You are not stuck with someone else's favorite fonts and colors. You can change things around as much as you want and save those changes as a custom theme.
Styles
 A style is a way to apply a whole set of formatting choices at once to a whole paragraph or to selected text.
Types of Styles
Word uses two basic types of styles to help you out. The Styles pane uses icons to show you which are which.
-
 Character
style
Character
style
Applies font, font size, color, bold, italics, etc. to the selected text.
Selected text could be a whole paragraph or more. -
 Paragraph style
Applies line spacing, alignment, borders, shading, and character formatting to a whole paragraph.
Cannot be applied to just selected text. -
 Linked style (combination of character and paragraph features)
Can have features of both a character and a paragraph style.
It can be applied to just selected text or to the whole paragraph.
If applied to selected text, only the character style features in the combo style will be applied, not paragraph features like line spacing, space before, etc.
Tools for Styles
There are several tools to use to work with styles in your document. They overlap in features but some things can be done only from one place. <sigh>
-
 Styles Gallery
On the Home tab.
Click to apply a style.Right click a style thumbnail to update, modify, or rename it.
The More arrow
 opens the full list of styles that are set to show in this gallery. Some styles are hidden until needed. Others stay hidden from this gallery but will display in the Styles pane.
-

 Word 2007, 2010: Styles Gallery from context menu
 Right click on text and hover over Styles in the context menu.
The same gallery and menu appear as with the More button in the Styles gallery on the Home tab. No Styles command in context menu:
If the text has wavy underlines for grammar and spelling errors, the context menu has commands about the error instead. Word 2013 does not have this command on the context menu.
-
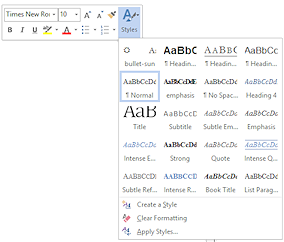

 Word 2013, 2016: Styles from Mini-Toolbar
Right click on text and click the Styles button on the mini-toolbar to open the gallery of styles and a menu of commands: Create a Style, Clear Formatting, and Apply Styles...
-
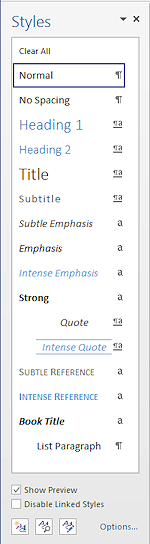 Styles Pane
Opens from dialog box launcher
 in the Styles tab group on the Home tab.
Shows the styles available which are set to show in Options. The default Recommended styles are a small subset of the full set of styles. If the Preview check box at the bottom is checked, then the
style name demonstrates the formatting.
If the Preview check box at the bottom is checked, then the
style name demonstrates the formatting. How this pane behaves depends on choices in the Options at the bottom of the pane.
Buttons on Styles Pane
At the bottom of the Styles pane are some useful buttons and a link to Options about how the pane works.
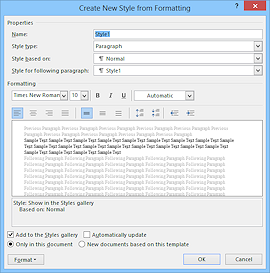
 New Style
Opens a dialog for choosing features for a new style.
 Style Inspector Dialog
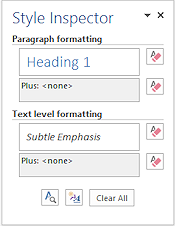
Shows only what paragraph and character styles were applied to selection.
-
 Reveal Formatting pane
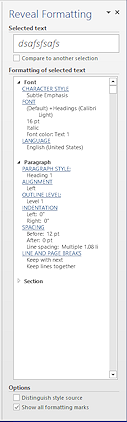
Opens with Key combo: SHIFT +
F1 or from the button on the Style Inspector dialog. (This button is confusingly
similar to the Style Inspector button.)
Key combo: SHIFT +
F1 or from the button on the Style Inspector dialog. (This button is confusingly
similar to the Style Inspector button.)
Shows ALL formatting for the selection, including manually applied formatting and section formatting like margins.This pane is VERY useful when your text is misbehaving!
-
 Manage Styles dialog
This dialog controls which styles you see and in what order you see the styles in the gallery and Styles pane.
Lists all styles available, including hidden ones.
 Points of confusion:
- Hidden styles: The default settings allow only Recommended styles to show in the Styles gallery.
- Sort order: The default sort order for the Styles pane is As Recommended. That puts recommended styles first and then the other styles are listed in alphabetical order.
- Missing custom styles: A custom style will not show in the gallery unless you check the box for that when you create or modify the style.
Why bother with styles?
Consistency - When writing long documents or several documents you want to look alike, it is easy to forget how you formatted the various parts. Creating styles and saving them as part of a template makes it easy to be consistent across several documents.
Saves time and effort - For
example, you could create a style that would format the company name just
right, like ![]()
Applying a style is much faster than selecting 5 characteristics each time! Plus, you don't have to remember what font and size you used!
![]() Manually formatted text: If you
formatted text yourself — changing the font, font style, font size,
color, borders, etc. — but did not save your changes as one of the standard styles,
your changes are not changed by picking a new style set (See the next topic below). If you did a
LOT of manual formatting, you may not notice any change at all. Confusing!
Manually formatted text: If you
formatted text yourself — changing the font, font style, font size,
color, borders, etc. — but did not save your changes as one of the standard styles,
your changes are not changed by picking a new style set (See the next topic below). If you did a
LOT of manual formatting, you may not notice any change at all. Confusing!
Style Sets
There are several style sets installed with Office, and you can create and save your own. Changing to a different style set changes all of the standard styles automatically. It wipes out any changes you made to the standard styles.
![]()
![]() Word 2007, 2010: Change Styles button
Word 2007, 2010: Change Styles button
The button Changes Styles on the Home ribbon tab opens a list which includes
Style Set (paragraph and character styles) plus the Colors and Fonts
themes that
also show on the Page Layout tab. The Style Set list
shows the names of alternate sets of paragraph styles. Live Preview works for
everything in this list. Sweet!
Word 2007 has 11 pre-designed style sets.
Word 2010 has 14 pre-designed style sets.
![]()
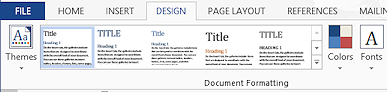
![]() Word 2013, 2016: Styles Set Gallery
Word 2013, 2016: Styles Set Gallery
The Design ribbon tab has a gallery of thumbnails for the style sets instead of just a list. If you hover over a thumbnail, a ScreenTip shows its name and Live Preview will temporarily change your document to match. The thumbnail shows a Title, a Heading 1, and a normal paragraph.
Word 2013 and Word 2016 have 17 style sets.
|
|
| © 1997-2017 Jan Smith All Rights Reserved |
Site Map What's New |
Privacy Policy Terms of Service Copyright Acknowledgements |
~~ 1 Cor. 10:31 ...whatever you do, do it all for the glory of God. ~~
Last updated: March 27, 2017