
Jan's Working with Words
Getting Started: Word Settings
To be sure that your copy of Word will look and react as the Step-by-Step directions describe, you may need to change some settings. There are many things about Word that you can change or customize. You will probably be comfortable with the default settings for most of Word's behaviors.
When Word itself or your document is not looking or behaving as you wish, there are several places that you can go to make changes.
-
Ribbon: Page Layout tab: Margins, orientation, columns, indentions, line spacing, etc.


The Themes tab group is on this ribbon in Word 2007 and 2010 but the group is on the new Design ribbon in Word 2013 and 2016.
-
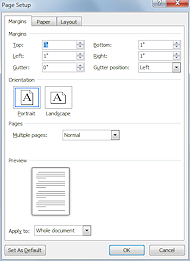 Page Setup
dialog: Set the size,
orientation, margins,etc.
Page Setup
dialog: Set the size,
orientation, margins,etc.
-
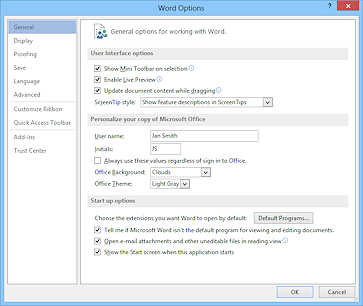 Word Options dialog: Contains several pages with many settings for how Word behaves and
reacts, including automatically saving, printing, spell check and grammar
check. If something is
happening automatically that
you don't like, this dialog probably contains the setting you
need to change. The dialog is slightly different in each version of Word.
Word Options dialog: Contains several pages with many settings for how Word behaves and
reacts, including automatically saving, printing, spell check and grammar
check. If something is
happening automatically that
you don't like, this dialog probably contains the setting you
need to change. The dialog is slightly different in each version of Word.
-
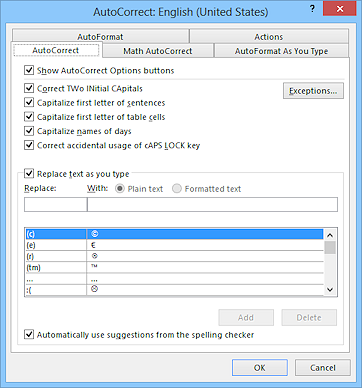 AutoCorrect dialog: Automatic
spelling corrections, automatic formatting, automatic replacement of
text with symbols or text block., etc. We will cover this one in the
next lesson.
AutoCorrect dialog: Automatic
spelling corrections, automatic formatting, automatic replacement of
text with symbols or text block., etc. We will cover this one in the
next lesson.
| |
Step-by-Step: Word Settings |
|
| What you will learn: | to change the way a document displays to change the page characteristics to change the window display to change the way Word behaves |
Start with: ![]() (Word is open with a blank document.)
(Word is open with a blank document.)
[If you are logged onto the computer under your own user name,
changes that you make below will not affect other users.]
Ribbon: Display of the Document
- Click on the Home tab.
-
 If it's not already highlighted, click on
  the Show/Hide Marks button to show the marks.
The button changes color to show that the feature is turned on .
.  Problem: Marks do not show or hide as expected
Cause: The Word Options dialog has a check list of marks that you can choose to show all of the time, regardless of what the Show/Hide marks button does.
- If necessary, at the bottom right of the document
window, click on
 the Print Layout View button.

 Word 2007, 2010:

 Word 2013, 2016:

-
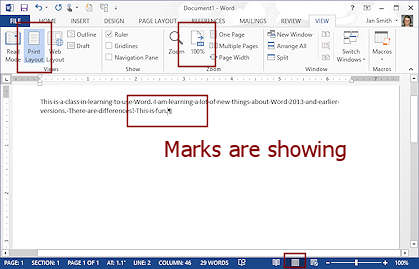 Click the View tab on the ribbon.
 - If necessary, click the button Zoom 100%
 to show the document at full size.
 - Type two lines of random text.
Do you find this 100% size easy to read and work with?
By the way, you will not need to save this document... ever!
Dialog: Page Setup
As you make changes in the Page Setup dialog, you can see the effect in the preview of a sample document in the dialog. The image is called a 'preview', but it's a preview of your choices, not of your actual document. Don't get confused!
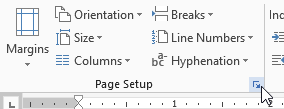 Click the Page Layout or Layout tab.
- In the Page Setup group, click on

 the Dialog Launcher button.
The Page Setup dialog appears. -
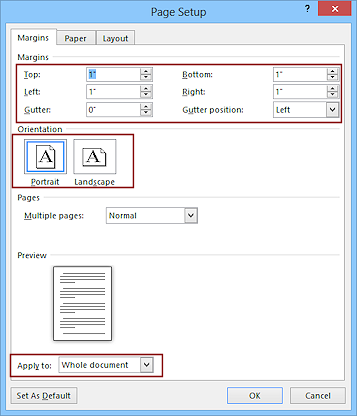 If necessary, click on the Margins tab.
 -
 Experiment: Page Setup
Change the values in the Margins using the up and down arrows or type in a value. See how the preview document changes. Switch between Landscape and Portrait orientations with different margin settings.
DO NOT click the button Set As Default!
- Return to the original settings:
- Margins = 1" top, bottom,
left, and right.
These are the default margins.
You cannot change the unit of measurement in this dialog.
The choice of inches, centimeters, whatever, is on the Word Options > Advanced tab, which you will see shortly. - Orientation = Portrait
- Apply to = Whole document
This setting is easy to overlook but can be very important once you have created sections in your document!
- Margins = 1" top, bottom,
left, and right.
-
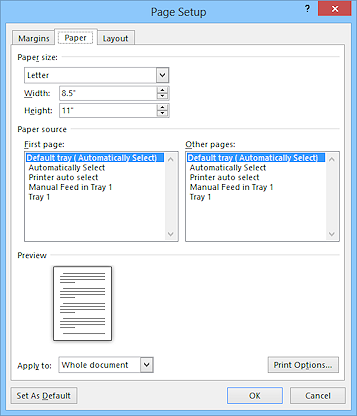 Click on the Paper tab.
 - Experiment: Page Size
Choose different sizes in the Page Size drop list. Did you know these sizes existed??
- Return to the original settings.
- Paper Size = Letter with Width = 8.5" and Height = 11"
If you will be using another size, like A4 which is common outside the USA, set the size to what you need to use. Just realize that the illustrations in these lessons assume Letter size. Your documents will wrap differently to the page. -
Apply to = Whole document
- Paper Size = Letter with Width = 8.5" and Height = 11"
- Click on OK to close the Page Setup dialog.
Window Display
-
If your window is not full screen, maximize your document window by clicking

 the
Maximize button on the document's title bar.
the
Maximize button on the document's title bar. The button changes to the

 Restore button.
Did the size of the text change?? Can you read your text easily? Is this a comfortable size for your computer screen's size and resolution?
On most desktop monitors full screen is uncomfortably wide for most documents. On a laptop, you may need all of the screen to edit comfortably.
Note: To keep the file size for the illustrations in these lessons small, the illustrations probably show a smaller window size than would be comfortable in real life.
- Restore the window to its previous size by clicking the Restore button at the upper right of the window.
- Experiment:
Window Size
Adjust the height and width of the window by dragging the edges.- How does the display of the document change as you change the height and width of the window?
- How does the ribbon change?
- Which groups on the ribbon collapse as you drag the window narrower?
- Decide on a comfortable width and height for your monitor and the work you expect to do.
 Warning: Window size is remembered.
When you open Word again, it will use the same size window as when it was last closed. - Return the window to a comfortable size at 100% size for the text.
-
Click on

 the Minimize button at the upper right of the title bar.
Where does the Word window go?
It is hiding in the Word icon on the Taskbar. Did you catch the animation of the window shrinking up and being absorbed by the icon?Problem: Other Word windows still show
If you have more than one Word document open, clicking the Minimize button only hides the current document window.
No Solution: There is no command to minimize all open Word documents at once. -
On the Taskbar click the icon for your document (Windows XP or Vista) or the Word icon (Windows 7, 8, 8.1, or 10).
Your document window shows up again.Problem: 
 Windows
XP/Vista: If you have more than one Word document open at once and your Taskbar icons are grouped, clicking the icon shows you a list of open
documents but does not automatically show a window.
Windows
XP/Vista: If you have more than one Word document open at once and your Taskbar icons are grouped, clicking the icon shows you a list of open
documents but does not automatically show a window.
Solution: You have to click on the icon to see the list and then click on the name of the document you want to see.Problem: 

 Win7, Win8, Win8.1, Win10: If you have more that one Word document open,
clicking or hovering over the Word icon on the Taskbar opens a gallery of thumbnails of the
documents above the Taskbar.
Win7, Win8, Win8.1, Win10: If you have more that one Word document open,
clicking or hovering over the Word icon on the Taskbar opens a gallery of thumbnails of the
documents above the Taskbar.
Solution: You must click the icon to see the thumbnails and then click on a thumbnail to bring that window back up.
If the thumbnail is not clear enough for you to decide that it is the correct document, hover the mouse pointer over the thumbnail and a full window will temporarily show up. You have to click the thumbnail to keep that window in view.
Change Ribbon Behavior
You cannot change the icons, tabs, or order of the items on the ribbon that come with Word 2007 2010, 2013, or 2016. In Word 2010, 2013, and 2016, you can create a custom ribbon tab or a custom group in an existing ribbon tab and add any commands that you want, in any order.
-
 Right click on the ribbon.
A context menu appears. Word 2010 and 2013 have one more choice than Word 2007, Customize the Ribbon...
-
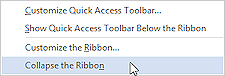
Click on Minimize the Ribbon or Collapse the Ribbon.
The ribbon collapses and shows only the names of the tabs.
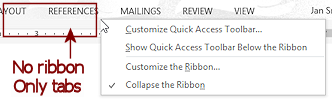
Minimized/Collapsed ribbon in Word 2010 and 2013
- Click on the Home tab.
The ribbon temporarily shows up again.
- Click on the Center button
 on the ribbon.
Your random text is centered - Click in the document somewhere.
The ribbon has vanished again. - Open the ribbon's context menu again by right clicking on the ribbon.
Minimize the Ribbon or Collapse the Ribbon now shows a checkmark. - Click on Minimize the
Ribbon or Collapse the Ribbon again to uncheck the command.
The ribbon expands back to full size and will stay that way. -
 Open the ribbon's context menu and click on ' Show Quick Access Toolbar Below the Ribbon'.
The short Quick Access toolbar shifts down and the ribbon shifts up.The Word control icon stays on the Title bar at the top.
Advantage to toolbar below ribbon:
Quick Access icons are easier to get to with the mouse.Disadvantage to toolbar below ribbon:
Less vertical space for the document.
- Open the ribbon's context menu again and click on Show Quick Access Toolbar Above the Ribbon to return the toolbar to the Title bar.
The other options on the ribbon's context menu, Customize the Quick Access Toolbar and Customize the Ribbon (Word 2010 and 2013), actually bring up the Word Options dialog. So let's go look at that dialog in some detail.
Word Options Dialog: Word's Behavior
The Word Options dialog has several pages, opened by clicking a choice in the Navigation pane at the left. We will look at some of these in this lesson and more in the next lesson.
Most of the settings are probably still at the original defaults. The steps below make sure that certain key choices are checked so that Word will behave as the lessons describe.
Note: If you want to save your changes before getting to the end of this page, click the OK button on the dialog at any point. The dialog will close and you will have to open it again to continue. Annoying, but I am sure you can deal with that.
-
Open the Word Options dialog:
Word 2007: Click the Office button  and then the Word Options button
  at the bottom right.
Word 2010, 2013, 2016:
Click the File tab and then on Options in the Navigation pane.In either case, the Word Options dialog opens to the page listed at the top of its navigation pane on the left.
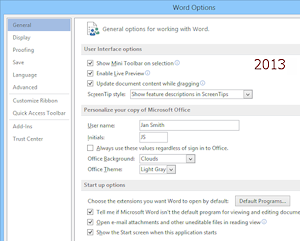
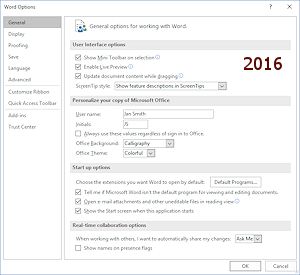
Popular/General: Some commonly changed settings.
The first page is called Popular in Word 2007 and General in Word 2010, 2013, and 2016. The choices on this first page are nearly identical between the versions.
Word Options: What's different between versions
- Name change: Word 2007 Popular = later versions General
- Name change: Word 2007 Customize = later versions Quick Access Toolbar
- New pages: later versions have Language and Customize Ribbon.
- Missing page: Resources page in Word 2007 does not appear in later versions
- A few extra settings in various places.
- Verify that the boxes are checked for:
- Show Mini-Toolbar on selection
- Enable Live Preview.
- Set ScreenTip style to: Show feature
descriptions in ScreenTips.
(You may want to turn that off after you learn what everything does.)
- Type you own name and initials in the matching textboxes.
-
Word 2013: If your Word does not match the screenshots in the lessons, you can change the Office Background to Clouds and the Office Theme to Light Gray.
Word 2016: To match the illustrations from Word 2016, change the Office Background to Calligraphy and the theme to Colorful.
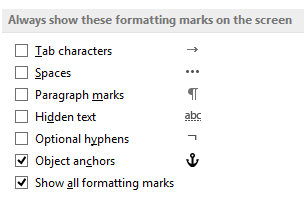
Display: What shows on the document page
 Click in the Navigation pane on Display.
The pane at the right changes.
All three versions have the same choices.
- Verify that your dialog has checked
boxes as in the illustration:
- Show white space between pages in Print Layout view
- Show highlighter marks
- Show document tooltips on hover
- Object anchors
- Show all formatting marks
- Print drawings created in Word.
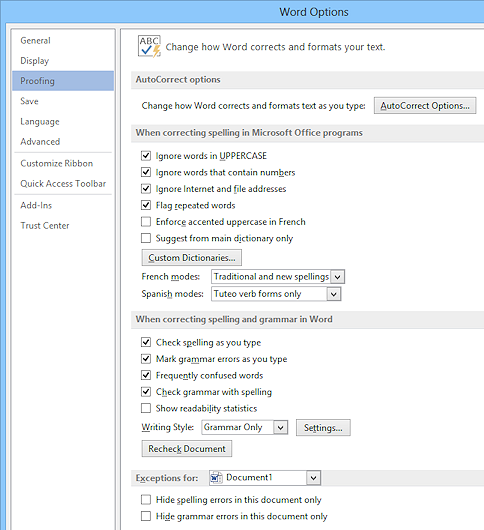
Proofing: What Word does about spelling and grammar
-
 Click in the Navigation pane on Proofing.
The pane at the right changes.
The versions of Word are almost identical here, too.
- Verify that your dialog has the same check marks as the
illustration.
- Ignore words in UPPERCASE
- Ignore words that contain numbers
- Ignore Internet and file addresses
- Flag repeated words
- Check spelling as you type
- Use contextual spelling
- Mark grammar errors as you type
- Frequently confused words
- Check grammar with spelling
- Writing Style: Grammar Only
We will look at AutoCorrect Options later. It has its own dialog.
Save: How, where, and how often Word saves
-
Click in the Navigation pane on Save.
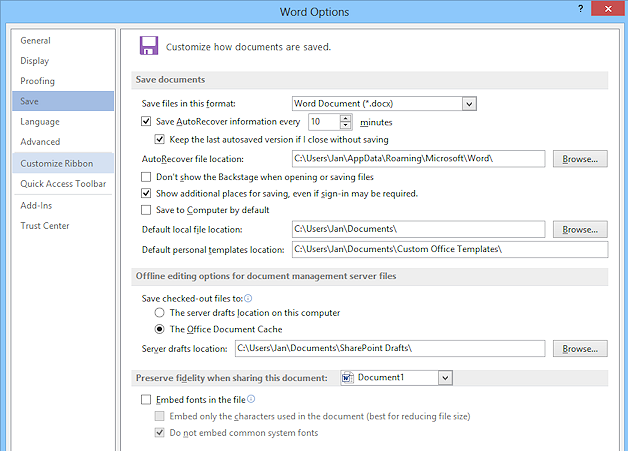
- Verify that Save files
in this format: Word Document (*.docx)
- Verify that your dialog has the same check marks as the
illustration.
- Save AutoRecover information every 10 minutes
- Keep the last
autosaved version if I close without saving
This one can be a real blessing!
 When Word is
doing an automatic save, you won't be able to work. So don't set the number of minutes too small. You may never notice the wait for small
documents that save really fast. The wait gets really annoying for
large documents!
When Word is
doing an automatic save, you won't be able to work. So don't set the number of minutes too small. You may never notice the wait for small
documents that save really fast. The wait gets really annoying for
large documents!Do not change the location of the AutoRecover files.
You can change the Default local file location on your own computer if you want Word to open the Save As dialog somewhere besides the top of your Documents folder.
Advanced: Many settings about editing, display, printing, etc.
-
Click in the Navigation pane on Advanced.
The pane at the right changes to a long, scrolling list of several sections of options.
Most of these options are the same between Word 2007 and 2010.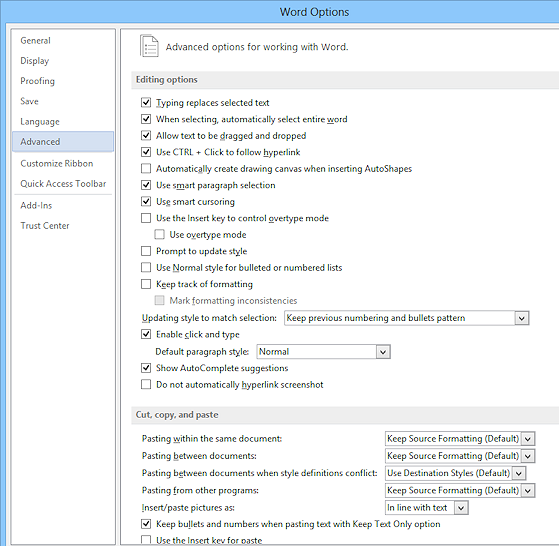
- Verify that at least the following options are
checked, or selected:
Editing:
- Typing replaces selected text
- When selecting, automatically select entire word
- Allow text to be dragged and dropped
- Use CTRL + Click to follow hyperlink
- Use smart paragraph selection
- Use smart cursoring
- Enable click and type
- Show AutoComplete suggestion
Cut, copy and paste:
- Keep bullets and numbers when pasting text with Keep Text Only option
- Show Paste Options button when content is pasted
- Use smart cut and paste
Show document content:
- Show drawings and text boxes on screen
Display:
- Show shortcut keys in ScreenTips
- Show horizontal scroll bar
- Show vertical scroll bar
- Show vertical ruler in Print Layout view
Print:
- Print in background
Save:
- Allow background saves
- Click the OK button to close the dialog and save any changes that you made.
Word 2010, 2013, 2016: Customize the Ribbon
You still cannot add items to the original tabs or groups. But in these versions you can create your own ribbon tab or add a group to an existing ribbon tab.
-
Open the ribbon's context menu again and select Customize the Ribbon...
The Customize dialog opens. It shows two lists, a list of popular Word commands on the left and a list of ribbon tabs and what commands are on them on the right.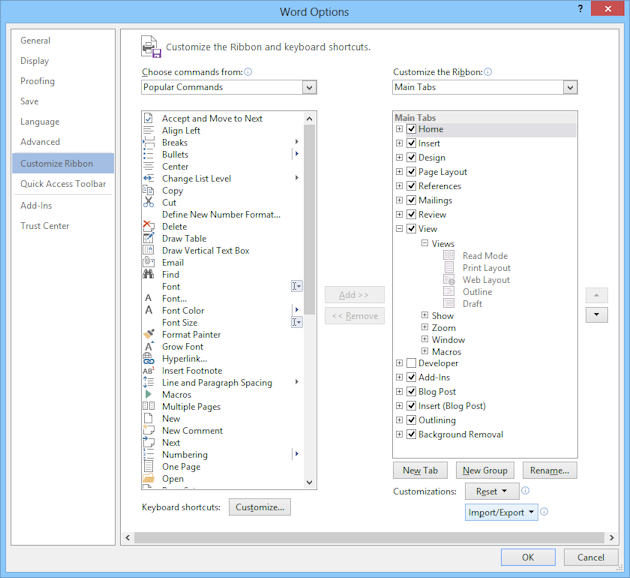
At the bottom right there are buttons for adding a new tab or a new group. You can also import or export your custom tabs and groups.
Notice that in the illustration that the View tab list is expanded and so is the Views group. The commands in the group are gray. You cannot edit this group by adding something, removing an item, or changing the order of the items in the group. Nothing!!
These lessons will not require a custom tab or custom group. But you might want to create one for your own work.
Customize or Quick Access Toolbar:
Change what icons are
on the Quick Access toolbar, which is at the top left of the Title bar.
-
Click in the Navigation pane on
Customize Ribbon or Quick Accesss Toolbar.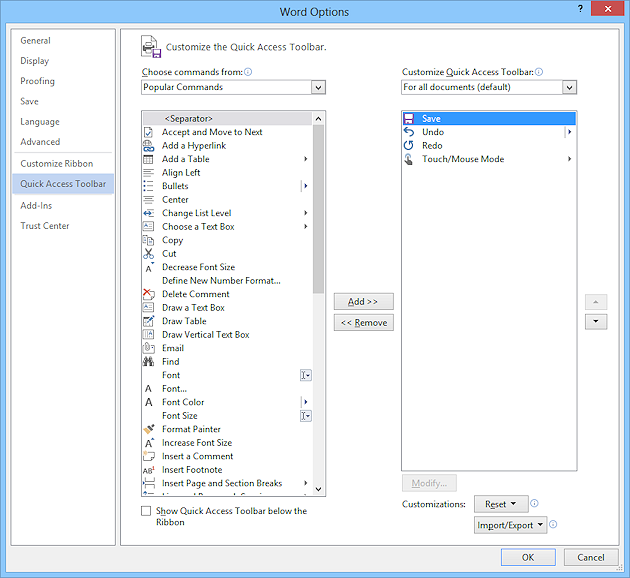
The pane at the right changes to show two lists. On the left is a list of popular commands in Word. There are other lists of commands from the drop list.
On the right is a list of the icons for commands currently showing on the Quick Access toolbar.
The default icons are Save, Undo, and Redo. The illustration shows a command that is automatically installed by a trackpad. So some items may show up without your assistance (for good or ill!).
- Scroll the left list until you see Print Preview or
Print Preview and Print, then click that
item to select it.
-
 Click the Add >> button in the middle.
The selected command is copied to the list on the right at the end of the list.
The selection moves down to the next item on the left, but the original command is still in the list.
-
 At
the top of the left list, click the down arrow and then select Commands Not in the
Ribbon.
At
the top of the left list, click the down arrow and then select Commands Not in the
Ribbon.
- Scroll the list to see what Microsoft has
left off the ribbon.
Are any of these commands things that you might want to get at easily? Those would be good to put on the Quick Access Toolbar.
- Scroll to see the AutoFormat commands. There are
several choices.
What are the differences?- Two choices have no icon and the other two use the same icon! Confusing.
- AutoFormat... opens a dialog where
you can choose to apply changes now or to review each change that
AutoFormat can make and either accept or reject it. Useful!! We
can use this one.
- AutoFormat As You Type... opens its tab from the AutoCorrect dialog for you to make changes to the settings.
- AutoFormat Now applies formatting
changes from the settings in the AutoFormat tab of the AutoCorrect dialog without bothering to open a dialog for you to review what
it did. Unhappily, the icon is the same as for AutoFormat...
- AutoFormat Options... opens the AutoFormat tab of the AutoCorrect dialog for you to change the settings.
- Click on the command AutoFormat... on the
left.
- Click on the Add >> button in the middle to move the command to the list on the right.
-
 Click the Up arrow at the far right.
The selected command moves up the list.
- Click the Down arrow to move the command back.
- Experiment: Organizing the Quick Access Toolbar
Select other commands from the left and move them onto the Quick Access toolbar list at the right. Move them up and down the list using the up and down arrows. - Clean Up: Select one of the new commands you put on the Quick Access list, except Print Preview and Print, and click the Remove<< button to remove it from the Quick Access Toolbar.
-
Repeat until you have the following icons: Save, Undo, Redo, Print Preview and Print, AutoFormat..., plus any others that you think you will find useful.


- Click on the OK button to close the dialog and save your changes.
|
|
| © 1997-2017 Jan Smith All Rights Reserved |
Site Map What's New |
Privacy Policy Terms of Service Copyright Acknowledgements |
~~ 1 Cor. 10:31 ...whatever you do, do it all for the glory of God. ~~
Last updated: March 27, 2017