
Jan's Working with Words
Brochure: Exercise Word 3-1
It's time to practice what you've learned about working with multiple documents and text boxes.
Computers Today has another idea to help boost subscriptions besides the flyer you created in Exercise Word 1-3. They are offering a free issue and they will refund your subscription money if you don't like the newsletter.
They want to mail out a paper which has the first page of a recent newsletter on one side. Half of the other side is for mailing information and the other half promotes the subscription offer. Refer to illustration at the end as you go.
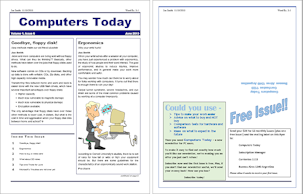
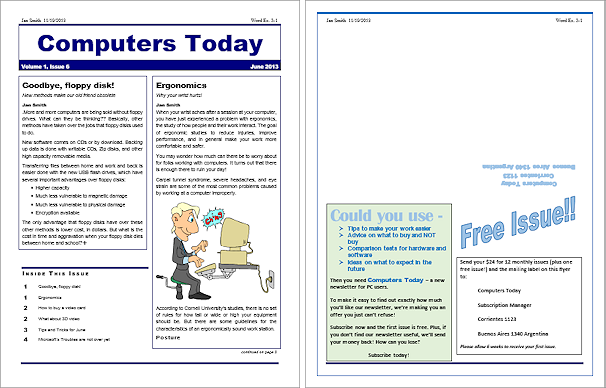
Exercise Word 3-1: Newsletter Sample
| What you will do: | Use a template with text
boxes Work with multiple documents Insert an image inside a text box Use Word Art Adjust line spacing |
Start with:![]()
![]() , newsletter-professional.dot from resource files
, newsletter-professional.dot from resource files
New Doc from Template
-
Using Local Copy of Template:
Navigate in a File Explorer window to the location of your local copy of the word resource files and double-click Newsletter-template.dot
A new document opens.
OR
Using Online Copy of Template:
Download the template Newsletter-template.dot from the online folder Online folder and save it. Remember where. If offered the option to Open the document, accept that option. If you don't get that option, open a File Explorer window and navigate to the location to which you saved the file and double-click it.In either case, instead of opening the template, you will get a new document based on the template. Just what you want! If you see a gold bar with a button called Enable Editing, click on it. This is a safety measure since some online documents contain harmful bits of code.
-
 Save as ex3-1-newsletter-Lastname-Firstname.docx on your Class disk in the word project3 folder.
Be sure to use the docx format. You may see a message about updating the file format. Warning: Word crashes
If you try to play around with the template before saving as a docx document, Word may lock up and have to restart. The template does need to be coverted by Word!This template for a newsletter has some information filled in, like the title (though it is not formatted yet), volume and issue numbers, and date and 5 pages with text boxes. You will have to change a lot of this and also get rid of temporary text and parts that you don't need.
-
If necessary, open Word Options > Advanced and uncheck the box in the Display section to show text boundaries.
That setting shows dotted text area boundaries for each text box AND each paragraph. That makes this page look too messy to work with!
-
Inspect all five pages and notice how this document has been designed.
Read the temporary text. Nearly everything is in a text box.
You can print it now, if you wish, for future reference. Some of the directions for how to do things are for older versions of Word, but you can get the general idea.
-
Look carefully at the paragraph marks. You can see ¶ marks in the text boxes but also a lot on the left side of the page, behind the text box. There are Page Break marks scattered around, too.
 Select carefully: It is easy to miss the text box and catch marks on the page itself.
 On pages 3, 4, and 5, select and delete each of the text boxes and the paragraph marks behind the text boxes and the page breaks until you have
only 3 pages left, with page 3 being blank.
On pages 3, 4, and 5, select and delete each of the text boxes and the paragraph marks behind the text boxes and the page breaks until you have
only 3 pages left, with page 3 being blank.
-
Delete the footer text, but leave one space so that the border will remain.
 Problem:
Border for footer vanishes
Problem:
Border for footer vanishes
You deleted too much.
Solution: Undo your deletion and try again.
- Change the year at the top of the first page to the current year.
- Show the Styles pane.
- Click in the first line, Computers Today, and, if necessary, apply the style Title - Professional from the
Styles pane.
(This style does not show in the Styles gallery on the Home tab.)
- Save.
[ex3-1-newsletter-Lastname-Firstname.docx]
Left Text Box - Floppy disk article
- On page 1 in the left text box, change the following text and check the Style Pane to see what style has been applied:
title = Good-bye, floppy disk! style = Heading 1- Professional
subtitle = New methods make our old friend obsolete , style = Subtitle - Professional
byline = your own name with style= Byline - Professional
Delete the company name line.
- Scroll the long list of styles in the Styles pane for this
document to see what all could be useful in a newsletter. You can drag the border of the Styles pane to enlarge it for easier reading.
Would you have thought of these styles?
- Select the paragraphs following the parts you just changed in the text box and delete them, leaving a blank line, except for the "end of article" symbol v. There are a lot of paragraphs since this article flows
onto page 2. Just keep deleting what you see in the text
box until you reach the end of article symbol.
- Open the document floppyarticle.doc from your resources files in the words resources folder and copy the
text.
Online copies: Online folder
- Close floppyarticle.doc and, back in your newsletter sample, paste in the text box below your
name.
- Format the pasted text as Body Text - Professional and justify it.
You can select a style from the Styles pane or from the Apply Styles dialog, which opens from the Dialog Launcher menu.
[January, 2016: In Word 2016 on Windows 10 the Styles pane is not applying the style that I clicked on but the Apply Styles dialog works correctly. ]
- Update the style to include your change.
Text in the right side text box updates automatically. Sweet!
- Delete the text box at the bottom of this text box, that says continued on page 2
- Bullet the list of advantages in the article with simple solid circles.
Adjust the tab on the ruler after the bullets, if necessary, to 1/8" after the bullet. The font should still be: Arial 10 pts.
Set Space after to 6 pts and Line spacing to exactly 11 pts.
- Use this text to create a style called bullet-article .
- If necessary, drag the bottom of the text box down until your last line is in view, with
the 4 diamonds symbol
 at the end of article.
 - Save.
[ex3-1-newsletter-Lastname-Firstname.docx]
Table of Contents
- Edit the Table of Contents at the bottom left to read:
1 Good-bye, floppy disk!
1 Ergonomics
2 How to buy a video card
2 What about 3D video?
3 Tips & Tricks for June
- Add a new row at the bottom with text: 4 Microsoft's troubles are not over yet
- Save.
[ex3-1-newsletter-Lastname-Firstname.docx]
Right Text Box - Ergonomics article
- In the text box on the right, change:
Title = Ergonomics
Subtitle = Why your wrist hurts!
Byline is your own name
Delete the line Company name.
Styles should be the same as for the left text box: Heading 1 - Professional, Subtitle- Professional, Byline- Professional
- Delete the
rest of the contents of this text box on the right. (This one flows on
to another page, too.) The temporary text does not have an end-of-article symbol.
- From the resources files in the words resources folder
or online
folder, open Ergonomics article.doc and copy the text
below the title. Paste in the text box below your name. Close the ergonomics article.
- Apply style Body Text - Professional to the text you just
pasted.
Some of the article slides out of view at the bottom of the text box. That's OK. If this were a complete newsletter, the text would flow into a text box on another page. But you are creating a document that is just a sample.
- Apply Heading 2 to the lines Posture and Design Features
- Modify the style Heading 2 with Space after = 6 pt and scaling = 150%.
- Apply the style bullet-article to the lines under Posture and Design Features .
-
Click at the beginning of the paragraph that starts According to Cornell… and insert the picture ergonomicdesk.wmf from your resource files or online folder.
The image does not move the existing text aside.
 Word 2007, 2010:
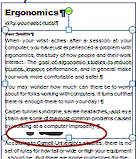 Whoops. It didn't all show. Looks really weird!
The image is still selected so the handles for the image show but most of the image is underneath the text. Only a slice at the bottom of the image shows at all!

 Word 2013, 2016:
 The image shows in front of the text. Since this image has a transparent background, you can at least see that there is text there. Surprisingly, Word 2013 will not allow you to change the text wrapping of the image.
-
If necessary, open the Styles pane and hover over the style for the text, Body Text-Professional.
A popup shows the formatting for the paragraph.
Do you see a setting that explains why the image does not show as expected?Explanation - In all versions of Word the problem is created because the style , which came with the template, set the line spacing for the paragraph to exactly 14 pts. That leaves little room for a picture... unless it is less than 14 pts tall! Word 2007 and 2010 put the image behind the text, showing only the bottom 14 pts worth of the image. Word 2013 and 2016 try to help by showing the whole image anyway but shows it in front of the text.
The cursor should still be at the beginning of the line with the image anchored to that paragraph.
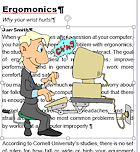
- Press ENTER to create a new line.
The image should now be anchored to the new paragraph, but you cannot see the anchor symbol. -
Change the line spacing for this new paragraph to at least 12 pts.
If necessary, delete the image and insert the image again in this paragraph.
(You cannot adjust the text wrapping. The choices are grayed out.)Now the image is in the text box. That pushes part of the text down below the bottom edge of the text box. You will create another text box for it to flow into on page 2.
- Center the image.
Problem:
Paragraph below the image centers also
Solution: The image must be in a separate paragraph.
- Change the text at the bottom of the text box to read continued on page 2 .
- Save.
[ex3-1-newsletter-Lastname-Firstname.docx]
New Text Box on Page 2
- Zoom to show the whole page
- Scroll to page 2.
- If necessary, delete the two text boxes that held the overflow
from the articles on the first page.
- Draw a text box to cover the right half
of the text area.
- Link the
Ergonomics article's text box to the new one.
The hidden text should appear in the new text box.
- Save.
[ex3-1-newsletter-Lastname-Firstname.docx]
Page 3
This page will form the back side of what is mailed out to potential subscribers. The top half of the page will have the return address and space for the mailing address. For the return address to show correctly after the paper is folded, it must be upside down in the top half of the page. You will use WordArt for the return address because WordArt can be rotated. A text box can not be rotated in Word 2007. Plus, you need more practice with WordArt and I did not want to write separate directions!
- Scroll to page 3.
This page should have a blue border.
Problem:
Page border is gone
Your deleting erased it.
Solution: Recreate the border.
On the Page Layout or Design tab click on the Page Border button to open a dialog. The top border is solid line, Dark Blue, and 4.5 pt width. The other sides are solid, Dark Blue, and 1 pt. Apply to All but the first page. If the border looks too far from the edges, check the margins in Page Setup. Top and bottom margins are 0.61". Left and right margins are 0.6".
- Insert 2 text boxes to cover the text area in the bottom half of page 3.
Make them about 4.5" tall.
- Insert WordArt at the top of page 3 for the return address.
Word 2007: Pick the scheme at the top left of the
WordArt Gallery. Set with Arial Black at 12 pt .
Word 2010: Use the scheme Gradient Fill Blue, Accent 1.
Word 2013, 2016: Use the scheme Gradient Fill Gray.
Use as text the following address:
Computers TodayCorrientes 1123
Buenos Aires 1340 Argentina
- Insert WordArt at the top of page 3 for the return address.
- Format your WordArt return address with fill color Dark
Blue, Accent 2, Lighter 40% and with outline color Dark Blue, Accent 2,
Lighter 60%
If necessary, change the text wrapping to Square.
Font = Arial Black
Font Size = 12 pt
-
Select the box holding the Word Art. Hover over the rotation handle and drag it around util the text box is upside down.
Alternate Method: Rotate 90o twice.Problem:
No rotation handle
The Word Art was inserted as inline.
Solution: Change the text wrapping to In Front of Text. - Drag the
WordArt address to position it above the right hand text box on page 3.
Be sure it is in the top half of the page.
- Insert another WordArt creation with text = Free Issue!
Word 2007: Start with the scheme in row 1 column 2, using Arial Black, 24 pt.
Fill Color = Blue, no outline, semi-transparent (50%)
Word 2010: Select the same scheme as for the address, Gradient Fill, Blue, Accent 1. Change the Text Fill to Blue, Accent 1, Lighter 40%. Apply the Text Effect > Transform > Slant Up
Word 2013, 2016: Use the scheme Gradient Fill Gray. Font Arial Black 36 pt. Change change the color to Blue, Accent 1, Lighter 40%. Change Text Outline to Blue, Accent 1, Darker 25%. Apply the Text Effect > Transform > Slant Up
- Position the Word Art in the top of the
right text box below the upside down address box.
If necessary, resize the box to about the width of the right side text box and a height that keeps the letters in good proportion.
- Save.
[ex3-1-newsletter-Lastname-Firstname.docx]
Left Text Box on Page 3
- In the left text box on page 3, type:
Could you use -
Tips to make your work easier
Advice on what to buy and NOT buy
Comparison tests for hardware and software
Ideas on what to expect in the future
Then you need Computers Today – a new newsletter for PC users.
To make it easy to find out exactly how much you'll like our newsletter, we're making you an offer you just can't refuse!
Subscribe now and the first issue is free. Plus, if you don't find our newsletter useful, we'll send your money back! How can you lose?
Subscribe today!
- Format the first line : Britannic Bold, 36 pt, Blue, condensed by 1 pt.
Word 2007: Emboss (in the Font dialog)
Word 2010: WordArt Quick Style 2nd row, 4th column (Fill Blue,
Accent 1, Inner shadow, Accent 1)
Text Fill: Dark Blue, Text 2, Lighter 60%
Word 2013, 2016: Color = Blue, Accent 1, Lighter 40%
Drawing Tools: Format > Text Effects: Bevel > Cool Slant
(The text effect may not show while you are editing anywhere in the text box.) - Remove any blank lines in the text box.
- Format the next 4 lines of the text as: Arial, 12 pt , Bold, Blue.
Apply bullet Ø(right pointing wedge from Wingdings). - Format remaining text: Calibri, 12pt, Bold, Space Before = 6 pt, Space After = 12pt.
- Center the last line: Subscribe today!
(If it isn't showing, your text box is not large enough or you still have blank lines.)
- Right click the text box border and select Format Shape.
For the fill color, select the text box Accent 6, Lighter 80%.
(This color varies with the version of Word.)
- Select the words Computers Today in the first line after the bullets and format as Arial Black, font color
Blue.
- Save.
[ex3-1-newsletter-Lastname-Firstname.docx]
Right Text Box on Page 3
- Drag the
top of the right text box below the Free Issue WordArt until it is about
2.6" high.
- Enter the following text:
Send your $24 for 12 monthly issues (plus one free issue!) and the mailing label on this flyer to:
Computers Today
Subscription Manager
Corrientes 1123
Buenos Aires 1340 Argentina
Please allow 6 weeks to receive your first issue.
- Apply the formatting of the black text in the left text
box to the text in the text box on the right.
(Hint: use Format Painter) - If necessary, resize the text box to be tall enough to show all of the text.
- Apply to the text in the box, Calibri, 12pt, Bold, Space Before = 6 pt, Space After = 12pt.
- Format the last line italics and 10 pt.
- Indent the address lines once.
- Save.
[ex3-1-newsletter-Lastname-Firstname.docx]
Finish
- Create a header with your name and the date at the left and at the far right Word Ex. 3-1.
- Remove the 'continued from' text that is already in the header.
- Preview and spell check . Make any
corrections necessary.
[Your dictionary may not spot the word "carpel", which should be "carpal". Both are words, but carpel refers to a part of a flower.]
- Save.
[ex3-1-newsletter-Lastname-Firstname.docx]
 Print pages 1 and 3 only.
[If you get an error message about the border being outside the printable area, you can still print, but you will be missing some of the blue border.]If you want to print page 3 on the back of page 1, use good quality paper, if you have a choice. The dark bar and title on page 1 may bleed through to the other side. Be careful how you re-insert the paper in the printer. The finished sample page would be folded, addressed, and mailed.
|
|
| © 1997-2017 Jan Smith All Rights Reserved |
Site Map What's New |
Privacy Policy Terms of Service Copyright Acknowledgements |
~~ 1 Cor. 10:31 ...whatever you do, do it all for the glory of God. ~~
Last updated: March 27, 2017
You cannot make changes to these files and save them in the same place. Save the changed documents to your Class disk. This keeps the original resource files intact in case you need to start over or another student will be using this same computer.
Online copies: Online folder
In other lessons you will see the same fictional organizations and people that you meet in these exercises: The City Theater, the City Soccer Team, and Computers Today.