This is a test of the
Emergency Filtering Network.


|
This is a test of the
Emergency Filtering Network.
|
These particular filters are set to make the text & images half transparent. The image on the left does not have a transparent background itself. So the filter applies to its background also. The image on the right has a transparent background to start with. So the filter applies only to the non-transparent part of the image.
What you should see

Syntax & Settings
As an example, the text above uses the filter:
In STYLE the general format for setting the Alpha filter is:
This filter allows transparency to vary across the object! A wide range of effects can be created.
Opacity is what % transparent/opaque the object starts with. Settings range from 0, which is totally transparent, to 100 which is totally opaque.
FinishOpacity is what % final opacity is and has the same settings as Opacity.
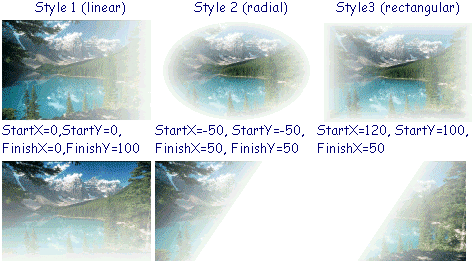
Style chooses whether the transparency is the same for the whole object or changes across the object. Settings are: 0 for same for whole object ; 1 for linear change; 2 for radial change; 3 for rectangular change.
StartX and StartY are the coordinates where the effect should start.
FinishX and FinishY are the coordinates where the effect should stop.
The default values for linear style set 100% opaque at left, fading toward the right.
| Style 1 (linear) | Style 2 (radial) | Style3 (rectangular) |
 |
 |
 |
Let's make a few changes in Style=1 which is "Linear". (Changing the coordinates for Radial and Rectangular styles doesn't seem to make a difference.)
Setting the starting and finishing coordinates. Not all choices make a difference!
| StartX=0,StartY=0, FinishX=0,FinishY=100 |
StartX=-50, StartY=-50, FinishX=50, FinishY=50 |
StartX=120, StartY=100, FinishX=50 |
 |
 |
 |
What you should see
Images of the samples above