
Jan's Computer Basics:
Applications: Web Pages
Example: Dreamweaver
To create a web page for the Internet, you must write HTML (Hypertext Markup Language) code to define what is on the page, create or acquire the images for the page, and then upload the files to a web server.
What do you need?
- HTML editing program
- Graphics editing program
- Uploading program
- Browser
- Web hosting
HTML Editor:
You can use any plain text editor, like Notepad, to write the code. Or, you
can use a specialty program for writing HTML pages. Such programs make it much
easier to manage complex pages and large web sites. Also useful are programs
that help you write scripts or that check your HTML code for errors.
Popular
programs for writing HTML include Notepad (write the code yourself!), Microsoft
Expression Web, and Adobe Dreamweaver.
See Wikipedia ![]() for an article listing popular HTML editors.
for an article listing popular HTML editors.
Graphics:
For the images on your web pages you need a graphics program that
can save your images in GIF or JPG format. PNG format will also work for all current
browsers, but GIF and JPG work even for very old browsers.
See Wikipedia's article ![]() listing popular raster graphics editors.
listing popular raster graphics editors.
![]() MS Paint: Old
versions of MS Paint, which comes with Windows, cannot save images in GIF, JPG
or PNG formats.
MS Paint: Old
versions of MS Paint, which comes with Windows, cannot save images in GIF, JPG
or PNG formats.
 What versions for your MS Paint?
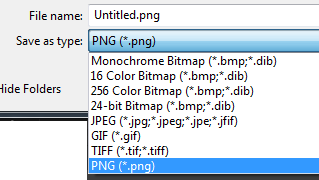
Open MS Paint (Start menu > Run > type mspaint and click
OK, or use the Windows 8, 8.1, or 10 search box and type Paint). Look in the Save As dialog at the file types: File > Save As > File type list. If the list includes GIF, JPG, and PNG, you are ready
to create and edit images for your web pages.
(If you do much with images, you will soon want a more advanced program than MS Paint!)
![]() Other useful items:
Other useful items:
Scanner to scan
photos and drawings.
Collections of clip art.
Uploading:
To move your new web pages and images to a web server, you need uploading
software, such as an FTP program.
HTML editors like Dreamweaver include uploading as a built-in feature.
See Wikipedia's list ![]() of FTP programs.
of FTP programs.
Browser:
To view your web pages you need a browser, like Edge, Internet Explorer, FireFox,
Google Chrome, Safari, or Opera.
See Wikipedia's list ![]() of browsers.
of browsers.
Web Hosting:
You can view pages yourself that you save to your hard disk, but no one else
can see them. You need access to space on a web server (the web host) to share your work with
others on the Web. Your ISP account, with which you connect to the Internet, may
come with some web space. There are ad-based, free web hosting accounts ![]() . Or, you
can sign up for a web hosting account with a commercial web hosting service. If you want to use your new web site for business, you have fewer choices. Many ISP and free web hosting services do not allow business use.
. Or, you
can sign up for a web hosting account with a commercial web hosting service. If you want to use your new web site for business, you have fewer choices. Many ISP and free web hosting services do not allow business use.
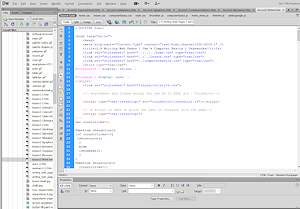
HTML Code
When each logical part of a web page is marked, the browser will know how to display the contents in a way that makes sense for the particular display device and user.
Special code tags are used to mark all the parts of a web page. For example the text in an ordinary paragraph is written in between opening and closing P tags like this:
<p>This is a paragraph</p>
Example:
In the iframe below is a simple web page. Click the link below it to view the source code for the page. Can you find the tags that define the two headings and the list items? How about a simple paragraph? What does the img tag contain? What line dictates the background image?
Do It!
A Really Simple HTML Editor *
The text area below is actually a basic WYSIWYG editor for HTML. If the box looks blank, formatting buttons should appear when you click inside the text area. You apply HTML tags by first selecting text and then clicking one of the buttons. In the source code view, the code is packed tight into a continuous line that wraps, instead of being on separate lines for easy reading.
![]() Select
first: Be sure to select
text before clicking a button to apply a tag! If the display goes
crazy, refresh the browser window and start over.
Select
first: Be sure to select
text before clicking a button to apply a tag! If the display goes
crazy, refresh the browser window and start over.
- Click in the text area below. Buttons appear
across the top and one at the bottom left.
Use the bottom left button to switch between WYSIWYG Mode (where you can see the effect of your tags) and the source code. The label on the button changes to the mode your are not in.
*The WYSIWYG editor above is TinyEditor
 ,
by Michael Leigeber, used under creative
commons license.
,
by Michael Leigeber, used under creative
commons license. - Type several lines of text. Include your name in the first
line.
- Use the ENTER key on your keyboard to start a new line.
Use SHIFT + ENTER to create a line break.
- Play with the various buttons until you understand what each of them
does.
- Apply at least two heading styles and 2 formatting choices to text
that you select.
- Look at your lines in both WYSIWYG and Source modes.
Learning more
Reading and analyzing the source code for the pages you see on the Web is a good way to learn about writing web pages. You can view the source code for any page that you can view with your browser.
Try it with this page. Right click on the page (not on a link or an image. A context menu appears. Select View Source or View page source or similar command. The source code will open in a text editor or in the browser, depending on your browser. The code for this page is a LOT more complex than the example above!
For a set of lessons on writing web pages,
go to Working with the Web:
HTML Basics![]()
|
|
| © 1997-2017 Jan Smith All Rights Reserved |
Site Map What's New |
Privacy Policy Terms of Service Copyright Acknowledgements |
~~ 1 Cor. 10:31 ...whatever you do, do it all for the glory of God. ~~
Last updated: April 4, 2017