
Jan's Computer Basics:
What You See: On the Inside
While you may not often tinker with the insides of your computer, it is a good idea to know a little about what it is like in there. The diagram below shows a basic arrangement but uses a large case to make it easier to see the parts. Your computer likely has several more internal devices than the illustration shows. Plus, all of the buttons, lights, and ports on the front of the case must connect to the motherboard inside.
The first task is to remove the case so we can see what's inside. Click on 'Case' in the illustration to get started.
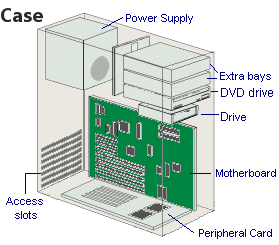
Inside a computer case
![]() Click on a part above and see an explanation below.
Click on a part above and see an explanation below.
![]() Show all explanations at once (good for printing)
Show all explanations at once (good for printing)
Explanation:
Removing the Case
To look at the inside of your computer, you must first remove the outer casing. It can be a challenge to figure out!
First unplug everything from the back - power cord(!), keyboard, mouse, video, sound, USB.
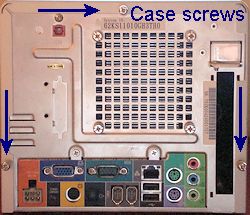
Small computer case: Back with case screws labeled
Next, remove the three or more screws on the back that hold the case on - if there are any! Some cases have panels that just slide and lift off.
There are lots of screws visible besides the ones that hold the case together, so be careful.
If you are lucky, the screws will be thumb screws, which you can unscrew by hand. Otherwise you will probably need a Phillips-head screwdriver. That's the kind with the X-shaped tip. Put the screws where you can find them again when you're done and where you won't step or kneel on one. They do hurt!
Once the screws are out, the case should slide off. Some cases need to be lifted up in the back a little so you can pull a lip loose at the front edge.
What do you see?
It can look quite messy with a lot of cables and wires running around. The inside can feel a lot smaller than the outside when you are trying to replace parts!
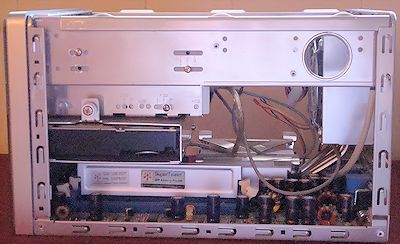
Side view:
The hard drive is the black rectangle at the middle left.
The media reader is above it and the DVD is at the top behind a metal panel.
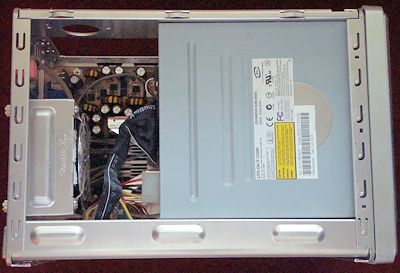
Top view. The motherboard is at the bottom inside.
You cannot see the processor in this view.
The DVD drive is the big gray part at the right.
![]() Ground yourself: Touching computer parts can cause a spark, especially on dry days. ALWAYS touch something metal like the power supply or metal parts of the case before touching ANYTHING inside the computer. Static electricity kills computer parts!!!
Ground yourself: Touching computer parts can cause a spark, especially on dry days. ALWAYS touch something metal like the power supply or metal parts of the case before touching ANYTHING inside the computer. Static electricity kills computer parts!!!
Some people wear a special wristband to discharge static as they work on computers.
What you see that does not belong: Dust!
You may see a lot of dust inside your computer, especially if it usually sits near or on the floor. Dust causes overheating which can kill computer parts or cause random errors that are very hard to diagnose.
You can get rid of the dust bunnies yourself. But, before diving in to clean up, make sure you have the correct tools!
 Can of compressed air - with an extension straw to get into tight places
- Soft, clean paint brush
- Dust mask
Brush the large dust bunnies out with the brush. Then use the can of air to blow the rest of the dust off all parts. Do this outdoors if there is much dust at all.
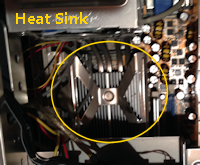 It is especially important to get the dust off of the heat sink fins for the processor chip. Those are often between the chip and a small fan so the gaps are hard to get to. Blow in between the fins.
![]() Warning: Deadly drips
Warning: Deadly drips
Hold the air can upright. Do NOT spray while it is inverted. What drips out can kill your computer!
![]() Warning: Freezing
Warning: Freezing
Air coming out of the can is VERY cold. Don't freeze your fingers or your computer parts! Short puffs are best.
Do not use water or ANY cleaning fluids inside your computer!! Not even a barely damp cloth.
Do not use a feather duster or a small 'computer' vacuum on the inside either. Those are great for keyboards and your desk. But they are can create static in your computer, which is like a lightning strike!
See Wikihow for more on cleaning the inside![]()
Access Slots
The access slots are openings in the back of the computer to allow devices to connect. The peripheral cards have a metal tongue which fits into the opening and contains the connectors. The tongue is held in place with a screw at the top.
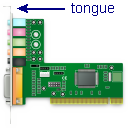
![]() Fully inserted: If the top of the tongue doesn't lie flat on top of the screw hole, the peripheral card is not all the way down in the slot.
Fully inserted: If the top of the tongue doesn't lie flat on top of the screw hole, the peripheral card is not all the way down in the slot.
Extra Bays
In the example diagram the tower has extra bays, or places to put drives and other devices.
Any drive must be connected to the power supply and to the motherboard. You can imagine how crowded it gets inside the computer case with all of these cables running around. Indeed you can run out of physical space and connections for the devices that you want. Sometimes it just won't all fit!
External devices that connect to the parallel or USB port come in handy when there is no more room inside the case. To switch between devices all you have to do is switch the connection. That's much easier than having to dig around inside the computer case to physically switch out a device!! You don't even have to shut down the computer to switch USB devices. No wonder they are so popular!
![]() Space for the future: When selecting a computer, be sure the case has an extra bay for that future device you don't know about yet
Space for the future: When selecting a computer, be sure the case has an extra bay for that future device you don't know about yet
Peripheral Cards
A peripheral is a device that connects to the motherboard and includes such things as a monitor, mouse, keyboard, modem, scanner, digital camera, and printer. Many of these devices attach to a expansion card (also called a controller card, adapter card, interface card, expansion board) which is connected to the motherboard via a expansion slot, or socket. Recall from the lesson on Processing the diagram and picture of a motherboard.
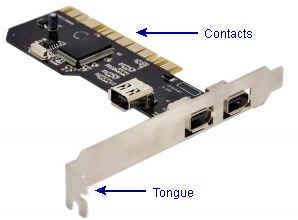
![]() Inserting and removing cards: Can be tricky at times. If a new card doesn't seem to work, be very sure that it is inserted all the way so that the contacts are down in the slot fully.
Inserting and removing cards: Can be tricky at times. If a new card doesn't seem to work, be very sure that it is inserted all the way so that the contacts are down in the slot fully.
![]() Line up the gaps: The bottom edge of a peripheral card may have a gap or two. Be careful to line these up with the corresponding spots in the socket before applying pressure to insert the card.
Line up the gaps: The bottom edge of a peripheral card may have a gap or two. Be careful to line these up with the corresponding spots in the socket before applying pressure to insert the card.
![]() Breaking things: If the motherboard flexes too much while you are pushing the card into the slot, you may break it or the card. In many cases you can place a flat book like a phone book under the computer case to block the flexing enough for you to get the card inserted.
Breaking things: If the motherboard flexes too much while you are pushing the card into the slot, you may break it or the card. In many cases you can place a flat book like a phone book under the computer case to block the flexing enough for you to get the card inserted.
![]() Extra slots: When selecting a computer, be sure that there are unused slots for peripherals. You may need to add one that you haven't thought of yet.
Extra slots: When selecting a computer, be sure that there are unused slots for peripherals. You may need to add one that you haven't thought of yet.
Hard Drive or Solid State Drive (SSD)
A hard drive or solid state drive is entirely internal. The only thing you can see on the outside is a LED light that lights up when the hard drive is in use. On the inside you can't see much more.
This kind of drive is a rectangle about the size of a medium paperback book. The drive needs to connect to power and to the motherboard.
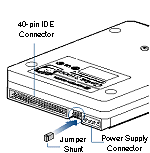
 For a hard drive,
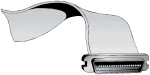
there are two connectors on the back end - one for a set of colored wires to the power supply and one for a 40-pin ribbon cable to the motherboard or to a controller card.
For a hard drive,
there are two connectors on the back end - one for a set of colored wires to the power supply and one for a 40-pin ribbon cable to the motherboard or to a controller card.
![]() Connecting error: Connecting things backwards inside a computer is sometimes possible, even though good design would shape the parts so that they'll only fit together one way. But just because it's possible, doesn't mean it's not damaging to the devices connected. So be careful. If the connector has a pin marked as "1" (you may need a strong light to see), it is important that you plug the cable in the right way!
Connecting error: Connecting things backwards inside a computer is sometimes possible, even though good design would shape the parts so that they'll only fit together one way. But just because it's possible, doesn't mean it's not damaging to the devices connected. So be careful. If the connector has a pin marked as "1" (you may need a strong light to see), it is important that you plug the cable in the right way!
There are also some pins which can be joined together with a jumper. This is a little piece that slides over two pins at the same time. Placing a jumper over pins closes the circuit, changing the path of the electricity. Different combinations of open and closed jumpers are used depending on whether you have just one hard drive or more than one. You need the manual for the hard drive to know for sure how to set the jumpers.
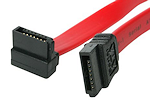 Newer drives use a SATA cable to connect to the motherboard. The cable may have an L-shaped connector on one end.
![]() Keep the manual: Keep all manuals until you get rid of that piece of hardware. If you trade or sell it, be kind and send the documents, too. It can be hard to get replacement directions.
Keep the manual: Keep all manuals until you get rid of that piece of hardware. If you trade or sell it, be kind and send the documents, too. It can be hard to get replacement directions.
Motherboard
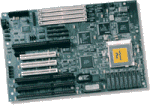
The layout of the motherboard was illustrated in the lesson on Processing.
The motherboard, or main circuit board, holds the processor (CPU), slots for memory cards, connectors for drives and power, slots for peripherals like FireWire, network, modem, and USB ports. There is a heat sink and usually a fan on top of the processor to help keep it cool.
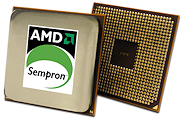
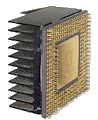
Processor - top, bottom, with heat sink
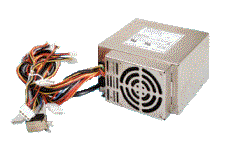 Power Supply
The power supply converts the electricity from the wall outlet into the flavor that the computer can digest. While all power supplies look pretty much alike, they are not all alike in what they put out.
![]() Correct Power: It is critical that the power supply provide exactly the right kind of power or the motherboard will be fried! Be careful when you are replacing the power supply or the motherboard that they match each other.
Correct Power: It is critical that the power supply provide exactly the right kind of power or the motherboard will be fried! Be careful when you are replacing the power supply or the motherboard that they match each other.
Notice the sets of colored wires coming out of the power supply. One or two of the wider connectors must be connected to the motherboard. Other connectors power your hard drive and CD or DVD drive. A peripheral device must get power either from a wall outlet or from the computer. In the latter case the peripheral's card would have a connection to the power supply.
DVD Drive
DVD drives come as standard equipment on new systems. CD drives are hard to find now. Tape drives are becoming obsolete. Floppy drives are no longer manufactured! Change, change, and change again in the world of computers!
![]() Know what device you're getting: Do you only need to read CDs and DVDs? Or do you need to burn new ones? Be sure you are getting the features that you need and the speed that you need, too. CD-RW and DVD-RW are discs that you can record on, erase, and record again. Some devices cannot read these, but can only read commercial discs.
Know what device you're getting: Do you only need to read CDs and DVDs? Or do you need to burn new ones? Be sure you are getting the features that you need and the speed that you need, too. CD-RW and DVD-RW are discs that you can record on, erase, and record again. Some devices cannot read these, but can only read commercial discs.
![]() Know what media you're getting: CDs and DVDs of all varieties look a lot alike on the store shelf. Read the labels very carefully. A DVD holds a lot more data than a CD. Some are double-sided. Can your DVD writer burn on both sides? Do you want rewritable discs? They cost more. A 'music' CD and a 'data' CD are the same once the packaging is off. But they use different formats when recorded.
Know what media you're getting: CDs and DVDs of all varieties look a lot alike on the store shelf. Read the labels very carefully. A DVD holds a lot more data than a CD. Some are double-sided. Can your DVD writer burn on both sides? Do you want rewritable discs? They cost more. A 'music' CD and a 'data' CD are the same once the packaging is off. But they use different formats when recorded.
|
|
| © 1997-2017 Jan Smith All Rights Reserved |
Site Map What's New |
Privacy Policy Terms of Service Copyright Acknowledgements |
~~ 1 Cor. 10:31 ...whatever you do, do it all for the glory of God. ~~
Last updated: March 24, 2017