
Jan's Working with Databases
Basics: Exercise Access 2-1
You need to use what you just learned, and maybe learn a little more. Complete all parts of the following exercises. Don't forget to backup your Class disk when you have completed the exercises or whenever you stop for the day and saved a document along the way.
Exercise Access 2-1: City Theater Employees
| What you will do: | Open an existing database Add records including an attachment Delete records Edit records Sort records Filter records View subdatasheets Print selected pages Create and print Relationships Report |
Start with: Access open
The City Theater is setting up a database of information about their employees. You will make some changes and do some printing.
- Copy the file citytheater-employees.accdb from your resource files to your Class disk in the databases project2 folder. (This is the folder where you kept the project database for Access Basics.)
- Change the file name by adding ex2-1 to the front and your own last and first names at the end, like ex2-1-citytheater-employees-Smith-Jan.accdb
- Open the database by double-clicking its name in Explorer/File Explorer and click the Enable Content button.
-
Employees table: Use the form Employees Form to add the records below to the table Employees. Fields that are not listed below are blank.
 Typing in the wrong place: If you type data into the wrong box, you can copy and paste it to the correct text box.Working with a Yes/No box: A Yes/No box can be clicked to check or uncheck it. If you are using the TAB key to move through the fields on the form, the box itself will not look selected but there will be a dotted line around the label for the box instead. When the Yes/No box is selected, press the spacebar to toggle the check mark on or off. Photos: The photos are in the resource files for this unit, databases resource files
  . Once attached, the photos are part of the database. An Attachment field can accept many image formats. Versions of Access before 2007 require using an OLE data type and a BMP image format.
EmployeeNumber 123-456-7890 987-654-3210 876-543-2109 FirstName Heidi Larry Samuel LastName Bumgardner Foster McKinney Title Mrs. Mr. Mr. EmailName heidibumgardner@citytheater.com lfoster@citytheater.com sammck@citytheater.com HomePhone 615-555-8899 615-555-7788 WorkPhone 615-555-8889 615-555-8899 615-555-8899 Extension 21 19 18 Department Production Production Design JobTitle Sound Engineer Lighting Engineer Chief Designer Supervisor? No No Yes SupervisorID Fellows Fellows LocationID Main Theater Main Theater Design Studio Photo bumgardner_heidi.jpg foster.jpg mckinney.jpg
- Click on the record selector that runs down the left side of Manuel Sanchez's record, which has EmployeeID = 5.
- Press the Delete key.
The record is deleted.
Note that the EmployeeID values do not change for later records. There is a permanent gap in the EmployeeID number sequence. That's the way AutoNumber fields work. - Switch to the table Employees in Datasheet view for the table and look at the Print Preview.
How many pages will it take to print these records in Portrait orientation?
In Landscape orientation? (Do not print.) - Switch back to the form and open Print Preview. Inspect all pages.
Some problems are apparent: The form is too wide for the paper causing the cut-off parts to print on a separate page. Some records start on one page and finish on the next. The email address for one record does not fit in the control.- Fit form to page: Make changes to the margins so that the form will fit in the width of a page.
- Keep record together on one page: In Form Design View, select the Detail section by clicking its header
bar.
In the Property Sheet for the Detail section, change the Keep Together value from No to Yes.
 Change background color: Alternate records have a printable background color. With each record printing on its own page, the background color is no longer helpful. In Form Design View, select the Detail section and change be property Alternate Back Color to Background 1 by editing the existing text or by clicking the ellipsis button and clicking on White at the top left of the palette of colors.
-
 Filter the records to show only records where the Location is "Main Theater".
 There are three records that match.
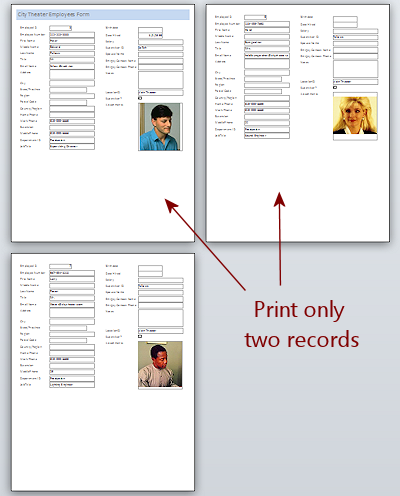
The form header shows only on the page with the first available record.
 Print pages 1 and 2 of the filtered records.
 - Toggle the filter off.
-
 Locations table: In Datasheet view of the Locations table, sort the records in
Ascending order on Location.
Locations table: In Datasheet view of the Locations table, sort the records in
Ascending order on Location.
- Print the sorted datasheet.
- Open all of the subdatasheets for this table.
(HINT: Click the upper left corner of the datasheet and then click a + button.)
Use the subdatasheet to answer the question: Which location has the most employees assigned?" On your print-out of the datasheet, circle that location.
-
-
 Relationships:
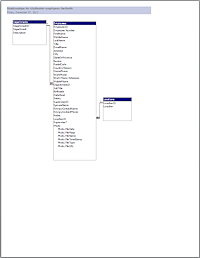
- Open the Relationships window.
- Enlarge the tables until all field names are showing.
- Create and print the Relationships Report.
|
|
| © 1997-2017 Jan Smith All Rights Reserved |
Site Map What's New |
Privacy Policy Terms of Service Copyright Acknowledgements |
~~ 1 Cor. 10:31 ...whatever you do, do it all for the glory of God. ~~
Last updated: March 23, 2017
You cannot make changes to these files and save them in the same place. Save the changed documents to your Class disk. This keeps the original resource files intact in case you need to start over or another student will be using this same computer.