
Jan's Working with Databases
Basics: Access Objects: Forms
A form offers a friendlier way to view and edit records than a datasheet. The record source of a form is where the records come from. The record source can be a single table or multiple tables by using a query or an SQL statement.
Examples below are from starwars.accdb ![]() which is downloadable and also is in your resource files, if you want to follow along with the illustrations.
which is downloadable and also is in your resource files, if you want to follow along with the illustrations.
Advantages of a Form
A well-designed form has several advantages over a datasheet.
-
Can show more fields at once. Much less scrolling!
-
Can show all of the text in a Memo/Long Text field, or at least several lines of text.
-
Can have titles, labels, and comments on the form.
-
Can format fields and their labels.
-
Images that are part of the records will display on a form but do not show in a datasheet.
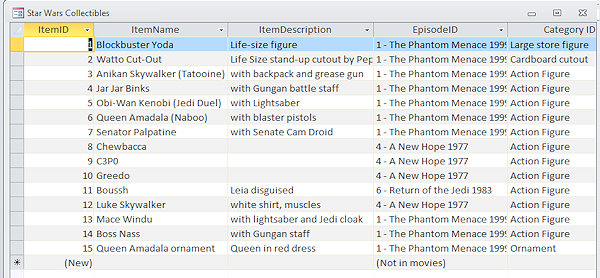
Example: Star Wars Collectibles
Simple Form from AutoForm
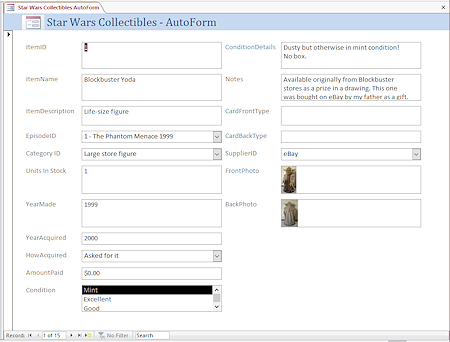
![]() On the Create ribbon tab, the Form button throws all of the fields in the currently selected table or query into a simple form. All of the controls are in columns.
On the Create ribbon tab, the Form button throws all of the fields in the currently selected table or query into a simple form. All of the controls are in columns.
There are usually design issues with this autoform. In the illustration, some fields like ItemID and Units in Stock are far too large. The FrontPhoto field is too short to show the photo well.
In this Stacked layout, resizing one control will resize others in its row or column. Is that an advantage or a disadvantage? It probably depends on the particulars of the form.
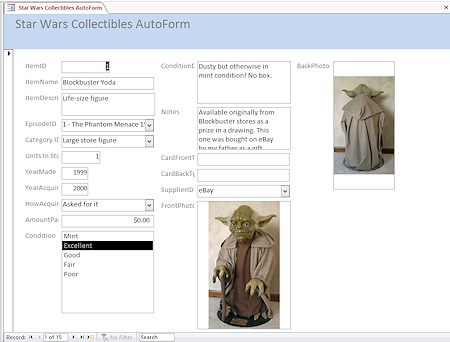 Simple Form from Form Wizard
On the Create ribbon tab, the button Form Wizard ![]() starts a dialog to create a simple form. First you select a table or query as the source and then select which fields you want to show on the form.
starts a dialog to create a simple form. First you select a table or query as the source and then select which fields you want to show on the form.
The wizard does a better job of guessing what size each control needs to be but it's not perfect.
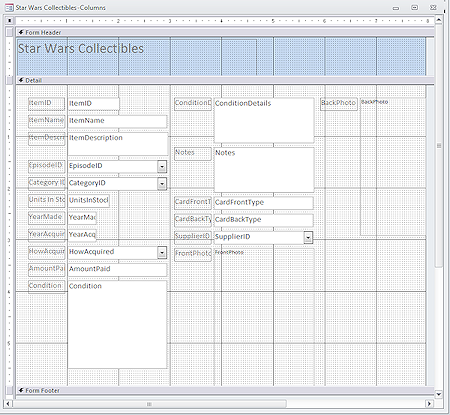
In the illustration many of the labels are too narrow to show the full field name. The space for the BackPhoto is smaller than for FrontPhoto. These choices keep the width of the form under 8 inches. That allows the form to print on letter-size paper in portrait orientation without chopping off parts.
This is better in many ways than the AutoForm, but it still needs editing.
![]() Theme used: The Form button and the Form Wizard will both apply the last theme that was used. A theme controls the look of the form, including fonts, font sizes, font color, and background colors for the form. The illustrations use the standard Office theme. The theme affects ALL objects in the database.
Theme used: The Form button and the Form Wizard will both apply the last theme that was used. A theme controls the look of the form, including fonts, font sizes, font color, and background colors for the form. The illustrations use the standard Office theme. The theme affects ALL objects in the database.
You can change the theme with the Themes button ![]() on the Design subtab for the Form Design Tools or Form Layout Tools. There are fewer themes shown in Access than in other Office programs.
on the Design subtab for the Form Design Tools or Form Layout Tools. There are fewer themes shown in Access than in other Office programs.
Views for a Form
 Form View
 Form View is what your database users will normally use to view or manage records. It is the default view when a form is opened.
What you can do in Form View:
- View records
- Navigate records
- Sort, filter, or find records
- Edit records
- Add records
- Select records
- Copy or delete records
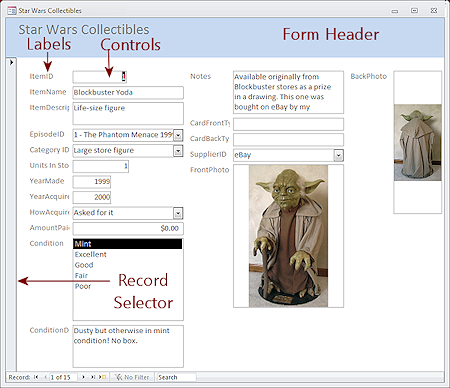
Data is displayed on a form in various controls, each of which normally has a label.
Most forms show only one record in the window at a time. A well-designed form arranges the fields so that as many as possible can be seen without having to scroll.
The form header and footer can hold a title or other information that you want to see with every record.
At the left of the controls is a bar that is the record selector. In the datasheet this bar is a small square. In a form it extends from the top to the bottom of the record. If you click on this bar, the whole record is selected.
What would you do with one or more selected records?
Copy or delete.
Why would you copy records?
- To create a new record: If most of the data is the same, it could save some effort to copy and paste a record and then make a few changes to update the info.
To paste to a different program:
If you copy the record and paste into another program like Word or Excel, the data will be displayed in set of rows and columns. The field names label the columns.Attachments and OLE Objects are not pasted even when they showed in the form.
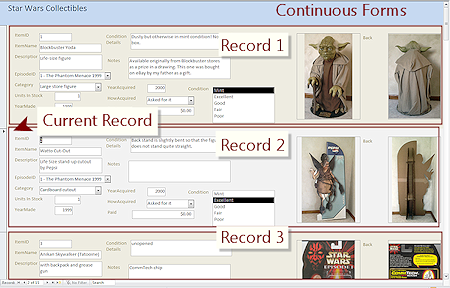
Continuous Forms
Some forms are designed to show records one after the other in a scrollable list, called continuous forms, usually with alternating background colors.
This is useful when a record does not have many fields to show or when you want to be able to scroll between records instead of using the Navigation Bar.
An arrow ![]() in the record selector shows which record is the current one.
in the record selector shows which record is the current one.
 Form Datasheet View
 This view is not available by default. The form properties must be set to allow Datasheet view. Otherwise this choice is not listed in a list of views.
Choose to allow Datasheet View when your users will need to see several records at once or may want to do a quick sort or filter.
The datasheet shows only the fields in the form. The form might not show all of the fields in the underlying tables or queries. You can edit the values for the fields that are showing.
Advantages of a Datasheet:
- You can see many records at once.
- You can select many records at once.
- You can drag the columns into the order you need.
- It is more obvious that a filter is active than in Form View.
Both Form View and Datasheet View use the same navigation buttons at the bottom.
 Form Design View
 In the
Form Design View the database designer works with the source, layout, properties of the form and of the controls, and behavior of the
form, but not the records themselves.
In the
Form Design View the database designer works with the source, layout, properties of the form and of the controls, and behavior of the
form, but not the records themselves.
What you can do in Design View:
- Choose which tables or queries to use as the source for the form
- Choose the type of control
- Choose the field to use as the control source
- Format all parts of the form
- Apply a theme
- Choose a look for controls, labels, and other objects on the form
- Arrange and size all parts
- Choose fonts, font colors, font sizes
- Choose background color or image
- Add titles or other text
- Add decorative lines and images
- Assign responses to actions like clicking on a control or closing the form.
By default, the text in the label for a control is the name of the field. You can edit or even delete the label without affecting the values that show up in the control.
Handles:
When you click or TAB to a control to select it in Design or Layout view, the control gets an orange border and handles (squares) appear at the corners and the middle of each
side.
The illustrations below show a selected label and then a selected control. The large gray handles at the top left of the object are for moving the object. The smaller orange handles are for resizing the object.
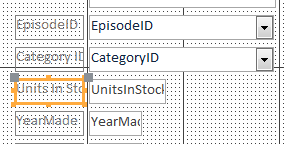
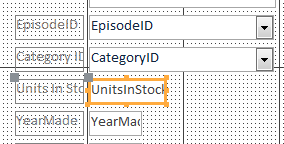
Label selected; Control selected
What are the background dots and lines?
The background of the form in Design View has a lot of' 'annoying' dots and lines.
They are there to help you get the controls and labels lined up neatly. The
labels are transparent so it can be hard to read them with the dots and gridlines showing!
 Layout View
Some people prefer to do most of their design work on forms in Layout View. The Layout View looks like the Form View, showing the field values in the controls. But you cannot edit the data or add a new record in Layout View. Instead you make changes to the layout itself - add or remove a control, move a control to a new position, or change its size.
The Form Layout Tools ribbon tabs contain nearly the same commands as the ones on the Form Design Tools tabs.
Advantage: Since the controls show actual data, you can see how your data fits in the controls. No more guessing if a control is big enough. Let your data tell you!
Disadvantage: Some properties cannot be changed in Layout View.
Form Design/Layout Tools
The commands for designing and formatting a form are on the three subtabs of the Form Design Tools and Form Layout Tools ribbon tabs. The current form must be in either Design View or Layout View to see these context tabs. The Layout version is missing only a few buttons in the Design and Arrange subtabs.
Design tab: Add controls, change the theme, show the property sheet, etc.

Arrange tab: Change the the way the controls and labels are arranged on the form including alignment, spacing, margins, and stacking order. In the Table tab group, you can apply or remove a layout that puts the labels and the controls in separate columns in a layout table. If you did not use a layout table, many of the buttons are grayed out because they do not apply. The Form button creates an autoform with the Stacked layout.

Format tab: Change the font, font size, number style, background color, etc. for the selected control or the form as a whole. Many of these buttons are also on the Home ribbon tab.

Properties
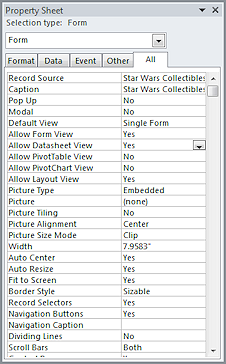 The
form and each of its parts has its own properties,
which you can see in the Properties pane. This pane is docked at the right by default, but you can drag it to float freely or dock it on the left, if you wish.
The
form and each of its parts has its own properties,
which you can see in the Properties pane. This pane is docked at the right by default, but you can drag it to float freely or dock it on the left, if you wish.
For most objects there are several tabs in this dialog: Format, Data, Event, Other, and All. The All tab lists all properties that can apply to the selected object. You will work with properties later. When your form or report does not behave as you expected, check the properties of the whole form or report first and then start checking properties of the parts.
|
|
| © 1997-2017 Jan Smith All Rights Reserved |
Site Map What's New |
Privacy Policy Terms of Service Copyright Acknowledgements |
~~ 1 Cor. 10:31 ...whatever you do, do it all for the glory of God. ~~
Last updated: March 22, 2017