
Jan's Working with Databases
Basics: Access Objects: Query Wizard
A query is a way to view, analyze, or organize your records. You can also make some kinds of changes using a query, like deleting or updating a group of records.
The magic behind a query is the programming language SQL (Structured Query
Language).
Happily, Access provides a wizard for creating simple queries and a visual Query Design View
when your query is more complex. You won't have to write
the SQL code yourself. At least, not for these lessons!
Examples
below are from starwars.accdb ![]() , if you'd like to follow along.
, if you'd like to follow along.
Query Wizard
The Access query wizard makes it very easy to create simple queries. It walks you through most of the choices that you need to make. Afterwards, you can use the Query Design View to add sorting and criteria.
-
Step 1:What type of query?
Simple, Crosstab, Find Duplicates, or Find Unmatching - Step 2:Which table or query and which fields to include?
-
Step 3: Show all the fields that you chose or do a summary?
- Step 4: Name the new query. (Use a name that is clearly for a query.)
- Step 5: Display the results or the Query Design View to make changes.
![]() Click to
see the wizard steps:
Click to
see the wizard steps:
Step 1 > Step 2 > Step 3 > Step 4 > Design View
Views
 Query Design View
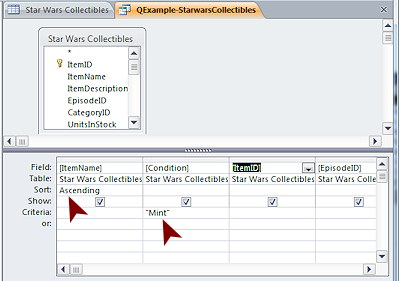
Create or edit your query in Design view. You choose which fields from which tables or other queries to include. You choose how to sort and what criteria to use.
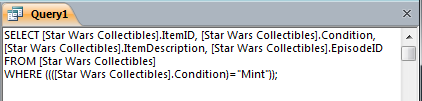
The query in the illustration is designed to show in the results only the fields that are in the grid at the bottom. The records that show will be only those where the value of the Condition field is "Mint". The results will be sorted on the ItemName field in Ascending order.
![]() Columns out of sight: The scroll bar at the bottom of the grid shows that there are many columns to
the right in the grid. Some are used in this example query, but there are blank columns at the far right! You have to scroll over and look to find out if those out-of-sight columns are blank or not.
Columns out of sight: The scroll bar at the bottom of the grid shows that there are many columns to
the right in the grid. Some are used in this example query, but there are blank columns at the far right! You have to scroll over and look to find out if those out-of-sight columns are blank or not.
 Query Datasheet View
After you run the query or switch to Datasheet View, the results are shown in a datasheet.
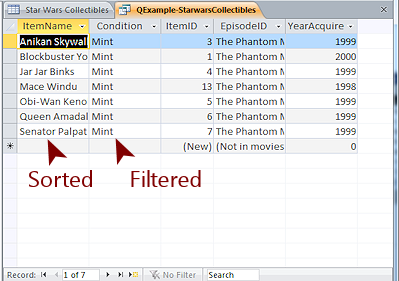
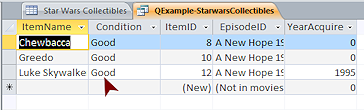
The illustration shows the result of the query above. The results looks a lot like a Table Datasheet View, but the original table had 14 records and more fields, too. This query datasheet shows only the 7 records that match the query criteria, sorted on ItemName. There are fewer fields and the fields are in a different order from the table.
![]() Is it a table datasheet or a query
datasheet?
Is it a table datasheet or a query
datasheet?
The title tab for the object shows the name of the object plus an icon for the object type:
![]()
Icons: ![]() =Table;
=Table; ![]() = Select Query
= Select Query
There are other types of queries which have their own icons.
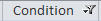
![]() Is it filtered?
Is it filtered?
Remember the clues that a filter is in place:
- Datasheet Navigation Bar says so: Filtered


- Status Bar says so: Filtered


- Toggle Filter button on the ribbon is highlighted.


- Column heading shows Filter icon

Query vs. Filter
You learned a bit about filters in the previous lesson. A filter selects records from a table based on criteria. So can a query. An advanced filter can sort based on several fields. So can a query. The Advanced Filter/Sort design grid looks a lot like a query design grid. The only obvious difference is the row in the query grid for Table.
This brings up a question...
What can a query do that a filter cannot?
A query can...
-
Use fields from more than one table or other queries.
- Show only some of the fields from the tables and queries used in the query.
- Change the order of display for the fields.
- Create new fields by concatenating text or by calculating using existing number fields.
- Accept input as criteria in a parameter query.
- Summarize and total data.
- Update records with new data.
- Append new records to a table.
- Delete records based on criteria.
- Make a new table of just the records and fields that you want.
- Be the source of data for a form or report.
Types of Queries
There are several types of queries in Access. Except for the
action queries, you can view the query results directly in the datasheet or use the
query as the source for a form or a report.
|
|
Most often used type of query. Selects certain fields and certain records from a table or from a set of related tables or other queries and shows them in a datasheet. Can sort on several fields. Can filter using simple or complex criteria. |
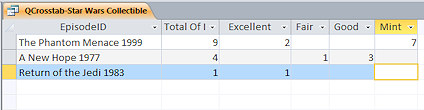
| Calculates totals of various sorts based of
two types of information, one across the top of the results datasheet
and one down the left side. Example: Show total count of UnitsinStock, by Condition (across the top) for each EpisodeID (down the left). |
|
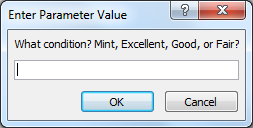
| Parameter query | Any query that asks for input for the criteria. Example: You are asked to type in a value to select records that match that value. Parameter dialog appears Query results datasheet shows only |
| SQL query | Query is written in SQL.
Simple example: Select several fields from the table Star Wars Collectibles but shows records only for those that are in "Mint" condition. SQL view shows the fields to include and the criteria in words; results in the query's datasheet Some advanced queries cannot be designed in the query grid but must be written in SQL. |
| Action queries: | |
|
|
Most dangerous of all queries! Deletes a group of records based on criteria. |
|
|
Selects certain fields and records and adds those records to a table. |
|
|
Second most dangerous query! Changes values in a group of records. |
|
|
Creates a new table from the results of the query. |

| |
Step-by-Step: Create a Query |
|
| What you will learn: | to create a simple query with the Query Wizard to navigate query results to edit a query in Query Design View to filter query results in Datasheet View to close a query to run an existing query |
Start with:![]() ,
,![]() , mytrips-Lastname-Firstname.accdb from previous lesson
, mytrips-Lastname-Firstname.accdb from previous lesson
Simple Query Wizard
The Simple Query Wizard walks you through the choices you need to make to create a simple query. You will create a query that will show just the trip names, the photo links, and the starting dates.
- If
necessary, open mytrips-Lastname-Firstname.accdb .
 Back up this database now so you will have a good copy to use if you need to start over. This works well while the database is small.
 Access 2007:
  > Manage > Back Up Database
 Access 2010: File > Save and Publish > Back Up Database > Save As button
 Access 2013, 2016: File > Save As > Back Up Database > Save As button
-
In the ribbon, click on the Create tab.
There are two buttons about queries: Query Wizard and Query Design.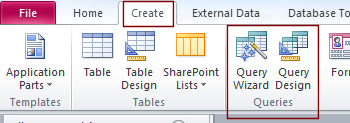
- Click the button Query Wizard.
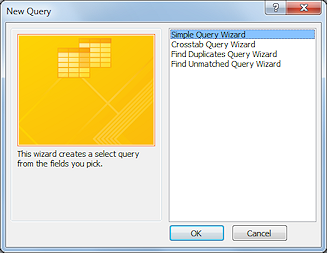 The
New Query dialog opens.
The
New Query dialog opens.
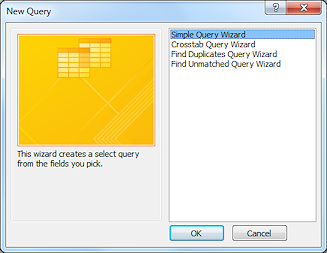
Your first job is to pick which wizard to run out of four choices:- Simple Query
- Crosstab Query
- Find Duplicates Query
- Find Unmatched Query
-
Click on Simple Query Wizard and then click on the OK button.
The Simple Query Wizard launches.In the first page of the dialog you must two decisions:
- Which table(s) and/or queries to use
- Which fields from those tables/queries to include
-
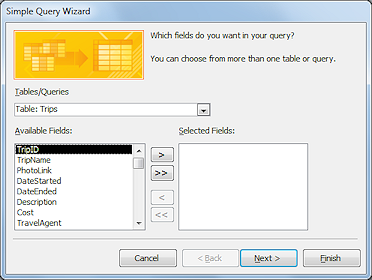 Select the table Trips.
The drop list of tables and queries only has one entry, the table Trips. So that part was easy!
The Available Fields list below the Tables/Queries list shows all of the fields in the selected table.
Now you must choose which fields you want to see in your query.
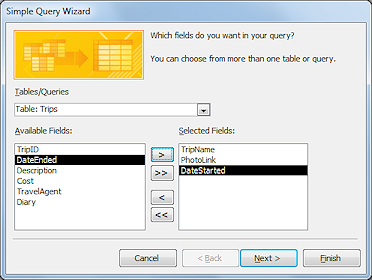 Click on TripName and then click on the > button in the
middle. The field TripName appears in the list of
Selected Fields and disappears from the list of Available Fields.
Click on TripName and then click on the > button in the
middle. The field TripName appears in the list of
Selected Fields and disappears from the list of Available Fields.
- Repeat for the fields PhotoLink and Date Started.
- Click on the Next button.
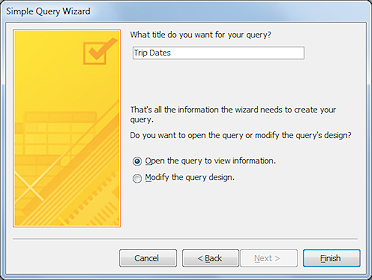 Type Trip Dates in the box for the title of your query.
- If necessary, select "Open the query to view
information" by clicking its radio button (the small circle).
- Click on the Finish button.
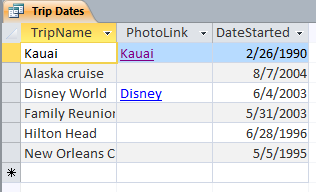 The
datasheet for the query opens, showing only the fields that you selected. The wizard did not have a way to sort or filter. For that you will have to go to the Query Design View, the grid.
The
datasheet for the query opens, showing only the fields that you selected. The wizard did not have a way to sort or filter. For that you will have to go to the Query Design View, the grid.
Query Datasheet: Navigate
This datasheet works the same way the Table Datasheet did.
- For review, practice with the Navigation buttons and with the shortcut keys that move you around in the datasheet.
Methods to Navigate a Datasheet:
-
Type the row number of the record you want in the navigation box.
Remember - the row number may not be the same as the TripID number if the datasheet is sorted or filtered or has had records deleted. -
Click a navigation arrow.
-
Scroll to see the record that you want.
-
 Using keystrokes:
| TAB or ENTER | Next field to the right. If in the last field in a record, moves to the first field in the next record. |
| SHIFT + TAB | Backs up one field to the left |
| HOME | First field in current record |
| END | Last field in current record |
| CTRL + HOME | First field in the first record |
| CTRL + END | Last field in the last record |
| Arrow keys | One field to the left/right One record up/down in the same column. |
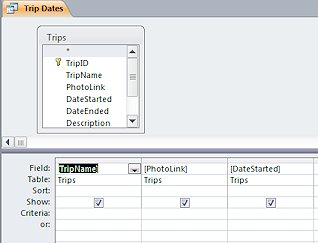
Query Design View: Edit
The Query Wizard is only the start of what you can do with a query. Did you notice that the wizard did not ask you about how to sort or if you wanted to use criteria to filter the records? You can do that in Query Design View. You can also change the order of the fields.
 With
the query's datasheet open, switch to the
Home ribbon tab.
With
the query's datasheet open, switch to the
Home ribbon tab.- Click on the Views button, which currently shows the Design View icon .
 The Design View shows the table Trips at the top and the three fields that
you choose for this query in the grid at the bottom. Nothing has been sorted or filtered yet. Those rows are blank.
The Design View shows the table Trips at the top and the three fields that
you choose for this query in the grid at the bottom. Nothing has been sorted or filtered yet. Those rows are blank.
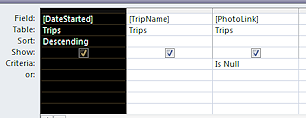
- Sort:
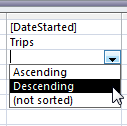 Click in the third row under DateStarted.
An arrow appears at the right. - Click on the down arrow and select Descending.
-
 Filter:
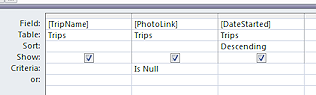
In the first Criteria row under PhotoLink, type Is Null.
-
 Order of fields:
Move your mouse pointer over the top edge of the column DateStarted. The pointer changes to the Select Column shape.
-
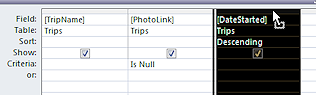 Click to select the whole column.
 - Move the mouse pointer over the top of the column and hold down the left mouse button.
The pointer shape changes to the Drag shape .
.
-
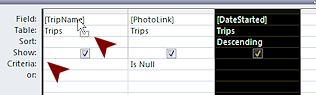 Drag to the left and drop to the left of the TripName column.
A black vertical bar shows where the column will drop.
 The DateStarted field is now the first column at
the left. This change does not change the order of the fields in the original table
itself but does change how they show in the query datasheet.
The DateStarted field is now the first column at
the left. This change does not change the order of the fields in the original table
itself but does change how they show in the query datasheet.
-
Run Query:
 Click on
  the Run button on
the ribbon to run the query.
the Run button on
the ribbon to run the query.
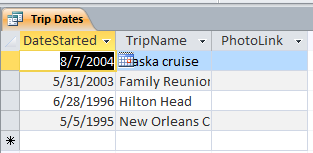
 The datasheet shows the records that match the criteria- PhotoLink value is null. They are sorted, with the most recent
trip first (descending order).
The datasheet shows the records that match the criteria- PhotoLink value is null. They are sorted, with the most recent
trip first (descending order). Why would you want a query like this, which finds records with blank fields? It is actually very useful to get a quick list of what is missing.
 Update records from query datasheet: If you fill in missing data or make corrections in a query datasheet, the underlying table is updated automatically.
Query Datasheet View: Apply a Filter
Any datasheet can be filtered, including a query datasheet. Yes, you already used criteria in the query design. You can still apply an additional filter.
 Open the Filter By Form:
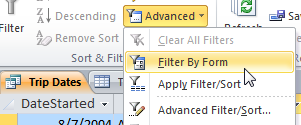
Click on the button Advanced in Home ribbon tab in the Sort & Filter tab group to open its list and then on Filter By Form.
The single row form appears.
-
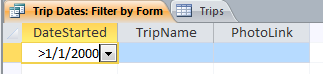 Click in the DateStarted cell.
This is where you put the value you want the filtered records to match.
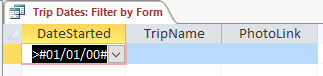
- Type >1/1/2000
This criterion asks that the date be later than January 1, 2000.
-
Press the TAB key to move to the next cell.
Access automatically corrects your date's format to proper syntax, putting a hash mark # before and after the date. Remember that the automatic formatting is different in different versions.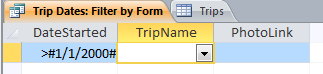
-
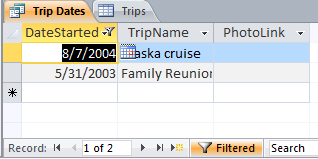 Click on
  the
Toggle Filter button.
the
Toggle Filter button.
The filter is applied to the records that the query found.
Note that the Navigation Bar and the column Date Started show that this datasheet is filtered.
Why didn't we include the filter's criteria in the original query?? To be honest... so you could create a filter, of course!
In the real world, a filter is often used when you want to pick out certain records temporarily, but you do not expect to need to use those exact criteria regularly.
Close Query
Your filter will be saved with the query, but it will not be applied automatically when you run the query again. Until you create a new filter for this query, you can apply the saved filter by clicking the Toggle Filter button.
-
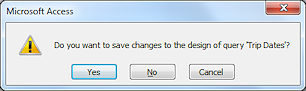 Close the query window by clicking its Close button
  .
.
A message box appears.
- Click on Yes to save your changes to the query.
Run an Existing Query
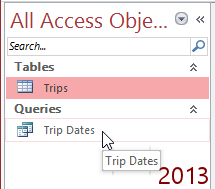
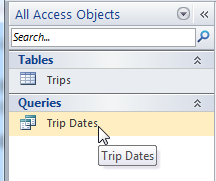 If necessary, click on Queries in the Objects list to expand the list.
Only one query so far!
- Double-click on the query Trip Dates to run it.
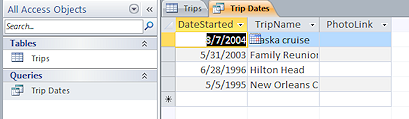 The
query runs and displays the
datasheet of results. The filter was NOT applied automatically. That's a good thing!
The
query runs and displays the
datasheet of results. The filter was NOT applied automatically. That's a good thing!The Toggle Filter button is available (not grayed out) because your last filter was saved with the query.
- Close the query by clicking its Close button.
|
|
| © 1997-2017 Jan Smith All Rights Reserved |
Site Map What's New |
Privacy Policy Terms of Service Copyright Acknowledgements |
~~ 1 Cor. 10:31 ...whatever you do, do it all for the glory of God. ~~
Last updated: March 22, 2017