
Jan's Working with Databases
Basics: Relationships: Table Relationships
You finally have two tables that have a relationship. The relationship was created in a previous lesson with the Lookup Wizard (2007) or the Contacts Application Part (2010, 2013, 2016).
Access will recognize matching fields between tables in some cases. In other situations you will have to show Access what fields to match and what kind of relationship it is: One-to-Many, Many-to-Many, or One-to-One.
Examples below are from starwars.accdb ![]() .
.
Relationships Window
Access provides a special window for viewing relationships. No tables are shown automatically. You must pick which ones you want to see.
Open the Relationships window: Database Tools > Relationships button
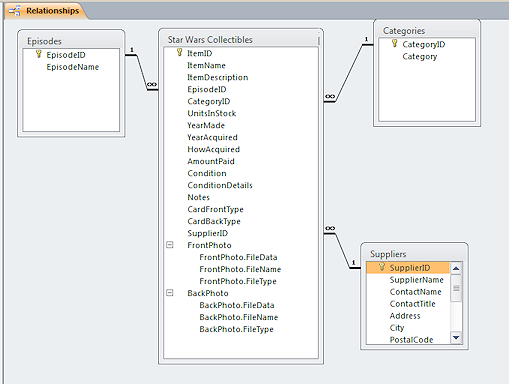
Join lines connect the matching fields between tables. A line with a
1 at one end and the infinity symbol ![]() at the
other indicates a One-to-Many relationship for which Access will enforce referential integrity. That means you cannot use a value on the Many side that was not already in the table for the One side.
This is a big help in keeping your data accurate.
at the
other indicates a One-to-Many relationship for which Access will enforce referential integrity. That means you cannot use a value on the Many side that was not already in the table for the One side.
This is a big help in keeping your data accurate.
On the other side, Access will not let you delete records on the One side that are related to records on the Many side. If you really need to do that, you first have to remove the related records. It would be an unusual situation.
![]() Removing records: Move records to a special storage table instead of deleting them if there is any chance at all that you might need that record later. Only delete records that were faulty to begin with.
Removing records: Move records to a special storage table instead of deleting them if there is any chance at all that you might need that record later. Only delete records that were faulty to begin with.
Example: In the Star Wars Collectibles database, you want to delete a particular supplier from the table Suppliers. But, Suppliers is on the One side of a One-to-Many relationship with the table Star Wars Collectibles. If that supplier's SupplierID appears in a record in Star Wars Collectibles table, Access will not let you delete a supplier. You must remove the conflict. There are two choices: change the supplier in the records or remove all of the records that used that supplier. Only then you can delete the supplier. Be careful and thoughtful before making changes like this to records. Tossing data out can often cause trouble later on when you find that you needed that data after all.
Ribbon: Relationship Tools: Design
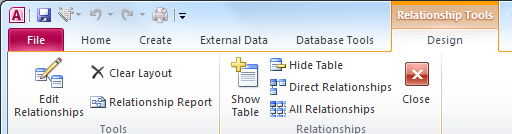 The Relationship window has its own ribbon tab.
Edit Relationships opens a dialog about the selected relationship. So you should click on a join line before clicking this button.
Clear Layout removes all of the tables from the window, but no relationships are actually deleted.
Relationship Report creates a printable version of the layout in the Relationship window. If a table has a scroll bar, then the fields out of sight will not print. Resize the display of the table first, then create the report.
Show Table opens a dialog that lists all of your tables and queries. You can show any or all of them in the Relationships window.
Hide Table removes the current table only from the layout and does not change any relationships.
Direct Relationships shows the relationships to a selected table. A table that you hid in the Navigation Pane will not show here either.
All Relationships shows all tables and all relationships, except those tables that you hid in the Navigation Pane.
| |
Step-by-Step: Table Relationships |
|
| What you will learn: | to view a relationship between two tables to delete a relationship to create a relationship between two tables to print relationship report to edit a subdatasheet to see referential integrity in action |
Start with: mytrips-Lastname-Firstname.accdb from previous lesson
View Relationships
There is a special window for viewing Relationships. Let's look at the relationship you created in a previous lesson.
-
 On the Database Tools ribbon tab, click onthe button Relationships .
The Relationships window opens. It may be blank or it may show existing relationships created by the Lookup Wizard or an Application Part.
If the window is blank, you can tell Access which tables to display in the Relationships window.For practice, let's look at how to create a relationship.
-
If the window is not empty, click on the Trips table in the Relationships window and press the Delete key.
That table vanishes along with its join line. Changing Relationships window: When you delete a table in the Relationships window, you have changed only what is shown in
the window. No properties are changed; no relationships are broken.
Changing Relationships window: When you delete a table in the Relationships window, you have changed only what is shown in
the window. No properties are changed; no relationships are broken. 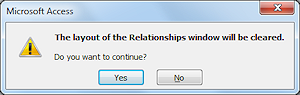 Click the button Clear Layout
  on the ribbon tab.
A message appears, warning you that the layout will be cleared.- Click on Yes.
The remaining table vanishes.
You could have used this the first time to get a blank window, but what's the fun of using just one method?
- Click on
 the Show Table button on the Relationships ribbon tab.
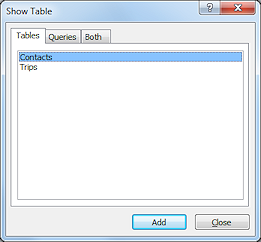 A dialog appears from which you can choose
tables and queries to put in the Relationships window.
A dialog appears from which you can choose
tables and queries to put in the Relationships window.
-
 Select the table Contacts and click the Add button.
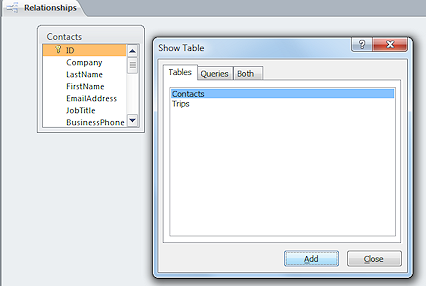
The Relationship window now shows a list of all the fields in the Contacts table.The default size of the list is too short to show all fields, so a scroll bar appears.
If necessary, drag the Show Table dialog to a position where you can see the list in the Relationships window.
 Select the table Trips in the Show Tables dialog and click the Add button.
The dialog probably blocks your view of the new table.
-
Close the Show Table dialog by clicking the Close button.
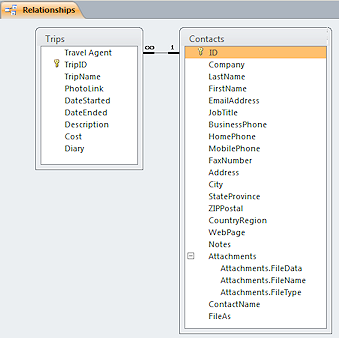
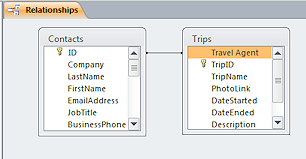
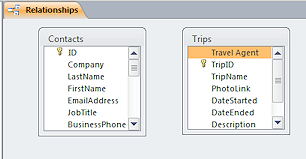
A line that connects the two tables because they already have a relationship - the Lookup field.The fields in the Trips table are in a different order in Access 2007.
- Drag the bottom edge of the each table
down until you can see all of the fields.
The field ID from Contacts is connected to the field Travel Agent in Trips by a line. This is the relationship that the Lookup Wizard (2007) or Application Part (2010, 2013, 2016) created.Matching Data Type: Fields
must have the same data type to be used to create a relationship between
tables. Usually primary key fields are used to create the relationship.
Names for Joined Fields: The names are often the same but it is not required that they be identical. In this lesson you are joining ID and Travel Agent. It is more common to use identical names.
 Close the Relationships window by clicking on
  the Close button on the Relationship Tools: Design ribbon tab.
A message box appears asking if you want to save the changes to the layout.
- Click Yes.
Access will now remember which tables were showing and their sizes and arrangement in the window for the next time you view Relationships.
Delete a Relationship
Why would you want to delete a relationship? If you need to make changes to the table design, Access may not let you while there is a relationship to another table. Of course, you need to be careful that the relationship will still work after you make your changes!
You will delete the relationship for practice and so you can recreate it manually.
-
 Open the Relationships window again.
 - Click on the line connecting the two
tables.
(It may take you some practice to succeed in clicking on the line itself.)
The line gets thicker.
-
 Press the Delete key.
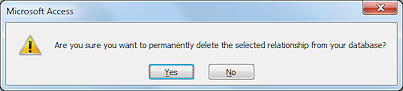
A message box appears asking if you are sure.
-
 Click Yes.
The line vanishes but the tables are still displayed.
Create a Relationship Manually
To create a relationship manually is a simple drag and drop action. You will create a new join between the two tables, but it will not be quite like the earlier one.
So far you have only used a relationship as part of a Lookup field. But, the join type affects any queries that use both tables.
![]() Missing Results: If a query leaves out records that you expected or includes extra records that you did not want, the cause may be the join type. Happily, you can make a temporary adjustment in the Query Design View, instead having to change the join in the Relationships window.
Missing Results: If a query leaves out records that you expected or includes extra records that you did not want, the cause may be the join type. Happily, you can make a temporary adjustment in the Query Design View, instead having to change the join in the Relationships window.
-
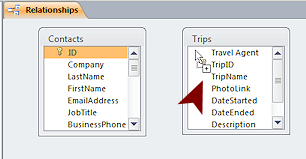 Drag the field ID from the Contacts table and drop it on the Travel Agent field in the Trips table.
(Be careful to drop on the correct field!)The Edit Relationships dialog appears, showing the table names and the field names for the relationship.
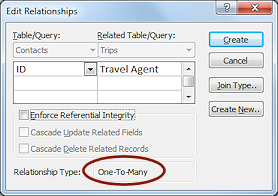
Verify the table names, field names, and relationship type (at the bottom of the dialog): Relationship Type: One-to-Many.
Access figured out the type of relationship automatically. In the dialog, the table on the left (Contacts) is the One side; the table on the right
(Trips) is the Many side. One travel agent in Contacts can have many trips. So the same ID could show up in many records in the Trips table. Problem: Your dialog does not match the illustration.
You have dragged the wrong field or dropped onto the wrong field. You might see a Relationship type like One-to-One or Indeterminate.
Solution: Click on Cancel and try again.
-
 Click the button Join Type...
The Join Properties dialog appears.There are three choices, which determine how records will be matched up in a query. You have not yet worked with a query that used two or more tables.
- Choice 1: (Default) A query will show only travel agents that have trips and trips that have travel agents. There must be a match in the other table or that record won't show! So agents whom you entered but have not used for a trip yet won't show. Trips that did not have a travel agent won't show!
- Choice 2: A query will show all of the agents and match them with the trips that share their ID number. It will show agents that do not have any trips. It will not show trips that do not have an assigned agent.
- Choice 3: A query will show all of the trips and match them
with the agents. It will show trips that do not have an assigned agent. It
will not show agents who don't have any trips yet.
Query Design and Relationships: In the Design View for a query, you can add, delete, or modify relationships but those changes affect only the query results. When a query seems to be leaving out some of the expected results, look at the relationships. Maybe you need to modify the join type. - Leave the dialog with the default choice, #1 = Include rows where the joined fields from both tables are equal."
A query will not include records where a trip does not have an assigned agent or an agent who does not have an assigned trip. You can adjust the join in a query window instead of in the Relationship window to change that for the query. - Click on OK to close the Join Properties dialog.
You are back in the Edit Relationship dialog.
-
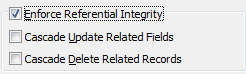 Click in the box Enforce Referential
Integrity.
Click in the box Enforce Referential
Integrity.
This choice tells Access not to allow changes that would break the connection between these tables.
Leave the other boxes unchecked this time. Cascading updates and deletions must be carefully done or you can mangle a database.
 Click on the button Create.
You are back in the Relationships window.
The line between the tables reappears, but this time it has symbols on each end that tell you it is a One-to-Many join and that referential integrity will be enforced
-
Click on
 the Save button on the Quick Access Toolbar to save this layout.
Access will remember which tables are showing, the sizes of the tables, and their placement in the window.
Print Relationship Report
There is no print button in the ribbon tab for Relationship Tools: Design but there is a special button to create a printable report of the Relationships layout. What you see on screen is close to what you get in the report. If some fields are out of sight in the table's field list, they won't print either. You should arrange the layout before creating the report.
 Drag the bottom edge of each table down until all fields are showing.
The scroll bar will vanish.- Drag the side of the table list wider to show the whole field name.
-
On the ribbon tab Relationship Tools: Design, click the button Relationship Report
 .
.
Access creates a report and shows it in Print Preview.The report shows the tables and joins that are in the Relationships window. It seems to pick up one or two fields that are not showing on the screen but it does NOT automatically show all fields.
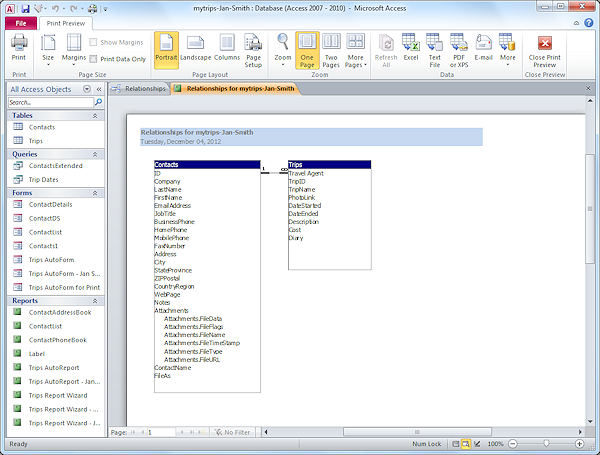
The report includes the database name, which includes your name. The dark blue section holds the table name.
 Click the Print button on the Print Preview ribbon tab and print the report.
- Right click on the title tab and choose Close.
- Choose No when asked if you want to save the report.
- Close the Relationships window, too.
Edit Subdatasheet
As you saw in a previous lesson, a table that is in a One-to-Many or One-to-One relationship can show a subdatasheet of the related records from the other table. You can actually edit the records in the subdatasheet.
-
Open the Contacts table.
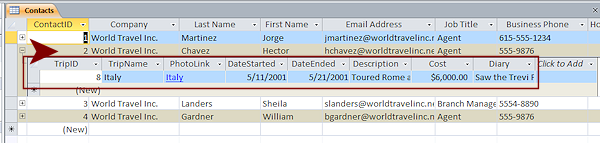
- Click the expand button
 at the left
end of the record for Hector Chavez.
at the left
end of the record for Hector Chavez.
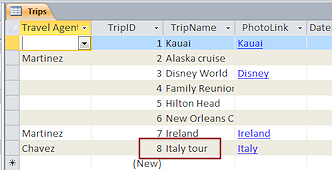
A subdatasheet opens to show the trips for which Chavez was the travel agent.
-
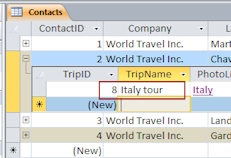 In
the subdatasheet for Hector Chavez, change the TripName to Italy tour and press the down arrow on the keyboard to move to the next record. Your change is
saved automatically.
In
the subdatasheet for Hector Chavez, change the TripName to Italy tour and press the down arrow on the keyboard to move to the next record. Your change is
saved automatically.
- Collapse the subdatasheet by clicking the
 collapse button at
the left of the record.
collapse button at
the left of the record. - Close the table Contacts.

 Open the table Trips in Datasheet View.
Did your edit stick? It certainly should have.- Close the Trips table.
 How
to see or hide all subdatasheets at once:
How
to see or hide all subdatasheets at once:
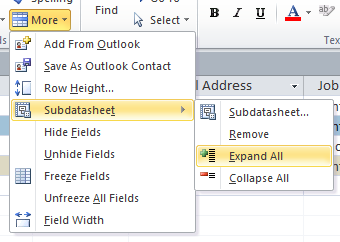
Method 1: Button menu
On the Home ribbon tab, click the More button and then hover over Subdatasheet to expand the menu. Choices are Subdatasheet..., Remove, Expand All, and Collapse All. Most items will not be available if the focus is in a subdatasheet.Method 2: Select whole datasheet first
Select all records by dragging or click the Select Table button at the top left of the datasheet. Click an Expand button
  or a Collapse button
  and the action you chose is applied to all subdatasheets at once.
Test Referential Integrity
Let's see what Access will do now that it must enforce referential integrity
on your new join.
[Be SURE the join between your two tables is still there and still has the box checked for Enforce Referential Integrity!]
- Open the Contacts table in Datasheet View.
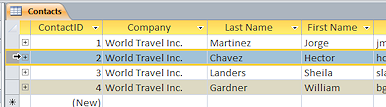
- Select the record for Hector Chavez by clicking the record selector at
the left end of the record.
-
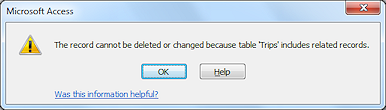 Press the Delete key to delete the record.
A message appears. Access will not let you delete the record because it is related to records in the Trips table.
Changing a related record: You can change anything about a record that is related to records in another
table, like Hector Chavez, except the field that is shared. In
this exercise the shared field was an AutoNumber field, which you cannot
change anyway!Deleting an unrelated record
from a related table: Access will allow you to delete a record in a table
that has a relationship as long as that particular record is not referred to
by another table. For example, Sheila Landers could be deleted from Contacts because no trips show her as the travel agent.
- Click on OK.
- Close the database mytrips-Lastname-Firstname.accdb and close Access.
|
|
| © 1997-2017 Jan Smith All Rights Reserved |
Site Map What's New |
Privacy Policy Terms of Service Copyright Acknowledgements |
~~ 1 Cor. 10:31 ...whatever you do, do it all for the glory of God. ~~
Last updated: March 22, 2017