
Jan's Working with Databases
Basics: Relationships: Application Part
(2010, 2013, 2016)
Before you can create relationships between tables, you need to have another table! You already created a table manually so this time you will use a template, which Access 2010, 2013, and 2016 call Application Parts.
 Application Parts are table templates but some of them actually create matching forms and reports, too. This can be a great help or a waste of time, depending on what you really need. Versions of Access before 2007 had a table wizard with more sample tables.
Rarely will the template be exactly what you want! It can still be helpful. You can always make changes in Design View afterwards.
Where's that Template?
Exactly where Office stores things depends on the version and possibly on your version of Windows. It can be confusing. Two places to look are where Office is installed and where user data is stored.
Access 2010 stores the templates and application parts in the AppData folder.
Access 2013 and 2016 store the application parts with the installed program.
![]() Access 2010: C:\Users\<username>\AppData\Roaming\Microsoft\Templates\Access
Access 2010: C:\Users\<username>\AppData\Roaming\Microsoft\Templates\Access
C:\Program Files\Microsoft Office\Templates\1033\Access\
![]()
![]() Access 2013, 2016: C:\Program Files\Microsoft Office 15\root\Templates\1033\Access\Part
Access 2013, 2016: C:\Program Files\Microsoft Office 15\root\Templates\1033\Access\Part
C:\Users\<username>\AppData\Roaming\Microsoft\Templates
The folder number 1033 in the examples above is for English. Other languages have different numbers.
Unfortunately, the AppData folder is hidden by default. To see it, you must change your Folder Options to show hidden folders.
Folders Options dialog > View tab > Hidden files and folders section > Show hidden files, folder, and drives
Windows 8 and 10 both have a check box on the View ribbon tab in File Explorer, Hidden items. Check it to show; uncheck to hide.
Changing Existing Fields
It is easy and usually painless to add or delete records from a table. But, changing the design of a table that already has records can be more of a problem. It depends on what kinds of changes you make. Let's look at some of the complications.
Changing Field Size
- Increasing Field Size can create a problem for large databases. Each record will need more storage space, even if the field is blank. That can enlarge the whole database more than you expect.
- Reducing Field Size can save storage space but can cause loss of data if you are not careful.
Example 1: Reduce field size safely
In the Star Wars Collectibles table, the field size for the field Condition allows up to 50 characters. The values in
this field come from a Lookup list: Mint, Excellent, Good,
Fair, Poor. The longest value you can chose is the word "Excellent,
which has 9 characters. You could safely change the length of the Condition field to 9. You would not lose any data. If you decided later
to add other values to the list, you might need to increase the field's size.
Example 2: Reduce field size and lose data
The field HowAcquired also allows up to 50
characters. The longest entry for this field that is actually used in the
records is "Bought retail", which has 13
characters. (You must count spaces also.) If you reduce the field size to
9, some entries will lose those last 4 characters. That's a "whoops!" You
really want to avoid throwing away your data!
Example 3:
Available but not used
You must look carefully at what the choices are, not just what you see in the records. For the field HowAcquired, one of the choices is "Bought at auction", which
has 17 characters. No record is using this value yet. Looking at the
records, you would not know that you need at least 17 characters. You
cannot reduce the field size to the 13 needed for the existing data after
all.
Example 4: Predicting the future
The field ItemName allows 50 characters but does
not have a list to choose from. How many characters do you really need??
The longest entry now has 27 characters. But what about the future? You must be a prophet to know how long future entries might be!
Better to leave this kind of field with lots of space.
Changing a Field's Type
Sometimes changing a field's type is no problem. Sometimes it is disastrous. The data for that field may be cut short or even completely lost. Some changes are just not allowed at all. Designing your tables right the first time works better!
Things to consider about changing Field Type:
- Number Type: Calculations can be done only with a Number type.
- Memo/Long Text to Text/Short Text: Will keep only enough characters to fit in the Field Size. Extra characters are lost.
- Text/Short Text to Number, Currency, Date/Time, or Yes/No: Inappropriate values are lost. Be sure that all values in the field make sense in the new type.
- Currency to Text/Short Text: Currency symbols like €, £, and $ are lost.
- Currency or AutoNumber to Number: Inappropriate values are lost. Check the Number field size first!
![]() Problem: Not allowed to
change a field's data type
Problem: Not allowed to
change a field's data type
Cause: The field is part of a relationship with another table.
Solution: Delete the relationship first in the Relationships window [Database Tools ribbon tab > Relationships], make your changes, then
recreate the relationship. But be careful that the new data type can be related to the field in the other table.
| |
Step-by-Step: Use Application Parts |
|
| What you will learn: | to create a table using Application Parts to view Caption property to add records with a form to attach a photo to create and use a Lookup field to delete a field to correct errors in forms and reports created by deleting a field to view subdatasheet in related table |
Start with: mytrips-Lastname-Firstname.accdb from a previous lesson


 Access 2010, 2013, 2016: Create a Table with Application Parts
The Trips table has a Memo/Long Text field TravelAgent for information about the travel agent. You must enter this data for every trip, even if you used that travel agent previously. It would be better to have that information in its own table instead. If you use the same travel agent again, all the information will be there, waiting for you. If you need to update an email address or phone number, you can change it in one place instead of having to find all of the trip records that show that agent and edit each one.
Access has a template that will create a table with fields for standard contact information, like a mailing address, phone numbers, email address, as well as the parts of the agent's name. This template is different from the one in Access 2007 in that it creates more than just a table.
 Back up this database now so you will have a good copy to use if you need to start over. This works well while the database is small.
Access 2010: File > Save and Publish > Back Up Database > Save As button
Access 2013, 2016: File > Save As > Back Up Database > Save As button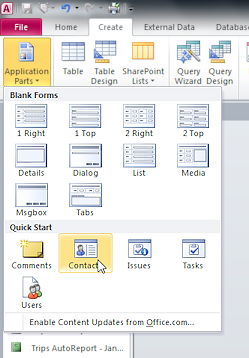 Switch to the Create ribbon tab.
 -
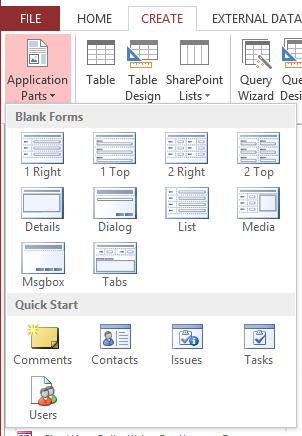
Click the button Application Parts to open the list of templates.
The top section shows different layouts for blank forms. - Click on Contacts in the Quick Start section at the bottom.
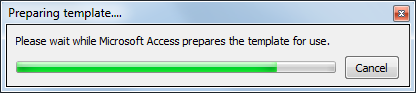 A message box tells you to wait while the template is prepared for use. Be patient. It will take a while. This template is going to create more than just a table!
The Create Relationship dialog opens. This dialog offers to create a relationship between the Trips table and the new Contacts table. You are NOT offered the chance to name the table yourself.
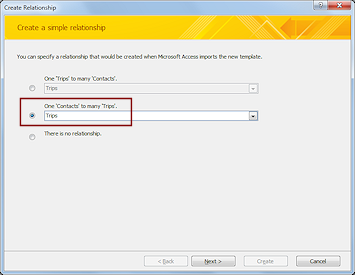 Click the radio button for One 'Contacts' to many 'Trips'.
One travel agent could help you with many different trips.- Click the Next > button.
A new page in the dialog helps you create a Lookup Column. This creates a field in the Trips table that will have a Lookup list based on the Contacts table. A Lookup list lets you pick from the list instead of typing in the data. There is some complex work going on behind this dialog.
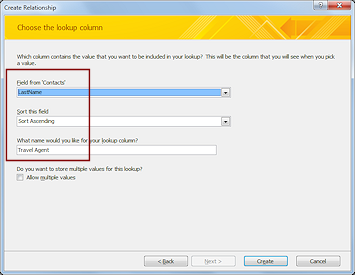 Select LastName in the first drop box, Field from 'Contacts'.
That's the value you want to see when picking from the new list.- Select Sort Ascending in the second box.
That's the order in which the lookup list will be sorted. - Type Travel Agent (with a space in the middle) for the name of the lookup column.
That will be the name of the new field in the Trips table. It seems like the obvious choice, since the goal is to match the travel agent with the trip in the Trips table. But, this may not be the best choice, as you will see later. 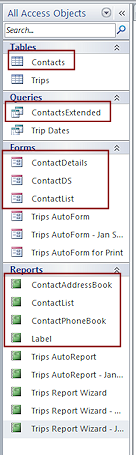 Click the Create button.
Surprise! Several new objects appear in the Navigation Pane.
It may take a while for the mouse pointer to get out of its 'Wait' animation so you can get to work.- Open and explore each of the new objects.
Can you guess what they are intended to do? The query is used as the source for a form or report. There are no records yet, so it may not be entirely clear. - Close any open objects.
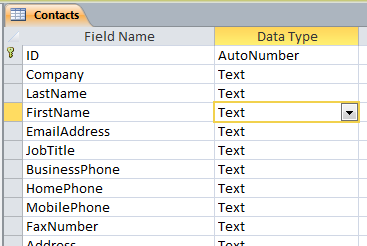
Access 2010, 2013, 2016: Caption Property
The default is to show the field name as the column heading for a table in Datasheet View. But you can change this behavior by setting the Caption property for the field. The template you just used did that automatically for most fields.
 Open the Contacts table in Datasheet View.
There are no records yet.
The column headings have spaces in the titles.
 Switch to the Design View of the Contacts table.
The field names do not have spaces but the column headings did. How did they do that? Let's see.
-
 Click on the field FirstName and look at the value for the Caption property (at the bottom of the window).
It's the Caption value that shows in the Datasheet View as a column heading
When the Caption property is blank, the actual field name shows. Another small mystery explained!
- Close the Contacts table.
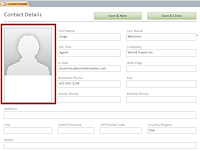
Access 2010, 2013, 2016: Use Form to Add a Record
 Open the form ContactDetails that the template created.
-
Enter the following record. Many fields will be blank for now.
(Remember that these are not real people, the companies are not a real companies, and the email addresses are not real either!)You can use the TAB key to move from field to field or just click on the field you want to edit.
FirstName Jorge LastName Martinez Country/Region USA CompanyName World Travel Inc. Title Agent WorkPhone 615-555-1234 EmailName jmartinez@worldtravelinc.net
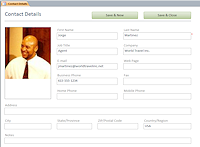
Access 2010, 2013, 2016: Attach Photo
To attach a photo: The default image at the left in the form can be replaced with one or more files. It is an Attachment field. A photo of this person would be the obvious first choice. But you could also attach files like the job offer letter, contract, or other documents.
 Click on the image.
A partly transparent mini toolbar appears at the top left of the control.

The arrow buttons move you through the various attached files, when there are any. The paper clip button opens a dialog for managing attachments.
 Click on the paper clip icon.
(You can also just double-click the blank field.)
The Attachments dialog opens. This dialog shows the names of all attachements in this field. When a file is listed, you can double-click it to open it - if you have a program that can view that file type.- Click on the Add... button.
The Choose File dialog opens. It looks amazingly like a Windows Explorer window. -
Navigate to the resource files that are part of your local copy of these lessons or where you downloaded those resources, and find the file martinez.jpg.
Be careful to select the correct version of this file. The resource files contain a much larger BMP version for lessons that use older versions of Access. You want the JPG version.
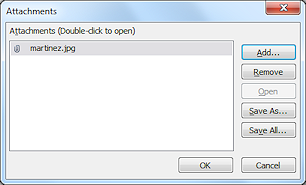 Click on the file and then click on the Open button.
The file name shows in the dialog now.
 Click on OK.
The dialog closes and the photo appears in the record.
Access 2010, 2013, 2016: Add More Records
Now you can add more records to practice your navigating and typing skills.
- Click the navigation arrow
 or
or  at the bottom of the form to advance to a blank record.
Or click the button Save and New at the top of the form. - Enter the records below. The photos are in your resource files.

 Copy
previous value: You can copy the value "World Travel Inc." into later
records by using the key comb CTRL + ' (the apostrophe) when your
cursor is in the field CompanyName. This key
combo copies the value of the field in the previous record into the current record. Of course, once you enter a record that has a different name in the Company field, this tip will not be helpful!
Copy
previous value: You can copy the value "World Travel Inc." into later
records by using the key comb CTRL + ' (the apostrophe) when your
cursor is in the field CompanyName. This key
combo copies the value of the field in the previous record into the current record. Of course, once you enter a record that has a different name in the Company field, this tip will not be helpful! FirstName Hector LastName Chavez Country/Region Argentina CompanyName World Travel Inc. Title Agent WorkPhone 555-9876 EmailName hchavez@worldtravelinc.net Photo chavez.jpg
FirstName Sheila LastName Landers Country/Region Australia CompanyName World Travel Inc. Title Branch Manager WorkPhone 5554-8890 EmailName slanders@worldtravelinc.net Photo landers.jpg
FirstName William LastName Gardner Country/Region Argentina CompanyName World Travel Inc. Title Agent EmailName bgardner@worldtravelinc.net WorkPhone 555-9876 Notes Nickname = Bill Photo gardner.jpg - Close the form.
-
Evaluate: Which is easier for this table - using a form or entering data directly in the datasheet?
Did you make many mistakes in typing in the data?
Was the data given to you in the best order? Not really! That was done to show you how useful it is for the order of fields on the form to match the order that you receive it.Sometimes you need to change the order of the controls on a form to match the order that the data comes to you. Sometimes you can adjust the data first so that the order you see it in matches the order on the form.
Access 2010, 2013, 2016: Lookup Field
The template you just used created a relationship between the tables Trips and Contacts and then added a Lookup field to Trips for the travel agent.
The advantage to using a Lookup field is that when entering a new trip, you can now pick a travel agent from the list.
The awkward part is that you must first add a new person to the Contacts list before you can pick them in the Trips table.
Now that the Contacts table has some records, let's see how the Lookup list the template created might be helpful and how it might present problems.
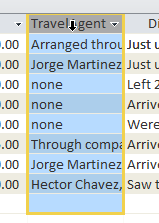
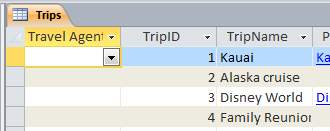 Open the original Trips table in Datasheet View.
It has a new column - the 'Travel Agent' lookup field that you added in the Create Relationship wizard. (The column may not be the first one.)You already had a Memo/Long Text data type field with a very similar name, TravelAgent, with no space in the name. You will remove one of these fields shortly to avoid confusion.
Can you figure out what the difference is between the fields? Since Travel Agent is blank, there are no clues here in Datasheet View. Let's look at the Design View.
-
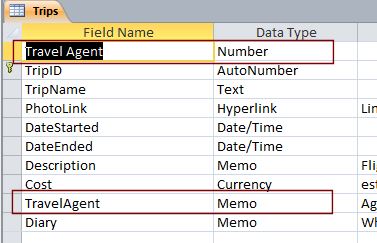 Switch to Design View for the table Trips.
The 'Travel Agent' field is first in the list. It shows Number as its data type.
The 'TravelAgent' (no space) field is second from the bottom of the list. It shows Memo (2010) or Long Text (2013, 2016) as its data type.That's a major difference!
The records you entered earlier used the field to hold the travel agent's name and contact info. All of that information (and more) is in the Contacts table now.
- Switch back to Datasheet View.
Now you will use the Lookup list feature to see what it is all about.
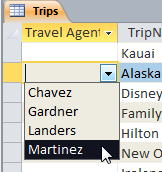
- Click in the second record in the Travel Agent column, the one with a space in the name.
This column may not be first in Datasheet view. -
Click the down arrow to open the Lookup list for this cell.
All of the agents you entered in the Contacts table are showing.No more guessing about spelling! Once the data is in the Contacts table, you can just pick from a list for a record in the Trips table.
 Point of Confusion: Field Data Type does not match Lookup list entry
The new Travel Agent field has Number data type. But the drop list shows a name, not a number. How can that work?Explanation: The template created a simple Lookup list that shows only one value but stores the related primary key value, ID. Surprise! Nothing in the interface tells you that what you see is not what is stored!
In fact, a Lookup list can display several fields, for example Lastname, Firstname, and Middlename, to help you choose the right entry, but the table can only store one value. The value that is stored does not have to show in the drop list at all! That's helpful, but more than a little confusing!
 Warning: Lookup Fields on a Table
Many database designers avoid using Lookup fields on tables. It is easy to forget that what you see in the table (like a name) may not be what is stored in that field (like an AutoNumber). Joining tables together using fields of different data types makes a mess when you try to create subforms and subreports. It can be hard to figure out where the problem is!Let's look at what the template created for the Lookup list for Travel Agent.
-
 Switch to Design View for the Trips table again and click on Travel Agent.
 -
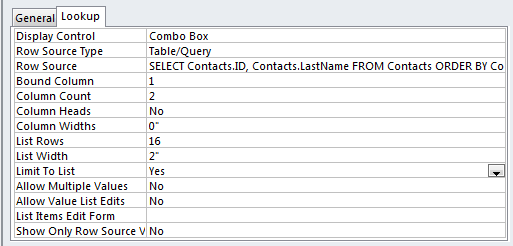
In the bottom pane of the window, click on the tab Lookup.
Many properties are filled in now.Display Control shows how the field will display, as a Combo Box, List Box, or Text Box. A combo box can show several fields to help you pick.
Row Source is a query that is written out in SQL. The results of this query form the Lookup list. The next properties control what columns in the query results will show in the Lookup list and what value will be stored.
Bound Column tells which column from the Row Source query will be saved in the Trips table. It is usually the first column, but does not have to be.
Column Count tells how many columns there are in the drop list.
Column Widths sets the width for each column in the drop list. A value of 0" here means that the list will use the width of the column itself. If the query has several columns, you usually want to set each width separately, like 0",0.5", 0.33",1".
List Rows sets the number of rows to show before showing a scroll bar.
List Width sets the overall width of the list. This needs to be equal to or larger than the total of the column widths.
Later we will look closely at the properties shown here.
- Switch to Datasheet View.
- Open the Lookup list for record 2, Alaska cruise.
- Click on Martinez.
The old TravelAgent field tells us that he was the agent for this trip.
-
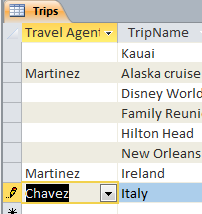 Set the Travel Agent for the Ireland trip to Martinez.
 -
Set the Travel Agent for the Italy trip to Chavez.
As you edit a record, a pencil icon
 appears beside the record. The record is dirty, meaning that you have made a change that has not yet been saved. Point of Confusion: When is a change to a record saved?
Changes to records are not saved automatically until you move on to a different record. Just changing to a different field in the same record does not save the change.To save changes without leaving the record, use the Save button
 on the Quick Access Toolbar or the Save Record button
 on the Home ribbon tab.
Access 2010, 2013, 2016: Delete Field
Now that you have selected travel agents in the new column Travel Agent, do you need the original field TravelAgent (no space)?
What will change if you delete this field?
-
You lose the comments about the trips arranged through a company hosting the convention. Only the name and company and email address are in the Contacts table. Not much of a loss! You could even add an entry in the Contacts table, like No Agent, to cover the trips without a travel agent.
- Any forms, reports, or queries that included the field you deleted will show an error. Access will not automatically switch to the new field.
 You must manually adjust or re-create.
So removing the old column has some important consequences. It's better to get the fields right at the beginning!
 Select the column for the Memo/Long Text field TravelAgent by clicking the column header.
- Press the DELETE key.
A message box ask you to confirm that you want to delete the selected field or fields. - Click Yes.
The column vanishes. - Close the Trips table.
Your change was automatically saved.
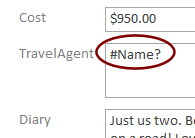
Access 2010, 2013, 2016: Repair Form Errors
Because the TravelAgent field was deleted, one of the textboxes in your Trips AutoForm now shows an error, #Name?. This code means that Access is looking for a named object that it cannot find. Either the object has been deleted or renamed or the name is mis-spelled. In this case, you deleted it!
Next you will fix the forms to use the new field. The same method can be used for reports also. For this lesson the goal is to show you how awkward it can be to change tables after other objects have been created based on those tables. Plan well first!
In later lessons you will learn how to insert controls yourself and how to use a Control Wizard to set up the control.
 Open the form Trips AutoForm in Form View.
The TravelAgent text box shows an error code, #Name?.
 Switch to Design View.
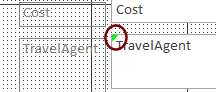
There is an error triangle at the top left of the TravelAgent control.- Click on the TravelAgent control to select it.
-
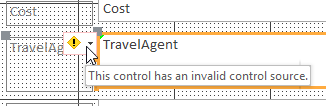 Hover over the Error Options button.
A screen tip tells you that the source for the control does not exist.In many cases you could just edit the Source property for the box to the correct field, Travel Agent. But Access stored an ID number in that field, not a name. On the form we want to see the agent's name.
There is a simple work around. You will create a new form to get the text box you need and then copy and paste it to the existing form. This lets Access do the heavy lifting for creating the combo box for the form.
- Select the table Trips in the Navigation Pane and click the AutoForm button to create a new form.
The new autoform opens in Layout View. - Inspect the first control on the form, Travel Agent.
At the right end of the control is a down arrow. This control has a Lookup list. Hurrah!
But the controls on the autoform are in a layout table and will paste as inside a table too! Not what we want. - Switch to Design View and select the text box control at the top of the new form, Travel Agent.
- With the control TravelAgent selected, remove the layout.
Form Design Tools: Arrange > Remove Layout button - Copy.
- Switch to the original form Trips AutoForm in Design View.
- Select the text box with the error and Delete.
- Paste.
- Drag the pasted text box to the location of the deleted text box.
Edit the form as needed to keep the spacing neat. - Switch to Form View and click in the Travel Agent field for the first record
- Click the down arrow for the box.
A list of agents from the Contacts table appears. The control is a combo box. Success! - Navigate to see the records that have an entry in this field.
- Similarly, repair the other forms you created to use the new field.
You may need to resize the new control and move controls around on the form.
Check Print Preview to be sure that your form for print does not accidentally get too wide. - Close the new autoform without saving it.
You only needed it to get a control to copy and paste.
Access 2010, 2013, 2016: Repair Report Errors
To correct a report, you can use a similar method. Use the Report Wizard to create a temporary report, which will automatically include the new field. Then copy and paste the new control to other reports. Do not use the AutoReport for this. It does not include a label for the field.
Check for formatting issues: Be careful to check what pasting a control changes in the way a form or report prints. A wide control can automatically widen the form or report so that it won't fit on one page any more. A tall control might change what fits vertically on a page.
-
 Open Trips Report Wizard by double-clicking it in the Navigation pane.
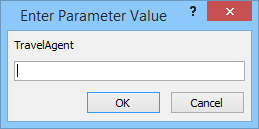
A Parament dialog opens. What is that?
Access cannot find the field that you deleted. It is asking you to provide a value. - Open Trips Report Wizard in Design View.
Again you have an error triangle and the problem is an invalid source for the control. - Select the Trips table and use the Report Wizard to create a temporary report.
The new Trips report opens in Report View. - Switch to Design View.
- Select the first control, Travel Agent and copy.
 Switch to the Design View of Trips Report Wizard.
- Delete the control with the error.
- Paste.
- Drag the new control down and position it where the deleted control was.
 Switch to Report View.
The new control has a border.- Close Trips Report Wizard and save changes.
-
Similarly, repair your other reports that were based on the report wizard.
Make sure your report does not get too wide to fit on a page!Do not bother to fix your other autoreports. Those are easy to recreate!
Access 2010, 2013, 2016: Subdatasheet
You now have two tables in a One-to-Many relationship. One record in Contacts is connected to Many records in Trips. The table on the One side (Contacts) will show a subdatasheet of the related records from the Many side (Trips). A relationship must be in place for subdatasheets to be available.
-
Open the Contacts table again.
A tiny + in a box, , shows at the left of each record because this table is on the One side of a One-to-Many relationship.
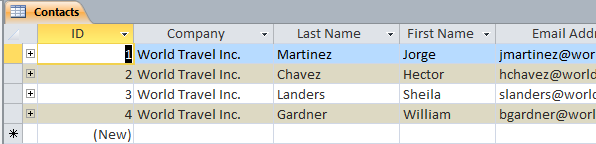
-
Click on the
beside the record for Martinez.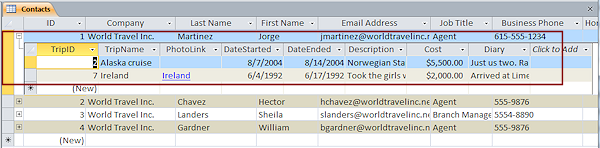
A subdatasheet appears below the record and shows the records of the two trips that Martinez handled.
The subdatasheet does not show the column Travel Agent because that is the field on which the tables are joined. Remember that this Lookup field in the Trips table actually stores the ID value, even though you see the LastName value.
Unfortunately, the subdatasheet does not show the name of the table that the record comes from. If you know your tables well, you will recognize the TripID field as the primary key for the Trips table.
-
Expand the subdatasheet for each of the other agents.
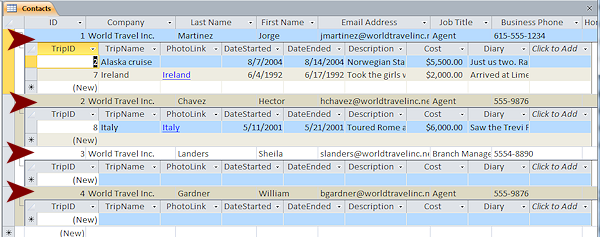
Martinez and two records and Chavez has one record in the subdatasheet.
The records for Landers and Gardner show only a blank record in the subdatasheet. There are no trips in the Trips table yet for which they were the travel agents.
Having several subdatasheets showing can make a table very hard to read. It is not normally a good plan to work directly with the table. Forms are much easier to use for data entry and review.
 Open Print Preview while the subdatasheets are showing.
Whoops. Only the records for Contacts will print, not the subdatasheets. How sad!- Close Print Preview.
- Close the Contacts table.
|
|
| © 1997-2017 Jan Smith All Rights Reserved |
Site Map What's New |
Privacy Policy Terms of Service Copyright Acknowledgements |
~~ 1 Cor. 10:31 ...whatever you do, do it all for the glory of God. ~~
Last updated: March 22, 2017