Jan's Working with Databases
Tables & Queries: Queries: Calculated Text
You can use a query to create a
new text string by combining several field values, either text type or
number type. You can even include fixed text. We call these calculated values,
even when the new values are text instead of numbers. Such new fields are not added to the design of the underlying tables.
 Point of Confusion: Calculated Field vs. Calculated Value
Access 2010, 2013, and 2016 have a Calculated data type. A field with this data type can use fields from the same table to calculate a value which is stored in the table. A query can pull fields from multiple tables to use in creating a calculated value but that value is not part of any table. So it must be calculated every time the query runs.
Expression
It is easy to write your own expression to calculate a new field
in your query using
other field values. That field is not part of any table.
The general form is:
NewFieldName:expression
Example: Name: [LastName] & ", " & [FirstName] would produce values like Smith, Janet and Gomez, Luis.
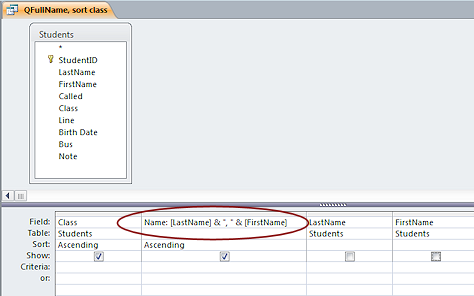
Calculated values are particularly useful in forms and reports.
They allow you to control the spacing of long text strings and to write
sentences or phrases that include a field value. This is similar to how companies
create those "personalized" letters that use your name instead of "Dear
Customer".
Putting Values Together (Concatenating)
Putting together field values, and possibly additional
text, into a single text string is called concatenating. In Access you normally use the ampersand operator (&)
as the glue to concatenate fields with each other and with literal text.
The rules for writing an expression are called the syntax for the expression.
Syntax for an Expression that Concatenates Values:
-
Fieldname is between square brackets, like [Score]
-
Literal text and spaces are between quotes, like "The score is "
-
Join the parts with:
Examples:
-
Concatenating several text fields and spaces:
The expression [FirstName]&" "&[MiddleName]&" "&[LastName]
takes the 3 separate field values, Whitney, R, and Green and produces a single text string, Whitney R
Green, with a a single space between fields.
- Concatenating text with a number field:
The expression "The average is "&[Average]&"."
produces a text string like: The average is 78.
which includes a period at the end of the sentence.
 Spaces and Punctuation: When you concatenate fields, you will usually want to include a space
between the fields. Sometimes you need some punctuation between fields or
after the last one, like a comma between last and first names [LastName]&", "&[FirstName] or a final
period &".".
 Don't forget the matching
parts: It seems to be particularly easy to fail to type the
second ampersand (&) or the second double-quote (") when including text or spaces in the middle of an expression,
like the comma and space in the paragraph above: &", "& . If you leave
one of the ampersands out, Access will produce an error message.
List of
common errors 
Creating a Calculated Field in a Query
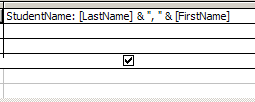 To
calculate a new field for a query, in the Query Design view, you should
type a new name in the Field row, followed by a colon (:) and then the expression that calculates
the value.
Syntax for calculated field in a query:
NewFieldName: Expression
Example: StudentName:[LastName]&", "&[FirstName]
If you do not pick a name for the new field, Access will assign it
a name. The first unnamed field will be named Expr1.
The next is Expr2, and so on
for each calculated field that has not been named.
 Calculated controls: In the next project, Forms and Reports, you will learn how to use the same
kind of expressions to create calculated controls for a form or report.
However, you name the control in a different way and the expression must
start with the equal sign (=) instead of with the new name and a colon.
 More room for typing:
You can get more room for entering and
editing your expression by opening either a Zoom window or the Expression Builder. (Right click
in the Field row of the column and choose Zoom... or Build...)
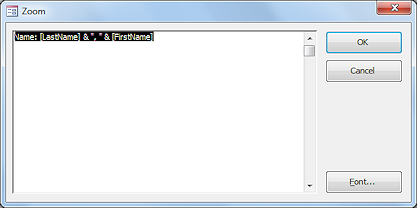 The Zoom window is just a large blank area. You will need to know what you want to type.
You can click the Font... button to get a dialog to change the font or
its size to suit your own eyes. Bigger is often better! This only affects the Zoom dialog.
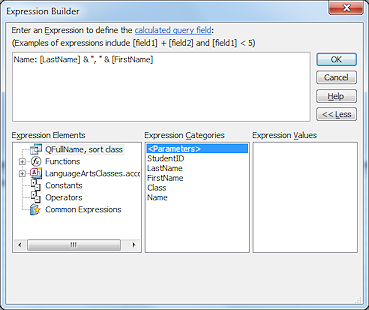 The Expression Builder can help you construct complex expressions. It
can show you the proper syntax for functions, like IIf or DatePart. It has lists of
all available
functions, tables, queries, and even some common expressions.
IIf: Conditional Expression
Sometimes you will want your query to show different results, depending
on whether the record matches your criteria or not.
For example...
Problem: In the expression [FirstName]&" "&[MiddleName]&" "&[LastName],
if the MiddleName field is blank,
then nothing will show for the MiddleName, but the two spaces on either side still show, like Whitney
Green. One extra space may be a minor problem, but in other
expressions you might wind up with several blank spaces.
Solution: Use a conditional expression (IIf)
to show one value when the field is blank and another when it is not.
Such an expression can look a lot more complicated than it really is!
Syntax for IIf (Immediate
If):
The general form of an IIf
statement has 3 parts.
IIf(expression, truepart,
falsepart)
where expression contains the criteria that you want to evaluate. It must be either True or False.
truepart is what you want to see when the expression is True.
falsepart is what you want to see when the expression is
False.
Examples using IIf in a new query field:
PassOrFail: IIf([Grade]>69.5, "Pass", "Fail")
In words: For the new field PassOrFail, if the grade is
greater than 69.5, show the word Pass. Otherwise, show
the word Fail.
FullName: IIf([MiddleName] Is Null, [FirstName]
& " " & [LastName], [FirstName] & " " & [MiddleName] & " " & [LastName])
In words: For the new field FullName, if
there is no middle name, combine the first and last names with 1 space
between them. Otherwise, combine first, middle, and last names with 1
space between each.
 To find the parts of IIf
expression: Look for the commas! (If only they were easier to
see...!!!)
 Common typing error: You can use IIf or IIF but not IFF!
Access Text Functions
Access has a number of built-in functions that can help you manage
text.
Examples:
-
Trim([City]) returns the value of the City field, but
without any leading or following spaces
-
Len([FullName]) gives the length of the value in the field (number of characters)
-
UCase([State]) makes all characters in the field State upper case.
-
LCase([ProductCode]) makes all characters in the field
lower case.
-
Left([LastName],1) returns the first character from the left of the
field .
This function is useful when you want to mark in a report where a list of names changes
from the A's to the B's etc. For other situations, you can use any
positive integer instead of the 1, to return that many characters.
 |
Step-by-Step: Calculated Value - Text
|
 |
| What you will learn: |
to copy, paste, and rename a query
to create a new field by concatenating text fields
to use an IIf statement to define a new field
to use a query as row source for a Lookup field
to change Lookup properties to match changed query
to view object dependencies |
Start with:  , Projects database (projects2-Lastname-Firstname.accdb) from previous lesson open.
The story so far:
World Travel Inc. has a new database for information about projects that includes tables for Staff, Projects, and Project Staff.
There is a Lookup field in the Project Staff table for EmployeeID that would work better if it
was based on a query that combined the three parts of a name into one
field. Then your choice would show in a more useful way, as a whole name instead of just the first name.
Copy, Paste, and Rename a Query
The query that you want to use for the Lookup field will be very
similar to the one you just created in the last lesson, with the addition
of a calculated field.
Happily, you can copy and paste database objects. You will have to pick
a new name, of course. This can be a big help when what you want is
similar to something that already exists. Making a few changes is easier
than starting all over!
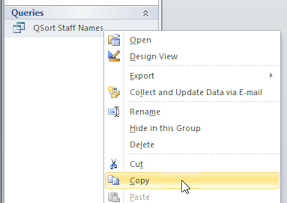 In the Navigation Pane, right click on the query QSort Staff Names.
- From
the context menu, select Copy .
The menu vanishes but nothing seems to have changed.
-
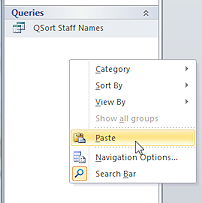 Right
click in a blank area of the Navigation Pane.
- From
the context menu, select Paste .
The Paste As dialog appears. You must create a name for the new object.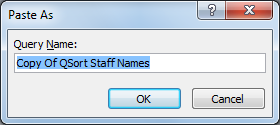 The default name is Copy of QStaff Full Name.
-
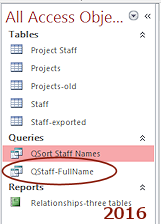
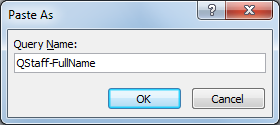 Type QStaff-FullName and click on OK.
The new query appears in the list.
Next you will edit the query to create the calculated field for a complete name.
Query Design:
Concatenate Text Fields
Now you will create a new field to combine the name parts into one text
string.

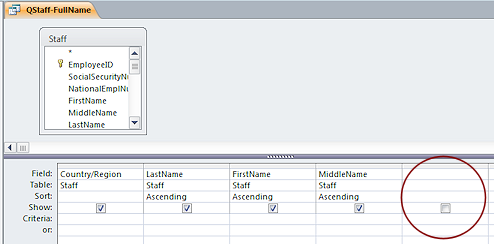 Open the query QStaff-FullName in Design View.
- Scroll to the right, if necessary, to see a blank
column.
 In the Field row in the blank column type FullName:
This column is not wide enough to show all that you need to type
this time. You need more space.
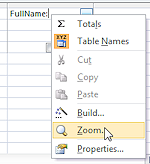 Right
click on your typing and choose from the context menu.
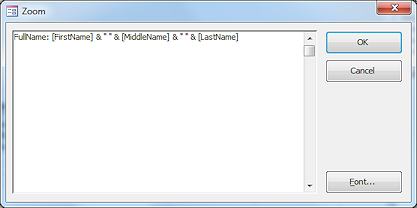
A new window appears where you can enter an expression to calculate a
value for your new field.- Complete the expression for FullName as:
FullName: [FirstName] & " " & [MiddleName] & " " & [LastName]
-
 Click on OK to accept the new expression and close the Zoom window.
You return to Query Design View with the field cell filled in with your
new expression. It's all there even though the column is too narrow to
show it all.
 Run the query.
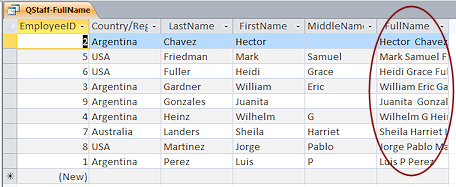
 The new field shows as the last column.
 Errors: If your typing is not EXACTLY right, you may see one of several
possible error messages. Some of these messages are helpful, but others
just announce that there is a problem... somewhere! List of
common errors
 Problem:
Values in FullName column are cut off in datasheet.
Solution: You can widen the column to see the
complete name.
 Size column to fit: Double-clicking the right edge of the column heading will widen the
column to show the widest name currently on the screen. This is
not necessarily the widest name in the whole datasheet.
 Extra
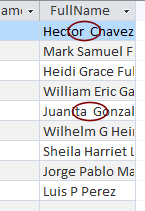
spaces: Look at the FullName value for Hector Chavez and for Juanita
Gonzales. There are extra spaces in the middle of the names because these
two did not have a middle name.
Next you will edit the field name to use an IIf expression to avoid this kind of spacing problem. The
solution looks more complicated than it is!
Query Design:
Using IIf
To avoid extra spaces in the new FullName field, you need a way to concatenate the text one way when there is a
middle name and a different way when there is not.
The IIf function described above is exactly what you
need.
-
 Switch back to Query Design View.
- Open the Zoom window for the FullName definition.
(Right click on the expression and choose Zoom)
-
Edit the expression to read:
FullName: IIf([MiddleName] Is
Null,[FirstName] & " " & [LastName],[FirstName] & " " & [MiddleName] &
" " & [LastName])
Be sure to type in the final parenthesis!
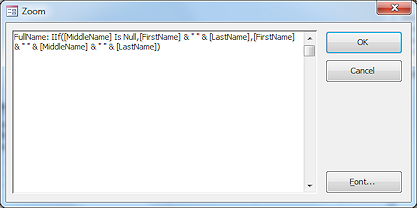 Remember that the IIf function has three parts - criteria expression,
truepart,
falsepart.
Look for the commas that separate the parts!
So what you typed means:
Expression: Is MiddleName Null?
Truepart: If so, use just the first and last names with a single space
between them.
Falsepart: If MiddleName is not Null, use all three name
parts, with a space between each part.
-
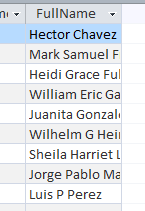
 Run the query.
 Now there are no extra spaces in the names!
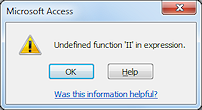
 Problem:
Error message- Undefined function
Cause: Mistyping the function name.
Solution:
Be sure that you have spelled the functions and field names correctly and that you typed all of the commas, ampersands,
parentheses, and brackets that you need. The illustration shows that the f was left off the IIF function name. Previous versions of Access were even picky about spaces.
 Problem: Still showing extra space
Cause: Something is not typed correctly in your expression.
Solution:
Check spelling and capitalizations and punctuations.
 Close the query. When prompted, save the query.
 Alternate Expression: The IIF function can be
included in the middle of an expression also. For example, you can
generate the same FullName value with the following expression:
[FirstName]
& " " & IIf([MiddleName] Is Null,"",[MiddleName] & " " ) & [LastName]
Table Design: Use Query as Lookup Row Source
This query is now ready for work! You can make it the source for the
Lookup field you created a few lessons back. You will have to change
some other properties in the Table Design View.
-
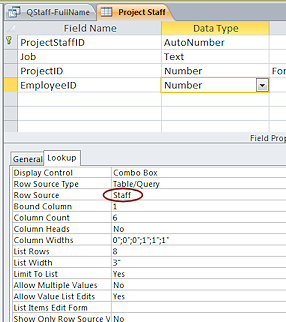
 Open the Project Staff table in Table Design
View.
- Click on the field EmployeeID.
Do no use the Lookup Wizard this time. This table is already part of two relationships so an error message would tell you
to delete those relationships first. Manually creatings the Lookup avoids this problem.
- Click on the Lookup tab, if necessary.
The Row Source is the table Staff.
-
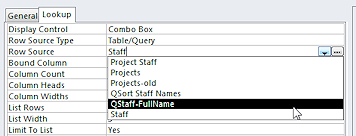 Click in the Row Source box and then on the arrow that appears at the
end of the box.
A list of tables and queries appears.
 Can you tell a query from a
table in this list? You can if you started the queries name with a Q! This is an excellent example of why it is helpful to make it obvious from the object's name what type of object it is.
- Select the query QStaff-FullName.
A
button appears at the left,  Property Update
Options.
-
Hover over the button until a down arrow appears, then click the arrow.
 A
list of options appears.
There are only two choices. One is to open a Help article and the other is to update all of the lookup properties in the database that use this
field, EmployeeID. If you had several tables that use a Lookup list using this field, this choice would change all of them at once. A great help and time-saver!
-
 Click on Update all lookup properties...
A message box appears telling you that nothing needed to be updated.
That is because there are no other Lookup fields in
other tables that used EmployeeID. Oh
well. Perhaps next time this feature will be more useful!
Table Design: Change Other Properties of Lookup Field
Your goal is to show the new FullName field
while storing a number value for the EmployeeID number. That way you won't have to try to remember which number goes with
which staff member. The columns for the query are different from the
columns for the original row source so you must change some of the Lookup properties.
-
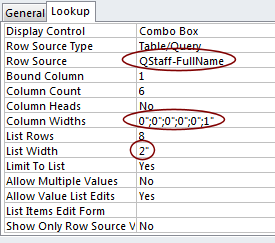 Change the Column Widths to 0" except for the 6th column
which is the FullName field. That should have
a width of 1".
- Change the List Width to 2".
With each change that options box appears so that you can update other
lookup fields, if there are any that use this same field.
-
 Save the table.
-
 Switch to Table Datasheet View.
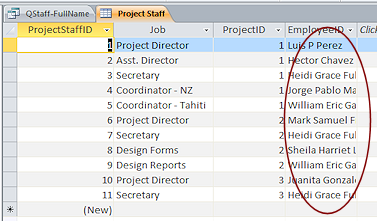 The EmployeeID column will now show the FullName values but it still stores the
EmployeeID number. The column is not wide enough to see the complete
FullName.
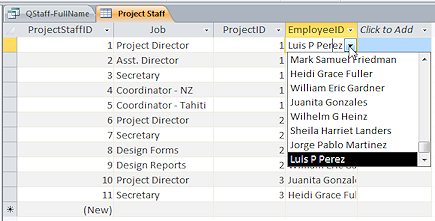 Click in the first row on Luis P Perez and then on the down arrow that appears in the cell.
This is your Lookup list. It shows full names and is alphabetized by last name.
Why is this better than the Lookup list before? The changes let you see the complete names in natural order. This is easier to read and avoids issues where only part of the name was visible.
Notice the width of the lookup list compared to the width of the column. They are not related at all. This is why you set the list width to 2".
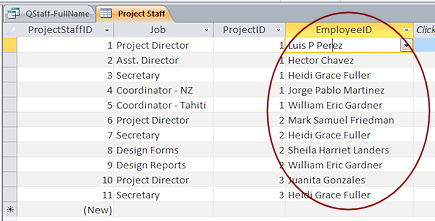 Double
click the right edge of the EmployeeID column to the right.
It
widens to show the widest name in the column, but only for the visible
rows. Close and save the table.
View Object Dependencies
Your database is getting more complicated. The three tables have a relationship, so they depend on each
other. The Project Staff table depends on
the new query, QStaff-FullName as a
Lookup source. Changes
to these objects may break some of these connections.
- In the Navigation Pane, click on the query QStaff-FullName.
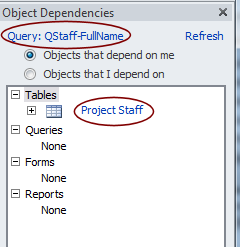
- In
the Database Tools ribbon tab, click on the button
 Object Dependencies .
The objects that depend on the selected query show in the Object Dependencies task pane.
Objects
that depend on me:
Only the Project Staff table depends on the query.
 Table depends on a query: The query is being used as a Lookup list for a field.
 Change
Lookup query =
Change Lookup properties
Change
Lookup query =
Change Lookup properties
Be careful about changing a query that is used with a Lookup field.
If you add or remove columns, you may need to change the Column Count and
the Column Widths properties, as you did in this lesson.
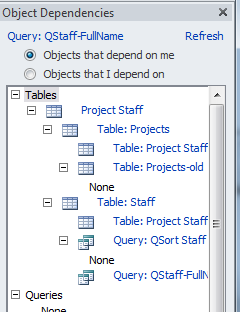 Click on the
 expand button for the Project Staff table.
The list expands to show what objects depend on that table. In this
case, you see the related tables. Access limits the expansion to 8 levels deep. You will see a lot of duplication of
objects. Just remember that each expansion is showing objects that
depend on the level above.
-
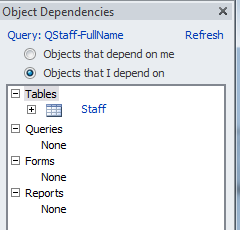 Click on the radio button for Objects that I depend on.
This query depends on only one
object, the Staff table.
 Breaking Dependencies: If you make changes to the Staff table, especially if you delete a
field, you might break queries, forms, and reports that depend on that
table.
Similar to the previous display, the expand button for the
Staff table opens a list of objects on which this object (the Staff
table) depends. This is very useful when you need to check to
see if you are about to break something without knowing it!
 Close the task pane and all open objects.
Save changes.


 To
calculate a new field for a query, in the Query Design view, you should
type a new name in the Field row, followed by a colon (:) and then the expression that calculates
the value.
 The
The  The
The  In the Navigation Pane, right click on the query
  Right
click in a blank area of the Navigation Pane.
 The default name is Copy of QStaff Full Name.
 Type
Type  Open the query
  Right
click on your typing and choose
 Click on OK to accept the new expression and close the Zoom window.

 Remember that the IIf function has three parts - criteria expression,
truepart,
falsepart.


 Click in the Row Source box and then on the arrow that appears at the
end of the box.
 A
list of options appears.
 Click on Update all lookup properties...
 Change the Column Widths to 0" except for the 6th column
which is the
  The
The  Click in the first row on Luis P Perez and then on the down arrow that appears in the cell.
  Double
click the right edge of the EmployeeID column to the right.
 Object Dependencies .
  Click on the
  Click on the radio button for Objects that I depend on.