
Jan's Working with Databases
Tables & Queries: Queries: Delete Query
![]() A Delete query always deletes entire records from a table, not just the fields and values that show in the
query datasheet. The query can include fields from many tables and
queries to select which records to delete, but records are deleted from
only one table, at least to start with.
A Delete query always deletes entire records from a table, not just the fields and values that show in the
query datasheet. The query can include fields from many tables and
queries to select which records to delete, but records are deleted from
only one table, at least to start with.
![]() Cascading Deletes: A Delete query may affect more tables and records than you expect,
depending on what relationships the table is in. See the discussion
below about cascading deletes. You cannot Undo a
deletion, or any other action query's actions.
Cascading Deletes: A Delete query may affect more tables and records than you expect,
depending on what relationships the table is in. See the discussion
below about cascading deletes. You cannot Undo a
deletion, or any other action query's actions.
Once again:
![]() No
Undo: You cannot "undo" an action query's action.
No
Undo: You cannot "undo" an action query's action.
![]() Backup first: Before running an action query, be sure you have a current backup of the database or an extra copy of the table that will change.
Backup first: Before running an action query, be sure you have a current backup of the database or an extra copy of the table that will change.
![]() Verify
selection first: Be sure the query selected the records that you
thought you did! View the datasheet to see
the query's datasheet. Check the records carefully. Then, run the
action query with the Run button
Verify
selection first: Be sure the query selected the records that you
thought you did! View the datasheet to see
the query's datasheet. Check the records carefully. Then, run the
action query with the Run button ![]() .
.
Example: Delete Query
In the Language Arts Classes database the append query used in the last lesson as an example added partial records to assist in recording the scores for an assignment. If that query was accidentally run twice, there would be duplicate records for that assignment. How can we find and remove such duplicate records??
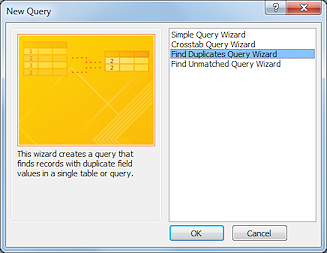
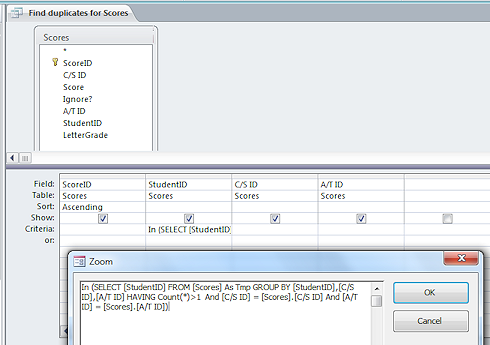
Access has a wizard for creating a query that finds duplications. You have to identify which fields you want the query to inspect for duplicates. In this case, we need to look at StudentID and A/TID. The wizard creates a complex SQL statement to pick out records that have duplicate values for StudentID and A/TID.
 When you run the query, the resulting datasheet
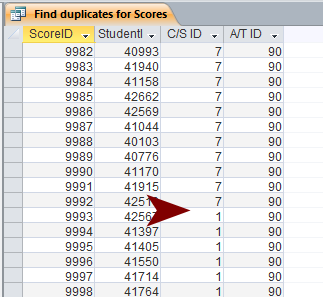
shows both sets of records. You must inspect the datasheet to find which values are duplicates. The illustration shows that in this case the records are in two groups. That's because they were added all at once with an append query. In other situations the duplicates might be scattered around randomly. You must know your records!
When you run the query, the resulting datasheet
shows both sets of records. You must inspect the datasheet to find which values are duplicates. The illustration shows that in this case the records are in two groups. That's because they were added all at once with an append query. In other situations the duplicates might be scattered around randomly. You must know your records!
Deleting a record from the datasheet will delete whole records from the Scores table. You could filter the datasheet and then delete. Or, you could add criteria to the query to pick out the records that you do not want and turn the query into a
Delete query.
When you run the Delete query, a message appears, telling you how many records you are going to delete. There should be 92 for this particular query.
Remember... You cannot Undo a delete query's action so it is critical that you verify what records the query selects before you run the query. You might need to add some fields to the query just to help identify the records.
Deletes May Cascade!!
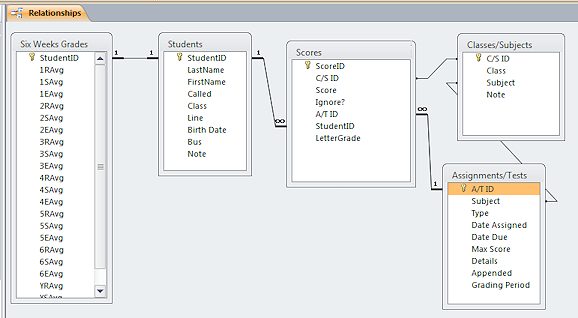 In the Language Arts Classes database, the Students and Assignments/Tests tables each have a One-to-Many relationship with
the Scores table. This means that one student can have many scores and
one assignment or test can have many scores. That makes sense!
In the Language Arts Classes database, the Students and Assignments/Tests tables each have a One-to-Many relationship with
the Scores table. This means that one student can have many scores and
one assignment or test can have many scores. That makes sense!
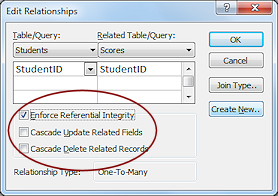 When such a relationship is set to "Enforce Referential Integrity",
Access will not let you delete a
record on the "One" side of the relationship (a student or an assignment)
when there are
related records on the "Many" side (scores). This is to
keep you from having records that refer to other records that do not
actually exist!
When such a relationship is set to "Enforce Referential Integrity",
Access will not let you delete a
record on the "One" side of the relationship (a student or an assignment)
when there are
related records on the "Many" side (scores). This is to
keep you from having records that refer to other records that do not
actually exist!
To delete a student or an assignment in that case, you have to go to the Scores table and delete all the related scores first, like the example delete query did. Then you will be allowed to delete the student or the assignment.
BUT, if cascading deletes are allowed, you CAN delete a student or an assignment and all of the related scores are also deleted... with no warning! Is this what you want to happen?? Maybe... maybe not! You might need to save those scores somewhere else first.
Is Cascade Delete allowed or not? Check the relationship: Open the Relationships window. Right click on the join line for the relationship you are interested in. The Edit Relationships dialog appears. Look at the check boxes.
![]() No
warning! A
delete query does not warn you about any cascading changes!
No
warning! A
delete query does not warn you about any cascading changes!
![]() View vs.
Run: In Query Design View, the View button
View vs.
Run: In Query Design View, the View button ![]() does not run the action for the action query.
It just shows the selected records/fields. It does not, however, show
what cascading changes will happen. On the other hand, the
Run button
does not run the action for the action query.
It just shows the selected records/fields. It does not, however, show
what cascading changes will happen. On the other hand, the
Run button ![]() actually performs the action. Before running an action query, always view the datasheet
to make sure that it selects what you meant for it to select AND check
the relationship to see if your deletes or updates will cascade!
actually performs the action. Before running an action query, always view the datasheet
to make sure that it selects what you meant for it to select AND check
the relationship to see if your deletes or updates will cascade!
Have we said this enough yet?...
![]() No
Undo: You cannot "undo" an action query's action.
No
Undo: You cannot "undo" an action query's action.
![]()
![]() Backup first: Before running an action query, be sure you have a current backup of the database or an extra copy of the table that will change.
Backup first: Before running an action query, be sure you have a current backup of the database or an extra copy of the table that will change.
![]() Verify
selection first: Be sure the query selected the records that you
thought you did! View the datasheet to see
the query's datasheet. Check the records carefully. Then, run the
action query with the Run button
Verify
selection first: Be sure the query selected the records that you
thought you did! View the datasheet to see
the query's datasheet. Check the records carefully. Then, run the
action query with the Run button ![]() .
.
| |
Step-by-Step: Delete Query |
|
| What you will learn: | to check relationships first - are cascading deletions allowed to check the table and its related records - what should be deleted to create a select query to change the query to a Delete query and run it to verify the deletion |
Start with: ![]() , Projects database from previous lesson open.
, Projects database from previous lesson open.
Previously you entered data for a project that has since been canceled. You want to remove that project from the Projects table and the matching staff entries in the table Project Staff. You will use a Delete query to do this. This is over-kill for the small tables that you have right now, but we have to practice on something!
You need to know, first, what kind of relationship the tables have. Some relationships will allow cascading deletions and some will not. You don't want to be surprised!
Check the Relationships First

 Open the Relationships window.
Database Tools > Relationships
-
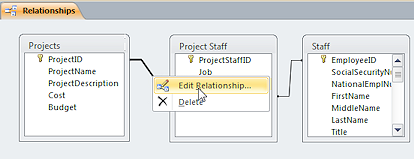
Right click on the join line between the tables Projects and Project Staff.
-
From the menu that appears, select .
The Edit Relationships dialog appears. This relationship is NOT set to enforce referential integrity. Therefore, if you can delete a project that has staff members assigned to it. The deletion will not cascade. It is probably not a good idea to delete records in this kind of relationship!
-
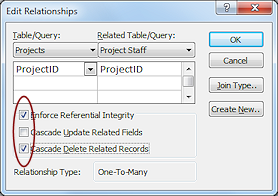 Check the box to Enforce Referential
Integrity. The next two boxes become available to you.
Check the box to Enforce Referential
Integrity. The next two boxes become available to you.
The next lesson will explain about cascading updates.
-
Check the box for Cascade Delete Related Records.
-
Click on OK to close the dialog.
In the Relationships window the join now shows characters on each end of the join line - a "1" on the One side and the infinity symbol on the Many side of the relationship. These only show if the box Enforce Referential Integrity is checked.

 Cannot
save changes to the relationship:
Cannot
save changes to the relationship:
If one of the tables involved in the relationship is open or if something that uses that table is open (a query, form, or report), you will see an error message about not being able to 'lock' whatever was open.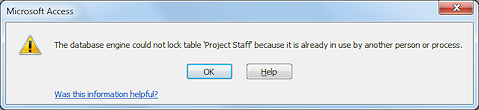
Solution: Cancel out of the Edit Relationships dialog. Close all objects that involve the tables in the relationships. Then try again.
-
Close the Relationships window.
Check the Table and Its Related Records
-
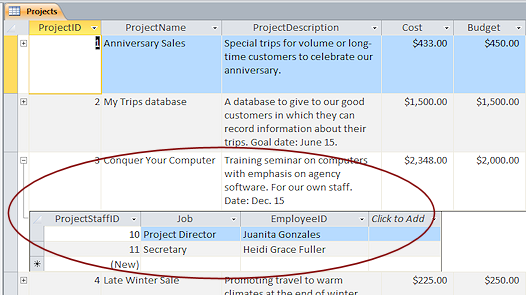
 Open the table Projects.
-
Click on the + at the left of the project "Conquer Your Computer".
A subdatasheet opens that shows what staff members are assigned to this project.Important: Leave this table open while you work on the Delete query.
Create Select Query
Suppose you are going to delete a project, but you have forgotten what its name was. It had something to do with computers. The Like operator can help you find what you want. (Yes, you just saw the correct name, but we are practicing here!)
-

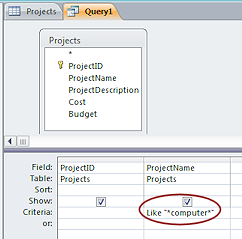 Create a new query based on the Projects table.
Include the fields ProjectID and ProjectName.
You need to select the project that had to do with computers. For practice, you will use the Criteria row to look for the name, as though you did not know exactly what the project's name was. So helpful!
-
Under ProjectName add in the Criteria row the following:
Like "*computer*".The asterisk * allows any kind or number of characters. So this criterion matches text that contains "computer" anywhere in the text. Very important if you are not sure where the word might be in the name.
-
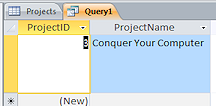 View the datasheet for the query.
Only one project contained the text "computer".If there had been others, you would need to figure out which one was the project that you wanted and set new criteria to select it or them.
Change Query to a Delete Query:
-
Switch to Design View.
-
 From
the Query Tools: Design ribbon tab, click on
From
the Query Tools: Design ribbon tab, click on  the Delete Query button.
A Delete row appears in the grid with "Where" filled in for both columns.
You can adjust the criteria at this point if the original Select query captured too many records.
-
 Save the query as QDelete Project.
-
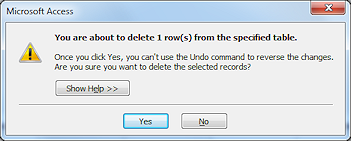
 Run the query.
A message appears telling you how many rows will be deleted. Which table? The
message does not mention which table will be affected. You must know your
query!!!
Which table? The
message does not mention which table will be affected. You must know your
query!!!
-
Click on Yes.
The message disappears and you are back in the design grid. Did anything happen?? Of course it did!
Verify Deletion
-
Switch to
the window for the Projects table, which you left open
earlier.
The record you deleted shows - sort of. It shows #Deleted in all of the cells.
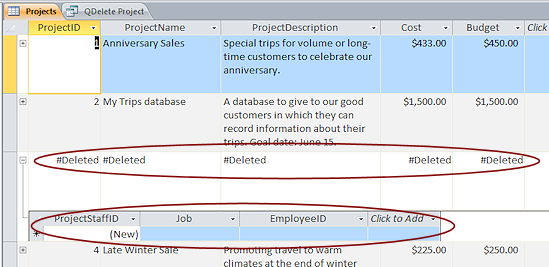
This happens if the table is open while you are deleting.
Since Cascade Delete was enabled, the matching records in the Project Staff table were deleted without any comment! If you were watching carefully, you may have been able to see the subdatasheet flick from showing staff to being blank as the deletion cascaded.
Remember- there is no way to Undo what the query deleted.
-
Close the Projects table and open it again.
No more #Deleted!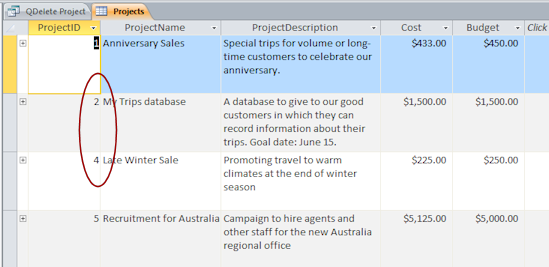
The only way to know that a record was deleted is to look at the ProjectID values. Since those are AutoNumbers, if any numbers are skipped, you know that those records were deleted.
-
Close all.
|
|
| © 1997-2017 Jan Smith All Rights Reserved |
Site Map What's New |
Privacy Policy Terms of Service Copyright Acknowledgements |
~~ 1 Cor. 10:31 ...whatever you do, do it all for the glory of God. ~~
Last updated: March 27, 2017