
Jan's Working with Databases
Tables & Queries: Queries: Document a Query
A query's design and purpose needs to be documented just as much as a table's design. The same tools can be used - Documenter and Object Dependencies.
-
Print the datasheet: Just like a table, you can print the query's datasheet. You cannot print the grid in Query Design View, even though that would be quite useful. For an action query you must View the datasheet, of course, instead of running the query.
-
Database Documenter: This report is a detailed list of the features of a query, including the SQL version of the query's design. This is likely more information than you want to try to digest!
Database Tools > Database Documenter -
Object Dependencies: This pane is very helpful when you are thinking about revising or deleting an object. It takes a bit of practice, however, to make sense of the tree of dependencies.
Capture and Print a Screen Shot
The Query Design View and the Object Dependencies pane do not come with a way to print them. There is a work-around.
A screen shot is an image of something on your computer screen. Many graphics programs have a built-in tool for capturing screen shots, but you can manage without an advanced program.
Procedure to capture and print a screen shot:
-
Position: Be sure what you want to capture is on top of any other open windows.
-
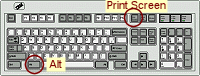 Capture: Hold
one of the ALT keys down while pressing the Print Screen key.
Capture: Hold
one of the ALT keys down while pressing the Print Screen key.
This sends an image of the active window to the Windows Clipboard.
(If you just press the Print Screen key, the Clipboard gets an image of the entire screen.) -
MS Paint: Open a graphics program, like MS Paint to a blank canvas.
Start menu > All Programs > Accessories or Windows Accessories > Paint. OR, Start > Run > type mspaint and click OK. -
Paste: Use the keyboard combo CTRL + V or the ribbon button Paste.
The image you captured is pasted. In recent versions of Windows, the canvas area enlarges automatically to hold the whole image. In earlier versions you must first enlarge the canvas and then paste. Very awkward. -
Edit: You can add text or other helpful markings or crop the image using the ribbon tools.
-
Save As: From the Paint menu, Save As.
The Save As dialog opens. -
File Type: Choose PNG file type to reduce the very large default file size.
PNG handles a large number of colors better than the older GIF format. -
Name and location: Enter a name for the file and navigate to the folder where you wish to save.
-
Print: From the Paint menu, Print...
 Compact and Repair a Database
Database Tools > Compact and Repair Database
Reduce Size: Access has a feature to compact the database so that it uses less space. As you work with your database, it gets bigger and bigger. You delete records and objects and then create new ones. Access is more interested in getting the new data written down quickly than in using disk space efficiently. There can be a LOT of empty space in the file.
Compacting usually results in a much smaller file size and usually helps database processes like sorting and filtering to run faster, too.
Example of the change: At one point, the Language Arts Classes database was 13,404 KB before compacting and only 2,420 KB afterwards.
Repair Errors: Your database file can become corrupt if the database shuts down unexpectedly, for example in a power outage. (Did your backup power supply fail or did you not have one at all? Whoops.) In fact, errors can occur along the way without causing a glitch that you see or notice. The repair feature can fix a lot of errors but not all. That's why good backup habits are so important!
If the database starts behaving oddly, make a backup copy and then compact and repair. Try this before getting into involved technical support questions about Access itself!
Frequency: It is a good idea to compact and repair your databases regularly. You can even set the database's Options to compact and repair every time the database closes.
| |
Step-by-Step: Document a Query |
|
| What you will learn: | to use Documenter to create a report about a query to view object dependencies for a query to capture a screen shot of object dependencies, paste to Paint, and crop to add text to screen shot and print to document Query Design View with a screen shot and print to backup, compact and repair a database |
Start with: ![]() , Projects database from previous lesson open.
, Projects database from previous lesson open.
Document a Query: Documenter Report
The Database Documenter produces a report about the query that is similar to the report for a table, but is not exactly the same.
-
 Open the Database Documenter dialog.
Database Tools > Database Documenter
-
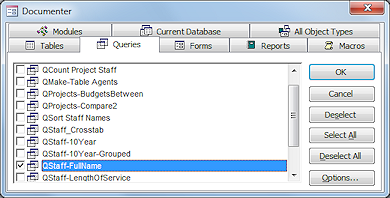
Click on the Queries tab.
-
Check the box for the query QStaff-FullName.
Click the Options... button.
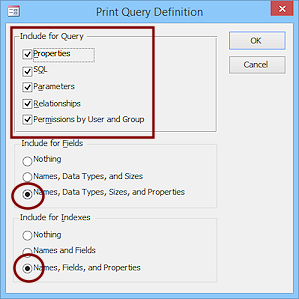
The choices in this Options dialog are remembered for the next Documenter report.-
Check all of the boxes in the top section and the third radio button in the second two sections.
These choices provide the most detail possible.Access 2013 and2 2016 have more check boxes than Access 2007 and 2010.
- Click on OK to close the options dialog and then click on OK again to generate the report.
Access creates a 5-page report and opens it in print preview.
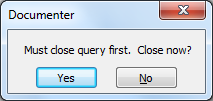
 Problem: Message appears instead.
If the object that you want to document is open, it must be closed first. Just click on Yes.
-
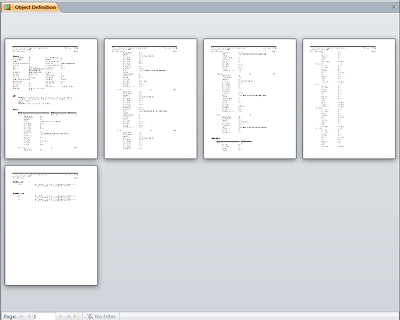 View each of the pages of this report.
What is different from what the Documenter produced for a table?
If you don't get 5 pages, you did not choose the options correctly.The reports may be slightly different in each version.
-
 Print the report by clicking the Print button
  on the Print Preview ribbon tab.
-
Close the report.
-
Find the following information in the report and highlight or circle it on the print-out. Label with the matching letter. If your instructor wishes, turn your marked report in for grading.
-
Name of the query
-
Location of the database file
-
Date the query was created
-
Date of the print-out
-
SQL version of the query
-
Size of the Country/Region field
-
Data Type for the calculated field FullName
-
How many indexes are there
-
What tables or other queries are used as the source for a field
-
- Close the report.
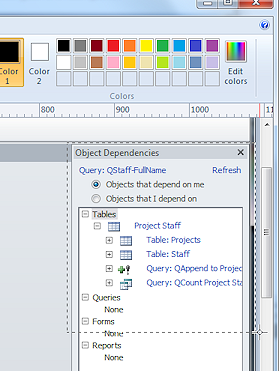
Object Dependencies: View
-
 In
the Navigation Pane, click on the query QStaff-FullName but do not open it.
In
the Navigation Pane, click on the query QStaff-FullName but do not open it.
- On the Database Tools ribbon tab, click on Object Dependencies
 .
.
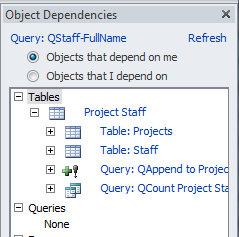
The task pane opens for the currently selected object. - If necessary, click on the radio button "Objects that depend on me".
-
Expand the tree for the one table showing.
Wow!
Four objects depend on the table Project Staff which depends on the query QStaff-FullName.This is what you need to know if you are thinking about changing the query.
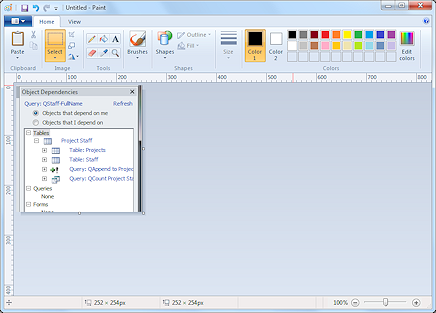
Object Dependencies: Screen Shot, Paste to Paint, Crop
Many graphics programs include a screen shot/screen capture feature and methods to crop and enhance a screen shot. Windows comes with a very basic graphics program, Paint, but it is good enough to get a printout of something that won't print on its own.
-
With the Object Dependencies task pane still open, hold the ALT key down and press the Print Screen key.
(ALT + Print Screen)
Nothing seems to happen, but the Windows Clipboard (a section of memory) now holds an image of the active window.
-
Open the program Paint.
(Start > All Programs > Accessories > Paint) or (Start >Run > mspaint)
Paint opens with a blank canvas. The size and shape of the canvas depends on what was done previously in Paint.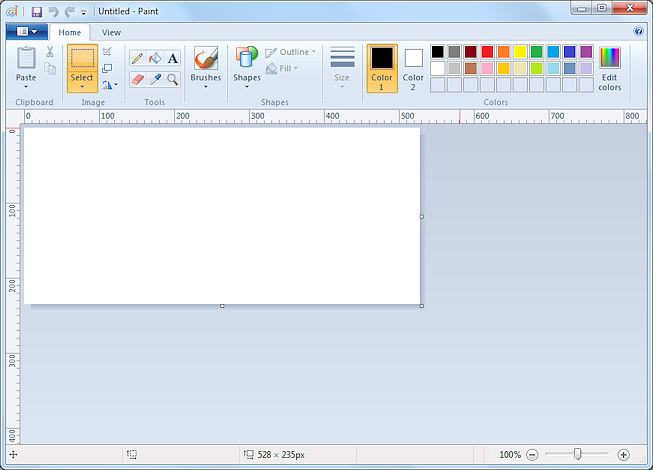
Illustrations and directions are from Paint in Windows 7 with the ribbon interface. Other versions of Paint are similar but do not have the ribbon interface.
-
Paste.
(CTRL + V)
Your image is pasted onto the canvas.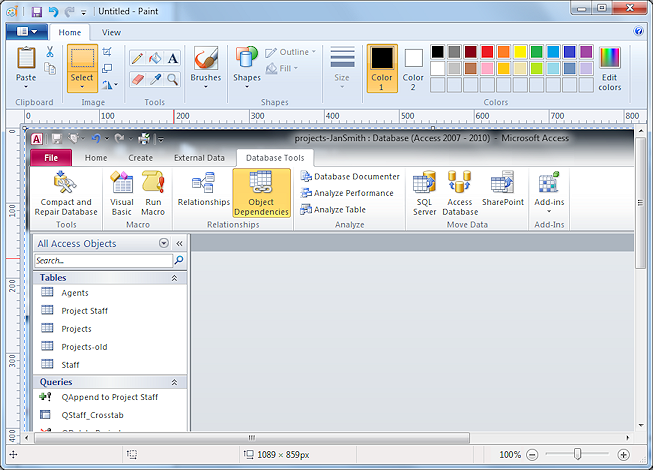
In recent versions of Paint, but not all other versions, all of the image is there, even if your window is not large enough to show it.
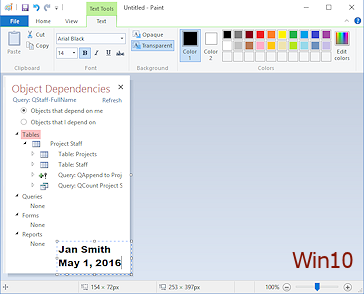
You need just the task pane part of the image.
-
 If necessary, resize the window
and/or scroll so that you can see the task pane part of the image.
If necessary, resize the window
and/or scroll so that you can see the task pane part of the image.
-
Click on the Select tool
 even though it is already highlighted.
The mouse pointer changes to the Select shape .
. -
Drag on the image to select just the task pane.
A dashed outline shows what is selection.


 Win 7, Win8, Win8.1, Win10:
 From the ribbon, click on the Crop button
  .
.
 Vista: Open the Image menu and select the Crop command.
 WinXP: Copy. Open a new blank image and resize the canvas to a very small size. Paste. The canvas enlarges to hold what you copied.
Only the selected area is left.
Object Dependencies: Add Text to Screen Shot, Print
Now that you have an image of the object dependencies tree, you can print it. Unfortunately, Paint does not allow you to add a header or footer. You can, however, add text directly to the image. For those of you in a class, your instructor needs to be able to tell one student's print-out from another! For the rest of you, this is a cool trick on its own.
-
Click on the Text tool
 at the left of the
window and then in a blank area of the image.
at the left of the
window and then in a blank area of the image.
A small box appears and the Text Tools ribbon tab appears.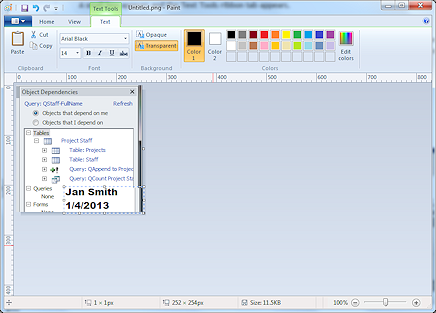
 Problem:
No text toolbar
Problem:
No text toolbar
Solution: After you click on the Text tool and then in a blank area of the image, open the View menu and click on Text toolbar. The bar will appear. If the Text toolbar choice is in gray and not clickable, click out of the image and repeat the steps.
-
On the ribbon, select the font Arial Black and size 14.
-
Type your name and the date.
If necessary, resize the text area by dragging one of its handles.
-
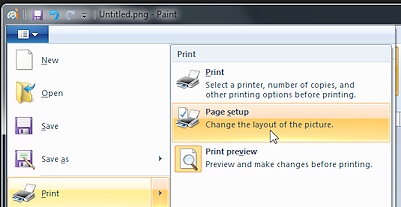 Open the Paint menu and select > .
The default page setup is different for different versions of Paint.
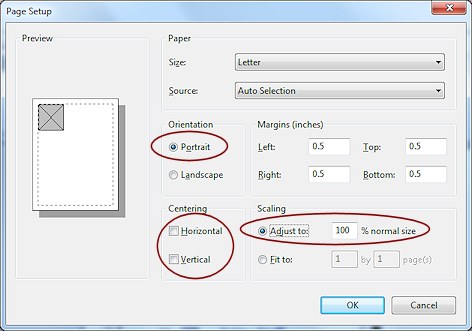
Change the Orientation to Portrait and the Scaling to Adjust to: 100%.
- If necessary, uncheck the Horizontal and Vertical boxes in the Centering section.
- Click on OK.
-
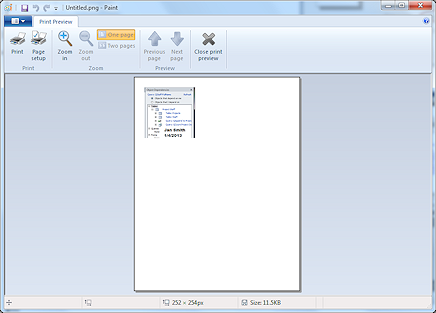 From
the Paint menu select > .
From
the Paint menu select > .
You can see how your image will look on paper, with your own name and the date as part of the image. -
Click the Print button
 on the Print Preview ribbon tab.
The Print dialog appears.
- Pick the correct printer and then click Print.
Your image is printed. Finally!
-
Close the preview, if necessary.
 Click the Save button on the Quick Access Toolbar at the top of the Paint window.
Since the image has not been saved before, the Save As dialog appears.
-
Change the type to PNG, if necessary.
-
Name the file objdep-QStaff-FullName.png
- Navigate to your Class disk and the folder databases project3.
-
Click on the Save button.
Do not close Paint yet.
Document Query Design View: Screen Shot and Print
The Query Design grid does not have a way to print the columns and tables used. A screen shot of the arrangement can work quite well.
 Open the query QStaff-FullName in Design View.
- If necessary, drag the bar below the table section upward to remove any empty space.
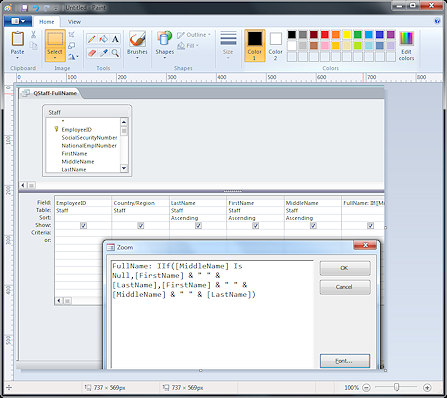
- Right click on the Full Name column and select Zoom.
- Click the Font button in the Zoom window.
- Choose a larger font size.
You can choose a different font if you wish. - If necessary, rearrange the Zoom window so that you can see all of the expression AND all of the parts of the Design View.
- Click in the Zoom window to remove the highlight from the code.
 Press the Print Screen button on your keyboard.
This copies the whole screen to the Windows Clipboard.- Switch to Paint and Paste.
- Crop the image to show just the Query Design grid and the expression in the Zoom window.
- Use the Text tool to add your name and the date to the image.
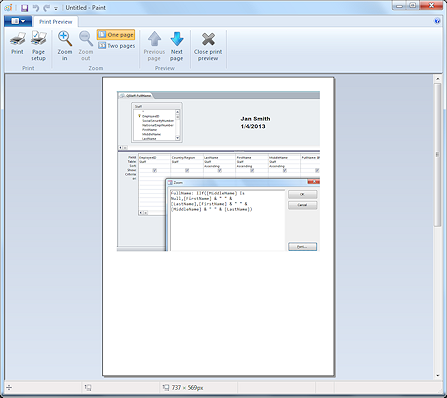 Print in a convenient orientation and size on exactly 1 page.
- Save the image to your Class disk in the the folder databases project3 with the name DesignView-QStaff-Fullname-Lastname-Firstname.png.
- Close Paint.
 Backup, Compact, and Repair
It is a good idea to make a backup copy before you make changes. It is also a good idea to compact your database after your work session. Compacting rearranges the database file to save space on the disk.
Both backing up and compacting require the database to close and reopen. Be sure that all of your changes have been saved or discarded first.
 Open the Database Properties dialog:
 Access 2007:


 Access 2010, 2013, 2016:
File > Info > View and edit database properties.The Properties dialog for the database opens.
-
If necessary, click on the General tab.
Write down the file size or capture a screen shot and save it.Your size is almost certainly different from the illustration.
-
Close the properties dialog.
Access 2007: You are back in the database work area. Access 2010, 2013, 2016: You are back in the Backstage View. - Backup the database:
Access 2007: > Manage > Back Up Database Access 2010: File > Save and Publish > Back Up Database > Save As button Access 2013, 2016: File > Save As > Back Up Database > Save As button
-
Click the Save As button.
The Save Backup As dialog appears. It looks like any other Save dialog.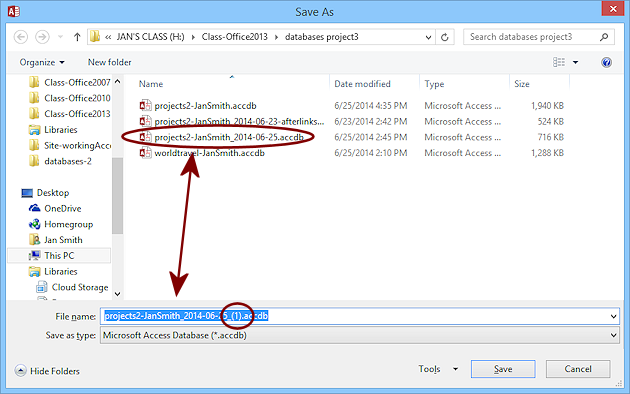
Because you chose Backup Database, the database name automatically adds the date to the new file name. If you have backed up once already today, Access adds _(1) to the file name. Each backup for today will get a larger additional number.
-
Navigate, if necessary, to where you are saving your work for these lessons.
-
If you wish, choose a new name for this copy.
Do not use the same name as the original database! Add something to the name to avoid confusion. In the illustration there is a backup with 'afterlinks' added. This shows that the backup came after the lesson on linking to another database.Clearly there should be more backups in the illustration if the user(me!) did all of the backups suggested in the lessons. At some point you can delete the older backups to release space on your drive.
-
Click on the Save button.
The database closes. Access makes a copy and opens the ORIGINAL database again.
You will see security warnings again if you saw them when opening the database before.
-
From the Database Tools ribbon tab, click on Compact and Repair Database
.
The database closes, is compacted and repaired with no messages to you, and then reopens.
You will see the security dialog again if you saw it the first time you opened the database.With a small database like this one, the database may close, compact and repair, and reopen before you can really see what is happening.
-
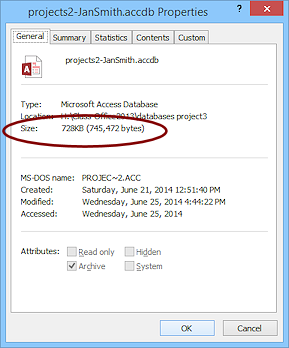 Open the Database
Properties dialog again and check the file size.
Open the Database
Properties dialog again and check the file size.
You should see a difference. Mine shrank from over 1.89 MB to 728 KB! That's less than 40% of the original size. Your numbers will be different, of course.
|
|
| © 1997-2017 Jan Smith All Rights Reserved |
Site Map What's New |
Privacy Policy Terms of Service Copyright Acknowledgements |
~~ 1 Cor. 10:31 ...whatever you do, do it all for the glory of God. ~~
Last updated: March 27, 2017