
Jan's Working with Databases
Tables & Queries: Tables: Document Table
After creating several tables, do you remember the design choices you made and why?
Good documentation is important. You may not be the one who has to maintain the database later. After a month or two have passed and after a few other projects have occupied your mind, you may get confused yourself about how all the parts fit together.
You can print a table's datasheet but you cannot print the Table Design View. So annoying! Access has several features that can help you document your tables and other objects but you will have to put the pieces together in your head yourself.
-
Relationships: The Relationships window can be printed as a Relationships report.
-
Documenter: This handy feature produces a detailed list of the features of your tables, including all of the properties of each field. This is a big mess... until you need what's in it. Then it is a gold mine!
-
Object Dependencies task pane: Shows what objects depend on other objects. This is very helpful when you are thinking about revising or deleting an object. It takes a bit of practice, however, to understand the tree of dependencies.
| |
Step-by-Step: Document a Table |
|
| What you will learn: | to print Relationships to print a table datasheet to Documenter for a table to view dependencies |
Start with: ![]() , Projects database from previous lesson open.
, Projects database from previous lesson open.
Print Relationships
The Relationships Report button creates a printable report that shows the Relationships window. You can edit this report in Design View but not while in Print Preview.
-
 Display the Relationships.
Database Tools ribbon tab > Relationships
-
 Click the button Relationships Report
  on the ribbon tab Relationship Tools: Design.
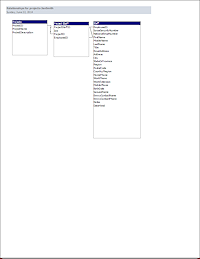
Access creates a printable version of the relationships.
You cannot add a header or footer or make any changes to this page in Print Preview. But you can edit the report in Design View.
-
Close the print preview window by clicking the Close Print Preview button on the Print Preview ribbon tab.
The report design view appears. - Drag the bottom of the Page Header section down about a quarter of an inch.
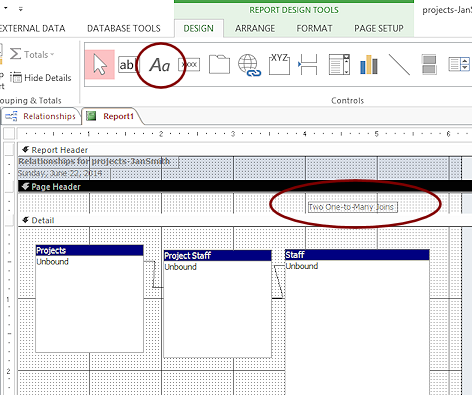 Click the Label button in the gallery of controls on the Report Design Tools: Design ribbon tab.
-
Click in the new Page Header section at about the 4" mark on the ruler and type Two One-to-Many
Joins.You could add other comments to the Details section by adding label controls.
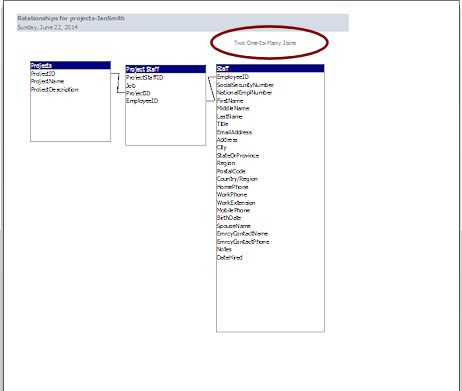 Open the report's Print Preview again.
-
 Click on the Print button on the ribbon to open the Print dialog.
 - Make any changes needed to the choices in the dialog and then print this one-page report.
- Close the tab and save the changes as Relationships-three tables.
-
Close the Relationships window.
Print Table Datasheet
-

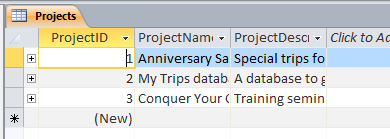 Open the table Projects in
Datasheet View.
Open the table Projects in
Datasheet View.The fields ProjectName and ProjectDescription columns are too narrow to show everything in them. This is exactly how the table will print. Not good enough!
You need to adjust the column and row sizes.
Resize the column for ProjectName wide enough to see all of the names.
-
Drag the ProjectDescription column wider and then drag the row to make it taller. All rows will be the same height!!
-
 Open
Print Preview again. Better!
Open
Print Preview again. Better!
The subdatasheets will not print even if they were open in Table Datasheet View!
 Problem:
Column headings do not show in the print preview.
Problem:
Column headings do not show in the print preview.
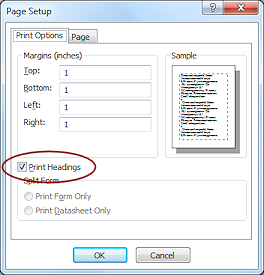
Solution: Click on the Page Setup button. On the Print Options tab, check the box for Print Headings. -
Print by clicking the Print button on the ribbon tab.
Unfortunately, you do not have much control over table print-outs in Access. That's why we will be learning about Reports later!
-
 Close Print Preview and then the table.
When prompted, save the changes to the table's layout.
Use Documenter for a Table
The Documenter report includes a LOT of information. Exactly what you see depends on what properties have been set for the table and its fields.
-
From the Database Tools ribbon tab, click on the Database Documenter button

 .
.
The Documenter window opens. The only view is Print Preview. -
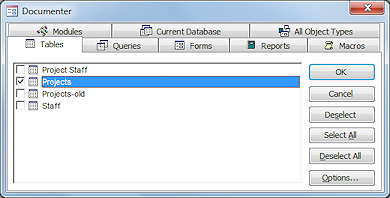 On the Tables tab, check the box for Projects and click on OK.
Access creates a report and opens it in Print Preview.
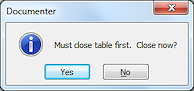 Problem: Message appears instead.
If the object that you want to document is still open, it must be closed first. Just click on Yes.
-
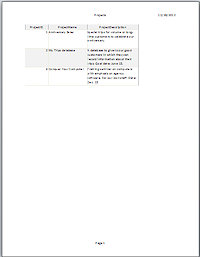
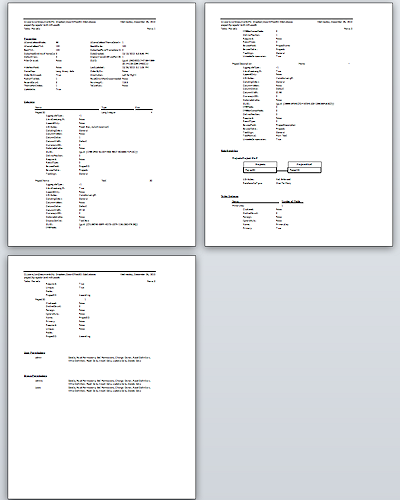 View each page of the 3-page report.
Eek! What a mess! There is a lot more information here than you probably want to deal with!Features that do not have settings, like Format property or Input Mask property, are not listed. Properties that have a default value will be shown.
Problem:
Cannot tell how many pages there are.
Nothing in the window tells you how many pages there are in the report.
Solution: Click on the Last Page button .
Once that last page displays, you can see in its page number in the
navigation box. That's how many pages are in the report.
.
Once that last page displays, you can see in its page number in the
navigation box. That's how many pages are in the report.
Complication: Access must format all of the pages before it can show you the last page. For long or complex reports, this can take a long time! If your computer is underpowered, the whole program can lock up or generate an error.
-
Print the report.
-
Close the report.
-
Find the following information in the report.
Highlight or circle the answers on the print-out and label with the matching letter.
Your instructor may want you to turn your marked report in for grading.-
Name of the table
-
Location of the database file
-
Date the table was created
-
Date of the print-out
-
Number of records in the table
-
Size of the ProjectName field
-
Type of the ProjectDescription field
-
Table(s) related to the table
-
Are cascading deletes and updates allowed?
"Not enforced" means that referential integrity is not enforced and therefore no cascades are allowed. -
Type of relationship
-
How many indexes are there?
-
-
Create a Documenter report on the the table Staff.
This table has more fields than the Projects table, so the report will be 10 to 13 pages long! Do not print unless your instructor tells you to.
-
Find the following information in the report.
Either mark your print-out or list your answers on the back of the Documenter report for the Projects table, along with the page number. The number of pages varies somewhat with each version of Access.-
Name of the table
-
Location of the database file
-
Date the table was created
-
Date of the print-out
-
Number of records in the table
-
Table(s) related to the table
-
Are cascading deletes and updates allowed?
-
Type of relationship
-
How many indexes are there?
-
What field(s) have a Format property set?
-
What field(s) have an Input Mask?
-
What field(s) have a validation rule and what is the rule?
-
View Dependencies
Access can show a hierarchy tree view of dependencies that is very useful when you are making changes or deletions to objects in your database. If you look at the dependencies before deleting or changing, you can see what other objects might be affected. This helps you avoid embarrassing and time-consuming mistakes, like renaming a field or deleting a query when it is used in 3 forms and 2 reports. Unfortunately there is no convenient way to print out this pane.
-
 In the Navigation Pane, select the
table Project Staff.
In the Navigation Pane, select the
table Project Staff.
-
On the Database Tools ribbon, click the button Object Dependencies
 .
.
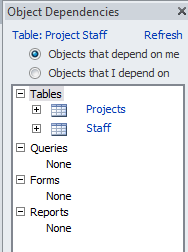
The Object Dependencies task pane opens at the right.This pane shows the name of the object at the top.
You can show one of two dependency trees for this object:- Objects that depend on me (the default view)
- Objects that I depend on
The Project Staff table has a relationship with both the Project table and the Staff table. As you add other tables, queries, forms, and reports, other objects that use fields from the Project Staff table will appear in the pane.
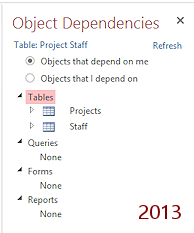
Problem:
No dependencies shown
Solution: Enable "Tracking name AutoCorrect info"
General

 Access 2013, 2016: File > Options > Current Database > scroll to 'Name AutoCorrect' section
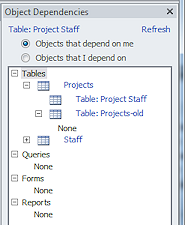
Click on an Expand button

 beside the Projects table.
The dependencies tree expands to show what objects depend on the Project table.Dependencies can be nested up to 8 deep but you can only navigate through 4 levels. When expanded, it can look very confusing because the same object will often appear in several places. Dependencies can be a tangle of relationships that loop back on themselves! The key facts are simple. Objects that are dependent on each other cannot be deleted or edited arbitrarily! It takes careful thinking.
-
 Experiment: Object Dependencies Pane
- Expand and collapse the dependencies tree.
- Show dependencies for a different object: Select the object in the Navigation Pane and click the Refresh link at the top of the Object Dependencies pane.
|
|
| © 1997-2017 Jan Smith All Rights Reserved |
Site Map What's New |
Privacy Policy Terms of Service Copyright Acknowledgements |
~~ 1 Cor. 10:31 ...whatever you do, do it all for the glory of God. ~~
Last updated: March 27, 2017