
Jan's Working with Databases
Tables & Queries: Tables: Redesign Table
After you add another table to a database, you need to look for duplications. Did your table design include data that is already in another table? You can remove duplicated fields. Less data entry for you!
Using a Lookup field lets you choose data instead of having to type it in. This reduces the opportunities for mistakes and saves wear and tear on your fingers, too.
Subdatasheets
Creating a One-to-One or a One-to-Many relationship
between tables allows you to view subdatasheets inside a table's datasheet view or as a subform or subreport. For example, in the Language Arts Classes ![]() database, the Students table has a
One-to-Many relationship
to the Scores table. So in the Students
table you can open a subdatasheet that shows all of the student's scores.
Subdatasheets can be nested up to 8 levels deep!
database, the Students table has a
One-to-Many relationship
to the Scores table. So in the Students
table you can open a subdatasheet that shows all of the student's scores.
Subdatasheets can be nested up to 8 levels deep!
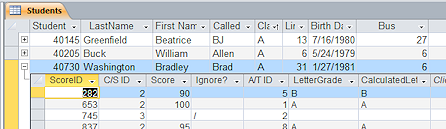
Each student has many scores.
 Only
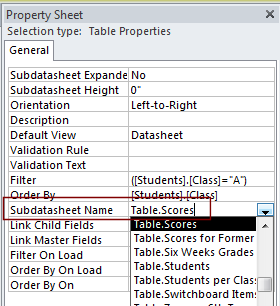
one kind of subdatasheet can be seen at a time, even if the table has relationships
with several other tables. You can choose which subdatasheet shows in the
Property Sheet for the table. In the property Subdatasheet Name you can choose from a list of
all the tables and queries in the database. Some choices will result in a
blank subdatasheet because there is no relationship. The default choice
is [Auto].
Only
one kind of subdatasheet can be seen at a time, even if the table has relationships
with several other tables. You can choose which subdatasheet shows in the
Property Sheet for the table. In the property Subdatasheet Name you can choose from a list of
all the tables and queries in the database. Some choices will result in a
blank subdatasheet because there is no relationship. The default choice
is [Auto].
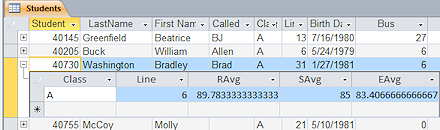
The Students table has a One-to-One relationship to the table 6 Weeks Averages. Each student has one set of averages for the grading term. Changing the Subdatasheet Name in the Property Sheet to the table 6 Weeks Averages makes the subdatasheet show only one record, the averages. This could be useful!
| |
Step-by-Step: Redesign Table |
|
| What you will learn: | to change field's data type to a Lookup field to select values from Lookup combo box to delete a field from datasheet view to view subdatasheets |
Start with: ![]() ,
Projects database from previous lesson open.
,
Projects database from previous lesson open.
Analyze Table Structure
Now that you have a Staff table, you need to check the design of your previous tables, Projects and Project Staff to make sure that the tables will work well together.
-
 Back up this database now so you will have a good copy to use if you need to start over. This works well while the database is small.
 Access 2007:
  > Manage > Back Up Database
 Access 2010: File > Save and Publish > Back Up Database > Save As button
 Access 2013, 2016: File > Save As > Back Up Database > Save As button
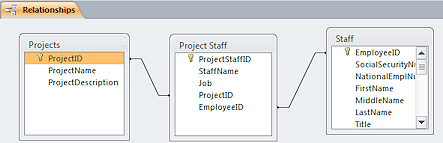 View the Relationships.
Database Tools ribbon tab > Relationships
You modified the relationships when you created the Staff table.- Thinking: For which fields would it be nice to pick a value from a list instead of typing in the value? ID fields that are foreign keys are often changed to Lookup fields so that typing errors do not mess up the tables. So in the Project Staff table, it would be nice to pick the project (ProjectID) and employee (EmployeeID).
Change Field's Data Type to a Lookup Field
You will edit the EmployeeID field in Project Staff table so that it pulls its values from the Staff table as Lookup list. You cannot make that change while that field is part of a join.
Once you select the matching values for each existing record, you will be able to delete the StaffName field. You cannot sort easily on that field anyway since the values start with the person's first name.
(Later you will create a query to make this Lookup field behave even better.)
- Delete the join between Project Staff and Staff tables.
- In the Relationships window, right click on the Project Staff table.
-
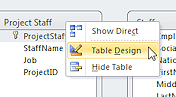 From
the context menu, select
From
the context menu, select
 The table opens directly into Table Design View. Slick shortcut!
-
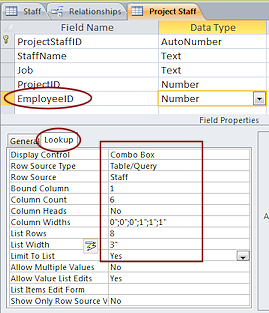 Select the field EmployeeID and click on the Lookup tab in the Field Properties.
-
Change the values to match the following:
Display Control = Combo Box
Row Source Type = Table/Query
Row Source = Staff
Bound Column = 1
Column Count = 6
Column Heads = No
Column Widths = 0";0";0";1";1";1"
List Rows = 8
List width = 3"
Limit to List = YesWhy these values?
Combo Box: This creates a drop list that can show multiple columns, like the first, middle, and last name of each employee. This will make it easy to choose an employee for the record in the Project Staff table.Bound Column: You want to save the EmployeeID value from the Staff table to the field with the same name in the Project Staff table. Since EmployeeID is the first field in the Staff table, you set the Bound Column to 1. No matter what fields are shown in the combo box, only the value in the Bound Column is actually saved in this table.
Column Count: This is the number of fields from the Staff table that are part of the combo box. The number must include any fields that are to the left of the ones that you actually want to see. In the datasheet view of the Staff table, the fields show in the order: EmployeeID, SocialSecurityNumber, NationalEmplyNumber, FirstName, MiddleName, LastName. So the Column Count must be 6. To avoid this you could create a query that pulls together the exact fields that you need.
Column Widths: You can hide a column that you don't really want to see by setting its width to 0". So using 0";0";0";1";1";1" means that the first three columns are hidden. Each column from Column Count must have a width set.
List Width: The drop list will be as wide as the column in the table's datasheet unless you set it to be wider here. To see all three name columns, you must make this width at least as wide as the sum of the column widths.
 Save the table Project Staff.
- Switch back to the Relationships window and recreate the join between the Staff and Project Staff tables, using the field EmployeeID.
The Lookup list would work without the join since you created it in the table's design. But the subdatasheet would not show because that feature is based on the join. - Save and close the Relationships tab.
Select Values from Lookup Combo Box
 Switch to Datasheet view.
-
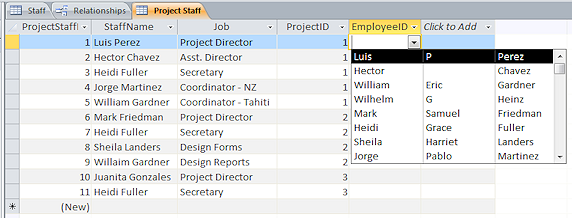
Click in the EmployeeID field for the first record and expand the Lookup list.
-
Choose the record that matches the name in the StaffName field.
-
Repeat for all records in the Project Staff table.
There are 9 names in the Staff table and we set the combo list to show 8 at a time. You will have to scroll the drop list to see one of the names. (Yes, I chose to do this on purpose!)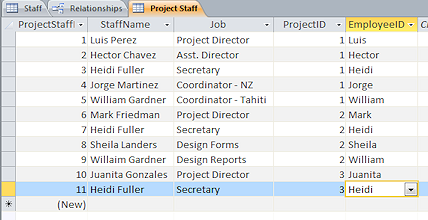 In the EmployeeID field you now see the first
name for the record that matches the number that is actually stored in
this field. Why?? The FirstName field is the first column that was displayed in the combo box. The value in the first visible column of the combo box is what shows. The value in the first column is what is stored.
In the EmployeeID field you now see the first
name for the record that matches the number that is actually stored in
this field. Why?? The FirstName field is the first column that was displayed in the combo box. The value in the first visible column of the combo box is what shows. The value in the first column is what is stored.Confusing?? YES, especially if two people have the same first name! You are not done with this table yet!
Later you will create a query that will let you show a full name instead of just the first name. Another approach would be to change the order of the fields so that the LastName was displayed. But, you could still have two employees with the same last name, so that change would not really be enough.
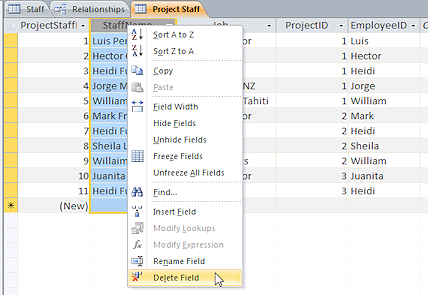
Delete Field (in Datasheet View)
You do not need the StaffName field anymore. The EmployeeID field will join the tables. You can remove the field from the Datasheet view.
Why delete the field? Removing the field will avoid a problem with data inconsistency. For each project the staff names might wind up being entered differently if you are typing them in directly. That will make it hard or impossible to answer simple questions like "What projects is Luis Perez assigned to?" because the sort and search features will treat the different spellings as different people.
Remember that our goal is to enter data once. So a person's name should be entered in one table (Staff) and then pulled from that table for other uses.
-
 Click in the heading for the column StaffName to select the whole
column.
Click in the heading for the column StaffName to select the whole
column.
-
Right click on the column and from the context menu select or .
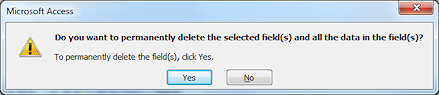 A confirmation message box appears asking if you want to permanently
delete the field and its data.
A confirmation message box appears asking if you want to permanently
delete the field and its data.
Alternate method: Select the whole column and press the DELETE key. You will get a confirmation message.
-
 Click on Yes.
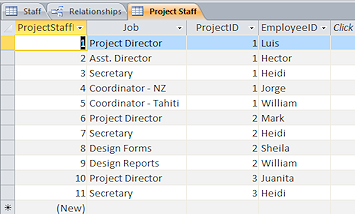
The field is deleted.This table is now more efficient but it is harder to read without the complete name of the staff member. (It would be even worse if we were looking at the numbers in the EmployeeID field instead of first names!)
"Good" table design often makes the table harder to work with directly but it is worth it to keep data errors as low as possible.
Later you will use queries and forms to access the records in a more user-friendly way.
-
Save the table Project Staff and close it.
View Subdatasheets
Your tables can show more information than is actually in the table. It's not particularly convenient, but at least it is there! Access will automatically create subdatasheets on the One side where tables have a One-to-One or a One-to Many relationship. If a table is related to several tables, Access may have guessed wrong as to which subdatasheet you wanted to see. You can change this behavior in the Table Property Sheet in the Subdatasheet Name property.
-
 Open the Projects table datasheet and click on the Expand icon
  at the left of each record.
A subdatasheet expands to show the matching records from the Project Staff table. This is available only when there is a relationship between the tables.
 Problem: No Expand icons show
Your tables are not joined.
Solution: Open the Relationships window and create the joins between the tables. - Close the Projects table.
-
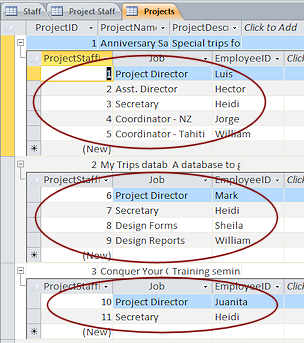
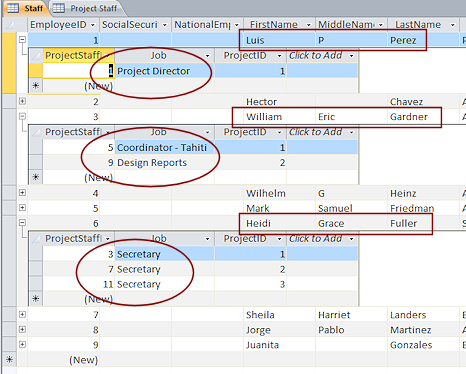 Open the Staff table and view the subdatasheets.
The illustration shows subdatasheets of project assignments for three records.Since you joined the Project Staff and Staff tables with the EmployeeID field, the Staff table can show to which projects each staff member is assigned. Now if we remembered what project went with those ProjectID numbers, it would all make more sense!
Idea: You can join queries to tables also. You could create a query that showed the data you want to see in this subdatasheet.
- Close all tables and, if prompted, save your changes.
|
|
| © 1997-2017 Jan Smith All Rights Reserved |
Site Map What's New |
Privacy Policy Terms of Service Copyright Acknowledgements |
~~ 1 Cor. 10:31 ...whatever you do, do it all for the glory of God. ~~
Last updated: March 27, 2017