
Jan's Working with Databases
Tables & Queries: Tables: Validation
Access has several features that can help you avoid certain kinds of data entry mistakes. You have already seen Input Masks, which restrict what kind of characters and how many you can enter.
You can also validate your data as you leave a field or record, according to validation rules that you create.
Examples below are from LanguageArtsClasses.accdb ![]() .
.
Validate a Field
 One of the properties for a field in the Table Design
View is Validation Rule. When you are entering
or editing data, Access won't let you leave the field until the value
fits the validation rule. A rule for a field cannot use values in other fields, so this rule cannot compare this field to another one.
One of the properties for a field in the Table Design
View is Validation Rule. When you are entering
or editing data, Access won't let you leave the field until the value
fits the validation rule. A rule for a field cannot use values in other fields, so this rule cannot compare this field to another one.
If the field's value does not meet the rule, a message box will display the Validation Text from the field's properties. A well-written message will tell the user exactly what kind of value is acceptable.
If there is a validation rule for a field, the field cannot be Null in some versions of Access, unless the rule itself allows it, like the first example below. For the other examples, the field cannot be Null. You must enter a value!
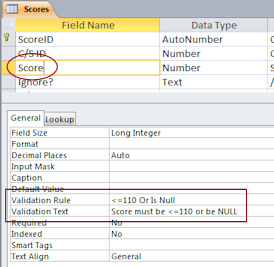
Examples of Validation Rules:
| Rule | Means |
|---|---|
| <=110 Or Is Null | The value is less than or equal to 110 or is Null. |
| <>0 | The value is non-zero amount. |
| >5 | The value larger than 5. |
| <#1/1/2012# | The date is earlier than January 1, 2012. |
| Is Not Null | There must be a value in the field. ( Zero counts as a value!) |
Other Ways to Restrict Field Values
Two other properties can also restrict a field.
Required property: Yes or No. If you choose Yes, then you must enter a value in the field.
Allow Zero Length property: Yes or No. If Yes, then you are allowed to leave the field blank with a zero-length string. This is not the same as a value of Null. Confusing!
What do they mean? Blank, null, and zero-length string
Blank: A field with no value showing looks blank and empty, like nothing is there. In fact, there are two different kinds of blanks - Null and Zero-length string.
Null: A Null field has no data. It is the same as saying "I have not entered a value for this field" or "I do not know if the value exists".
Example - Null value: You do not know whether or not a customer has a cell phone. The CellNumber field should be Null.
Zero-length string: The name "Kathy" is a string with length 5 because there are 5 characters in the text string. "" (which is two double quote marks) is a string with 0 characters, a zero-length string. The double quote marks tell Access to start and stop a string of characters, but there are no actual characters in this string. Strange concept, for sure!!
If you type two double quote marks into a text field with nothing between them, like "", Access interprets this zero-length string as meaning "I know that this field does not have a value."
Once you leave the field, the quotes disappear. The cell looks blank again.
Example - Zero-length string value: You know that a customer does not have a middle name. The field MiddleName should contain "", a zero-length string.
Validate a Record
 In the Property Sheet for the table, you can set a
validation rule that applies to the record as a whole. You cannot save the record until the values meet this rule. A rule
for records can use the values from several fields, often to compare one
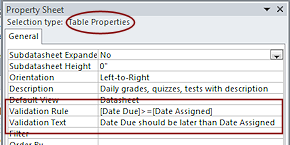
to another. The illustration shows a validation rule that compares two dates for the table Assignments/Tests in the Language Arts Classes database. The date the assigment is due should be equal to or later than the date it was assigned.
In the Property Sheet for the table, you can set a
validation rule that applies to the record as a whole. You cannot save the record until the values meet this rule. A rule
for records can use the values from several fields, often to compare one
to another. The illustration shows a validation rule that compares two dates for the table Assignments/Tests in the Language Arts Classes database. The date the assigment is due should be equal to or later than the date it was assigned.
How to show Table Property Sheet: Click the Property Sheets button  while you are in Table Design View. This button is a toggle, hiding and
showing the Property Sheet pane for the table.
while you are in Table Design View. This button is a toggle, hiding and
showing the Property Sheet pane for the table.
Managing the Property Sheet Pane:
You can drag that pane by its title bar to float it. Whether floating or docked, you can resize the dialog's width by dragging the inside edge. If the value for a property is too long to read, click in the value and then on the ellipsis button  for the property. The Expression Builder dialog will open with lots of space to show the full text of the property.
Examples of Table Validation Rules:
| Rule | Means |
|---|---|
| [ShippingDate] > [OrderDate] + 14 | The shipping date must be at least 14 days (two weeks) later than the date of the order |
| >=#1/1/2012# and <#1/1/2013# | The date must be in the year 2012. |
Other Validation Rules
While we are talking about validation, let's go ahead and mention that there are also ways to validate your data in a form.
Control: In the Design View for a form, you can create a validation rule for a control. The validation rules for the field and for the record still apply. You must be careful that all of the rules work together the way you expect.
Macro or event procedure: Forms (and reports) can run little bits of programming as macros or as event procedures. These little programs are often executed when a form is opened or when the focus moves to a new record or in response to an event, like clicking a button or saving a record. Such programs can include validating data in more complex ways than you can manage with a Validation Rule property.
Process of Validating
A particular field can easily wind up with several different rules that it must satisfy when it is used on a form or in a report. The order in which these rules are checked can sometimes be important. If the rules contradict each other, you won't be able to enter any data in that field!
Order of Validation:
- Macro or event procedure in a form or report
- Control on a form: ValidationRule property
- Field's own properties: ValidationRule, Required, and AllowZeroLength
- Table's property: ValidationRule (This property performs validation on whole records)
Test Validation Rules
When you add validation rules after the table has records, you need to check that the existing data abides by the rules. The table does NOT check automatically. You must save the table before Access can check.
 In the Table Design View, in the ribbon tab Table Tools: Design, there is a button Test Validation Rules. Microsoft Access will test the rules in turn. If existing data violates a validation rule or the Required or AllowZeroLength settings, a message box appears to tell you which rule and which field. But, Access will NOT tell you which record or how many records violated the rule.
You would then sort or filter or create a query to find all of the records to see whether you need to fix the data or fix the rule.
| |
Step-by-Step: Field & Record Validation |
|
| What you will learn: | to set the Validation Rule and Validation Text for a field to save table and automatically test rules to understand warning messages about breaking the rules to set a Validation Rule and Validation Text for the table to test the effect of validation rules to add records after rules were created |
Start with: ![]() ,
Projects database from previous lessons open.
,
Projects database from previous lessons open.
You will add a new field to the Staff table and create a validation rule for it.
Create Validation Rule and Validation Text for Field
 Back up this database now so you will have a good copy to use if you need to start over. This works well while the database is small.
 Access 2007:
  > Manage > Back Up Database
 Access 2010: File > Save and Publish > Back Up Database > Save As button
 Access 2013, 2016: File > Save As > Back Up Database > Save As button
-

 If
necessary, open the Staff table in Design View.
If
necessary, open the Staff table in Design View. -
Click in the first blank row and type a new field name, DateHired.
-
Choose the Date/Time type and accept the defaults.
-
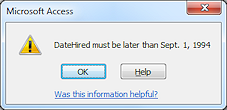
In the row for Validation Rule, type >#9/1/1994#
This tells Access that the date must be greater than (later) than Sept. 1, 1994, which is the founding date for World Travel Inc.
-
In the row for Validation Text, type DateHired must be later than Sept. 1, 1994.
Save Table and Automatically Test New Rule
 Save the table.
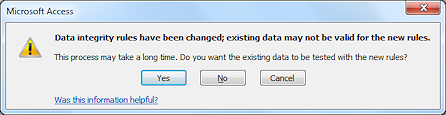
A message box appears warning you that the rules for data integrity have changed.Existing data that does not fit the validation rule creates a problem!
 Testing data takes time: When you make this kind of change after creating many records, it can take a long
time for Access to verify how the data fits with the new rules. It is
better to figure out what needs to be validated when you design the table
to start with!
Testing data takes time: When you make this kind of change after creating many records, it can take a long
time for Access to verify how the data fits with the new rules. It is
better to figure out what needs to be validated when you design the table
to start with!
Click on Yes.
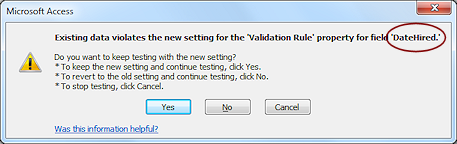
Since there is only one record, it won't take long for Access to do the check!Another message box appears telling you that existing data violates the rule.
Don't panic! You have not entered any data into the new field yet. Therefore, the new field is Null, which is not a date at all! There isn't really a problem yet.
Violation message for existing data: Note the field carefully. This message will appear once for each rule that was violated, not
for each record. You cannot tell from the message how many records or which records are creating the problem. -
Click on Yes to keep the new setting and continue testing.
-
 Switch to Datasheet View.
- For the first record, enter as the DateHired the date August 31, 1994 as 08/31/1994, which is earlier than the rule
requires.
You did not set an input mask for this field.
- Save value (mouse method):
Click in the another field to save the value you just entered.
 A
message box pops up and displays the Validation Text that you entered
for the DateHired field.
A
message box pops up and displays the Validation Text that you entered
for the DateHired field.
- Click on OK.
- Change the date to 09/02/1994.
- Save record (button method):
From the Home ribbon tab, click .
.
The dirty record symbol vanishes.
No messages this time!
This command saves the record but leaves your cursor in the cell.
 Keyboard shortcut to save a record: SHIFT + ENTER.
Create Validation Rule and Validation Text for Table
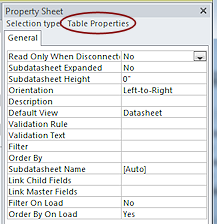
The table has properties of its own, including Validation Rule and Validation Text properties. The rule applies to a record rather than to an individual field and can use more than one field.
- Switch to the Design View for the Staff table.
-
 On
the ribbon tab, click the Property Sheet button
On
the ribbon tab, click the Property Sheet button  .
.
A dialog appears for the properties of this table. Warning: No table name in the Property Sheet.
The properties are for the active table, so you must pay attention to which one that is. No
Property Sheet appears:
No
Property Sheet appears:
The Property Sheet button is a toggle button to show or hide the dialog. The dialog was already open so your click closed it.
Solution: Click the button again.Next you will create a validation rule, but you will mistype part so that you can see how smart Access is, and how not-quite-helpful Access is!
- In the Validation Rule box in the Property Sheet, type [DateHired]>[BirthDate>
This expression is supposed to tell Access that the value in the field DateHired must be larger (later) than the value in the field BirthDate, but you typed a > instead of closing bracket ].
![Message: The expression you entered is missing a closing parenthesis, bracket (]), or vertical bar (|).](message-expressmissingparenthesis.png) Click in the Validation Text row, which makes Access try to save your new rule.
Click in the Validation Text row, which makes Access try to save your new rule.
A message box appears that says you are missing something. This is helpful but not as helpful as showing you which character is missing! Access must know which, but it won't tell!- Click on OK.
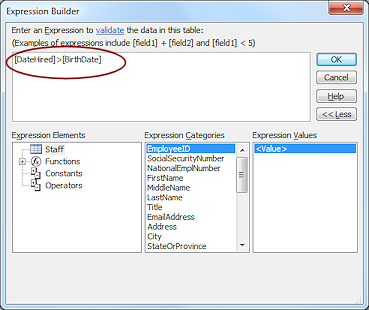 Click in the Validation Rule row again and then click on the ellipsis button that appeared in that row.
The Expression Builder window opens. Now you can see the whole validation rule.- Correct the error by replacing the last angle bracket > with a square bracket ].
- Click on OK.
The Expression Builder closes.
- Click in the Validation Text row.
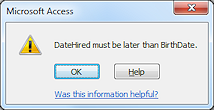
Access saves the value for the rule. No messages this time! - In the Validation Text box, type DateHired must be later than BirthDate.
- Click in another row to save the value for Validation Text.
Test the Rule
You should always test your rules with sample data. Sometimes rules combine in ways that you did not expect!
- Test 1: Data that fits the rules
- Test 2: Data that does NOT fit.
- Test 3: Values at the edges.
Example: Should the rule have been >= (greater than or equal to) instead of just >??
![]() Test a copy: When the table already has many records, make a copy with just a few records. The test will run faster and you can safely change values for testing without damaging existing data.
Test a copy: When the table already has many records, make a copy with just a few records. The test will run faster and you can safely change values for testing without damaging existing data.
-
Switch to Datasheet View.
Once again you must save the table and let Access verify the data.Test 1: Data that fits: Done!
You have already entered data that fit the rule and the rule worked as expected. - Test 2: Data that does not fit
Change the BirthDate value to 10/1/1997, which is after the DateHired.
- TAB out to the next field.
There is no warning message! There is no validation rule for the BirthDate field. Your new rule is for the record so you will have to save the record, not just the value.
-
 Save the record with the key combo SHIFT + ENTER.
Now the warning message appears! But it only shows the Validation Text you entered. It would be nice if it told you which field is wrong! Ah well. Maybe in the future.
- Click OK.
- Test 3: Change the BirthDate value to 09/02/1994.
[Remember that this field uses an input mask so type carefully.]
- Save the record again.
The warning message appears again.
Why? Because the DateHired is equal to the BirthDate instead of greater than (later than).
Of course DateHired should really be MUCH later that the BirthDate, by at least 18 years!
- Press the ESC key to throw out all of your editing.
Add Records
You need to add records to the Staff table. You must at least have records for the people already included in the Project Staff table. Of course there could be more people than this in a real company.
-
Enter the data below in the Staff table. The EmployeeID is an AutoNumber field, so you won't actually type that in.
Some fields in the table will be blank for all of these records and some will be blank for certain records. If you mistyped in a field with a validation rule, pay attention to the message that appears.
Some dates show only a two digit year. Remember that you actually want to enter a 4 digit year.
Printable copy
 of records 2 - 5 (Use Portrait orientation)
EmployeeID 2 3 4 5 First Name Hector William Wilhelm Mark Middle Name Eric G Samuel Last Name Chavez Gardner Heinz Friedman Title Agent Agent Agent Agent Email Name hchavez@
viajesmundiales.netbgardner@
viajesmundiales.netwheinz@
viajesmundiales.netmarkf@
worldtravelinc.netAddress Primero 3344 Segundo 1415 Circulo 440 11 Piney Ridge City Buenos Aires Buenos Aires Buenos Aires San Diego State CA Region Postal Code 1123 1124 1123 99800 Country Argentina Argentina Argentina USA Home Phone 999-0011 555-2253 555-6631 999-555-1123 Birthdate 01/25/1965 06/19/1971 11/09/1955 09/30/72 Spouse Name Carla Chavez Sofia Gardner Charlotte Heinz Helena Friedman Emrgcy Contact Name Carla Chavez Sofia Gardner Charlotte Heinz Helena Friedman Emrgcy Contact Phone 999-0011 555-2533 555-6631 (999) 555-7766 Notes Esp. informed on golf packages Date Hired 04/15/2000 2/3/2004 8/9/1995 5/25/2004 Printable copy
of records 6 - 9 (Use Portrait orientation)EmployeeID 6 7 8 9 First Name Heidi Sheila Jorge Juanita Middle Name Grace Harriet Pablo Last Name Fuller Landers Martinez Gonzales Title Secretary Branch Manager Agent Branch Manager Email Name heidifuller@
worldtravelinc.netslanders@
worldtravelinc.netjmartinez@
worldtravelinc.netjgonzales@
viajesmundiales.netAddress 6633 Harding Road 42 West Beach Drive 1442 West Columbia Dr. Primero 5843 City Nashville Sydney Franklin Buenos Aires State TN NSW TN Region Postal Code 37456 2000 45672 1123 Country USA Australia USA Argentina Home Phone 615-555-3476 5555-6666 615-555-9977 555-1487 Birthdate 4/12/1980 03/23/82 12/23/85 05/13/70 Spouse Name Paul Landers Flora Martinez Emrgcy Contact Name Margaret Fuller Paul Landers Flora Martinez Jorge Gonzales Emrgcy Contact Phone 615-555-4466 5555-6666 615-555-9977 555-8879 Notes Date Hired 12/5/2002 2/15/2003 2/15/2003 01/05/95 After all of this typing directly in the table, you can see why another method was invented. Using a form would make this easier.
As you entered records, you may have noticed the + at the left for a subdatasheet. You already created a relationship between the Staff table and the Project Staff table. But you have not yet entered the EmployeeID values in the Project Staff table. So Access cannot show the subdatasheets yet.
-
Close and save the Staff table.
|
|
| © 1997-2017 Jan Smith All Rights Reserved |
Site Map What's New |
Privacy Policy Terms of Service Copyright Acknowledgements |
~~ 1 Cor. 10:31 ...whatever you do, do it all for the glory of God. ~~
Last updated: March 27, 2017