
Jan's Working with Numbers
Excel Basics: Getting Started:
Header/Footer
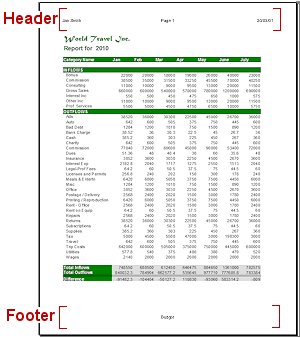
Information that you want to see on every printed page can go in the header at the top or in the footer at the bottom. Spreadsheets often need several paper pages to print. It is important to put the right information in the header or footer so you can tell which pages go together and in what order.
Header and footer text fits
inside the top and bottom margins.
Both the header and footer have 3 sections: Left, Center, Right. The Page Layout view puts its "Click to add..." comment in the center area. You must create and format these three areas separately.
![]() Separate
Header/Footer for each Sheet: You must actively set the header and footer for each sheet. Excel will then put the header and footer on each piece of paper that it takes to print that sheet. If you wish to use the same header/footer for several sheets,
you can select all the sheets first and then create the header/footer. Just
don't forget to unselect the sheets when you are done or all your keystrokes
will apply to every selected sheet. You can overwrite a lot of data this
way!!!
Separate
Header/Footer for each Sheet: You must actively set the header and footer for each sheet. Excel will then put the header and footer on each piece of paper that it takes to print that sheet. If you wish to use the same header/footer for several sheets,
you can select all the sheets first and then create the header/footer. Just
don't forget to unselect the sheets when you are done or all your keystrokes
will apply to every selected sheet. You can overwrite a lot of data this
way!!!
Creating a Header or Footer
There are two approaches to creating a header or a footer for your print-outs.
-
The Page Layout view lets you type on a 'page'.
-
The Page Setup dialog has a Header/Footer tab where you can pick one of the predesigned choices or create your own custom header or footer.
| |
Step-by-Step: Setup Header & Footer |
|
| What you will learn: |
to create a header or footer in Page Layout view that Undo does not track changes to the header or footer that text does not wrap in a header or footer to create a header or footer with the Page Setup dialog to create a custom header or footer to print |
Start with: ![]() ,
, ![]()
Header: Page Layout
-
 Open a new blank workbook.
 - Change the view to Page Layout.
The header contains a 3 cell table.
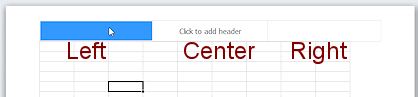
The center cell of the table shows the text "Click to add header" but you can also type in the left and right cells. - Click in the left section of the Header area.
- Type your name.
This section automatically aligns the text to the left. - Press the TAB key to move to the center section of the Header.
The cursor lands in the center of this cell because its default alignment is Center. -
 Switch to the tab Header & Footer Tools: Design.
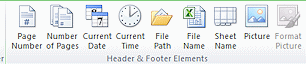
The tab group Header & Footer Elements has several buttons to insert things that are commonly used in a header or a footer. You used the Current Date button in a previous lesson. -
 Click on the button File Name, type a space, and click on the button Sheet Name.
Excel puts codes into the center section. - Press the TAB key to move to the right section of the Header.
The cursor lands at the far right because the default alignment for this cell is Right.
The center section immediately changed to show the current name of the file and the name of the current sheet.
Your sheet may show a different number instead of Book1 if you have had other blank worksheets open in this session, even if they had been closed.
-
 Type Excel Project 2.
-
 Save your file to
your Class
disk in the excel
project2 folder you created earlier, with the name header-Lastname-Firstname.xlsx.
Save your file to
your Class
disk in the excel
project2 folder you created earlier, with the name header-Lastname-Firstname.xlsx.
The header changes to show the new file name.
Header/Footer Does Not Wrap
![]() No
wrapping: The sections of the header do not wrap
automatically. If what you type is too long, it will print on top of the text in
the next header section. Let's prove it!
No
wrapping: The sections of the header do not wrap
automatically. If what you type is too long, it will print on top of the text in
the next header section. Let's prove it!
![]() Tip: The preview in the Header dialog that shows your custom text on a page that is smaller than the normal paper page. So if everything fits in the preview, you should be clear of overlaps on the real page, too.
Tip: The preview in the Header dialog that shows your custom text on a page that is smaller than the normal paper page. So if everything fits in the preview, you should be clear of overlaps on the real page, too.
- In the Left section of your header, copy your name.
- Type a space after your name and paste the name and space again.
- Repeat, if necessary, until the text
overlaps the text in the Center section.
The Left section hides the Center section while you are typing or pasting.
-
 Click in the Right section of the header.
The Center section text now shows, but the extra text from the Left section is lying on top of it! Not at all what I expected!
- Use Undo to get rid of this mess!
But wait! Undo is not available. The button is grayed out. Truly unexpected!
Are you keeping a list of the things that did not work the way you expected? I've lost track already.
- Click in the Left section and delete all but one copy of your name.
Header/Footer: Page Setup Dialog
The same methods work for both a header and a footer. Let's looks at the dialog that lets you create those. There are some pre-designed headers and footers but you can also create a custom one.
-
 With
your cursor still in the header, switch to the Page Layout ribbon tab.
With
your cursor still in the header, switch to the Page Layout ribbon tab. - Open the Page Setup dialog.
Whoops! The whole ribbon tab is grayed out while you are in the header. Who knew?! - Click out of the header.
- Open the Page
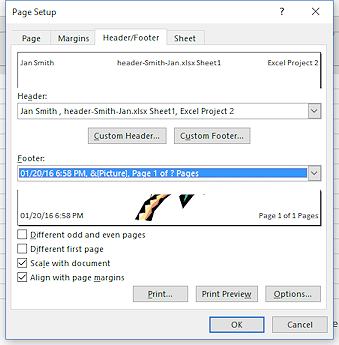
Setup dialog to the Header/Footer tab.
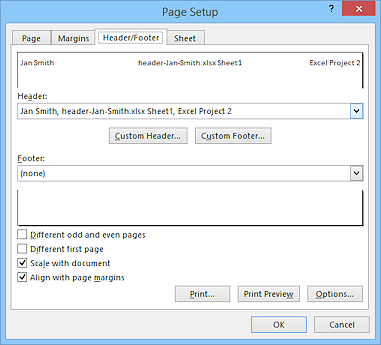
The dialog shows separate text boxes and previews for the header and footer. Your current header shows in the Header preview. In the Header text box there is a comma between the text for each section. The arrow at the end of the box opens a drop list of commonly used headers.
-
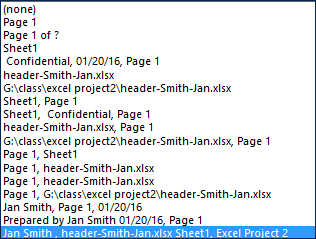 Open the drop list on the Header text box and scroll it to see the pre-defined headers, with your current custom header at the bottom of the list. The list of choices is the same for both header and footer.
Do not select any of these suggestions. You would lose the header you just created!
Your list will look different from the illustration since your author name, file name, and path will be different.
It is hard to see but a comma separates the text for each section. Unhappily, you cannot tell from this list which sections are used when there are only one or two parts.
The author's name is the name on the account currently in use. So if you are using someone else's computer, the default author is not your own name.
The author's name for this document can be changed in
 File > Prepare > Properties or

 File > Info.
  Experiment: Pre-designed Footers
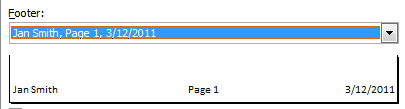 Click on drop list for the footer.
- Select one of the choices in the drop list. The preview box below
the footer box changes to show how your choice will display- left, center, right.
The preview does not use the actual font and font size in your header.
The illustration shows a choice that uses all three sections. Most do not. - Try several of the pre-designed choices.
- When you are ready to continue.... select (none) in the list of pre-designed
footers.
-
Click the Custom Footer… button.
A dialog box opens with 3 sections. You must enter and format each section separately.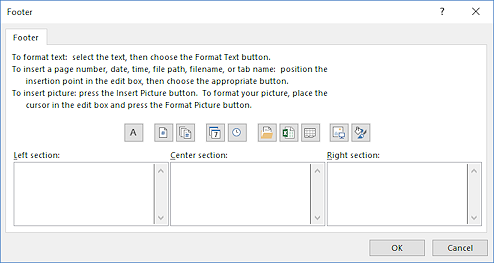
The Left section is Aligned Left. The Center section is Centered. The Right section is Aligned Right. You cannot change these alignments.
This dialog is similar to the one in Word, but Excel has more buttons to enter data that will be updated automatically.
You can also type plain text in any section. It's very flexible.
- Experiment: Custom Footer
- Click in a
section and try out each of the buttons to see what they will put
there.
What you see to start with is a code, like &[Date], which inserts the current date.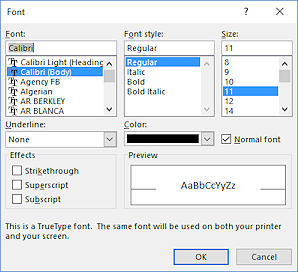
 Font button - Opens the Font dialog. You must format each section separately. You can format just part of a section's text, if you wish.
You do not have quite all of the choices here that the Font dialog has in Word. Some of the Effects are missing.
 The check box Normal font will return the header to the default workbook
Body font. For a workbook created from the default Blank
workbook template, this is Calibri 11 pts.
The check box Normal font will return the header to the default workbook
Body font. For a workbook created from the default Blank
workbook template, this is Calibri 11 pts.  Insert Picture button - Opens the Insert
Picture dialog for you to browse for an image.
Insert Picture button - Opens the Insert
Picture dialog for you to browse for an image.
If your image is bigger than the space for the footer (or header), it will still show but your document will land on top of it. That may or may not be a problem. You can have only one picture in a section at a time. A company logo is a common choice. Format Picture button - Available only after
you insert a picture. Opens dialog to change the size etc. of the
picture.
Format Picture button - Available only after
you insert a picture. Opens dialog to change the size etc. of the
picture. - When you are ready to continue, remove your experimental text and picture.
- Click in a
section and try out each of the buttons to see what they will put
there.
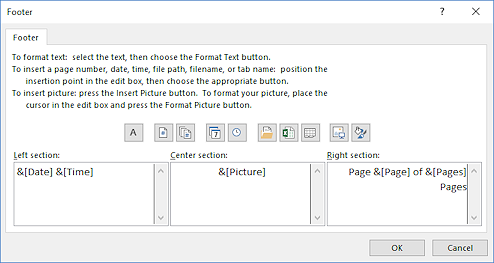
- Use the buttons to create your own Custom Footer with the following sections:
Left = the Date, a space, and the Time.
Center = a picture (your choice). The resource files for these lesson contains several images if you do not have one of your own. Format the picture with Locked Aspect Ratio and set the to Height = 1.5", which is taller than the height of the margin. What will happen?
Right = Type Page and a space, insert page number, type of and a space, insert Total number of pages, type a space and Pages.
- Click on OK to close the
customize Footer dialog and on OK to close the
Page Setup dialog.
Your header and footer now have something in each of the three sections. That is usually overkill!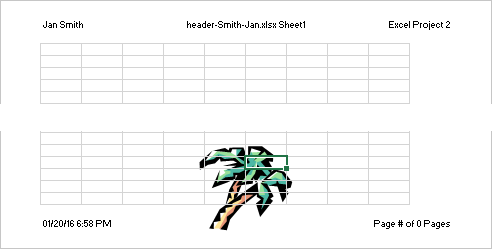
Page Numbers: Do you have "Page # of 0 Pages" in the footer? What's with that? Apparently Excel has not yet figured how many pages there are in the document. That's all right. You haven't entered any data in the worksheet yet! That's why the total number of pages is zero.
Picture Size: The picture is too tall to fit in the Footer area. It lies under the grid area. This one is easy to forget! At least it did not get chopped off. To guarantee that the picture won't run into the data, size it to the height of the Footer alone. Or be sure you won't have data in the cells the image in under.
You will be using this style of header on each sheet for your projects and exercises in these lessons. You will not usually need footer text for the projects and exercises.
- Click in the sheet to get out of the header and footer.
Open Print Preview.
Since you have not entered anything in the worksheet yet, an error message appears. Apparently the lovely header and footer do not count!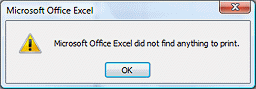 Excel 2007:
 Excel 2010, 2013, 2016: The message appears in the Backstage View where the print preview
should be.
Excel 2010, 2013, 2016: The message appears in the Backstage View where the print preview
should be.- Return to the worksheet:
Excel 2007: Click on OK to close the error message.
Excel 2010: Click on a ribbon tab other than File to return to your sheet.
Excel 2013, 2016:
Click the Back arrow  at the top left of Backstage view.
 - Select cell A1 and press the spacebar once and then press ENTER.
This puts a blank space into the cell. -
 Open Print Preview again.
It works! Apparently a space is "something to print".The image in your footer may be different, of course.
- Save.
[header-Lastname-Firstname.xlsx]
-
 Print.
You will learn more about controlling your printing later.
|
|
| © 1997-2017 Jan Smith All Rights Reserved |
Site Map What's New |
Privacy Policy Terms of Service Copyright Acknowledgements |
~~ 1 Cor. 10:31 ...whatever you do, do it all for the glory of God. ~~
Last updated: March 22, 2017