
Jan's Working with Numbers
Excel Basics: Getting Started: Margins
The margins are the blank space between the edge of the paper and the area where you can print data. You have margins on all four sides: top, bottom, left, and right. The page header lies inside the top margin. The footer lies inside the bottom margin. The lessons use the default margins in most cases. The instructions will, of course, tell you to change the margins if it is necessary.

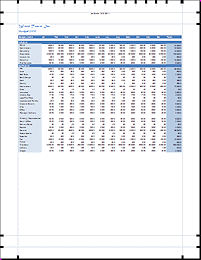
Margins (highlighted with green dots) surround the body
of the printed spreadsheet
If you don't use "letter" size paper, you may need to use different margins to have your documents look similar to the illustrations.
Some printers cannot print as close to the edge of the paper as others. You may have to make adjusts to your documents if your printer needs extra wide margins.
| |
Step-by-Step: Setup Margins |
|
| What you will learn: | what the margins are to set the sizes for margins in Page Setup dialog to resize margins in Page Layout view to resize margins in Print Preview how the margins relate to the header and footer to center on the printed page |
Start with:![]() ,
, ![]() budget-chart-2010-Lastname-Firstname.xlsx from your Class disk, excel
project1 folder.
budget-chart-2010-Lastname-Firstname.xlsx from your Class disk, excel
project1 folder.
Margins: Page Layout Ribbon Tab
-
 If
necessary, open budget-chart-2010-Lastname-Firstname.xlsx to the Budget tab.
If
necessary, open budget-chart-2010-Lastname-Firstname.xlsx to the Budget tab. -
On the Page Layout tab, click the Margins button.
The menu offers 3 default settings plus the last custom settings you used.
(Your Last Custom Setting may be different from the illustration.)This time we want to see all the settings instead of using one of the pre-designed settings.
- Click on Custom Margins...
The Page Dialog opens to the Margins tab.
Margins: Page Setup Dialog
Margin settings are in inches if Regional settings = English (United States)).
[See the earlier page]
The Page Setup
dialog does not show you what the unit of measure is! It just gives
the numbers. There is no place inside Excel to change the
measurement system being used.![]()
-
 If necessary, change the margins to match the illustration:
Top = 1, Bottom = 1, Left = 0.75, Right = 0.75, Header =0.5, Footer = 0.5Center on page boxes not checked.
If your computer uses the metric system, the default sizes are in centimeters:
Top and Bottom 2.5, Left and Right 1.9, Header and Footer 1.3. Units
of Measure: You can type in the unit of measure as well as the number,
like 2.5 cm, if the system is not using what you want. Excel will convert your measurement
and show the equivalent number.
Units
of Measure: You can type in the unit of measure as well as the number,
like 2.5 cm, if the system is not using what you want. Excel will convert your measurement
and show the equivalent number. -
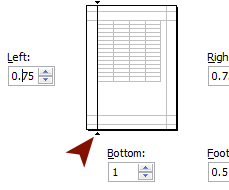 Click in the Left margin text box.
A dark line appears on the diagram so you can see what area will be affected by a change in this text box.The diagram in the middle of the Margins tab is not really a preview of your document. It just shows the dividing lines for the margins and header and footer. As you change the values on this tab, the diagram will NOT adjust to match.
-
 Experiment: Margins in Page Setup dialog
- Click in each of the other text boxes on this tab to see exactly what area they control.
- Use the spin arrows
or type in different values.
The diagram does not change. - Click Print Preview to see the effect of your changes.
- Return to Page Setup and try out other values.
- When you are ready to continue... reset the margins and header and footer to the values in step 1 above.
- Close the dialog.
Margins: Page Layout View
The Page Layout view lets you see how your data will fit on the page, including data that will not print with the current settings. You can adjust the page margins in this view using the ruler.
-
Click in the Status bar on the button for Page Layout view
 .
.
In this view the rulers show for the page where the cursor is. The ruler shows you column widths, row heights, and margins
The illustration shows the Budget sheet with reduced zoom so you can see at least part of each of the 4 pages. Only the top two pages would print because of the print area you set in an earlier lesson.
 Problem:
No rulers
Problem:
No rulers
You have turned off display of rulers.
Solution: On the View tab in the Show tab group, check the box Ruler. This box is grayed out unless you are in Page Layout view. Warning: Changes you make using the
ruler apply to ALL pages for this worksheet.
Warning: Changes you make using the
ruler apply to ALL pages for this worksheet.
- Experiment: Margins with Ruler
Watch how the wrapping to each page changes as you change the margins.
- Hover over a margin boundary on the ruler to see a screen tip with name and
size.
- Click on a margin boundary and hold down the mouse button to
see a boundary line on the page.
While the mouse button is down, a screen tip shows the width of the first column but the screen tip is not wide enough for all of the text. Confusing! - Drag the boundary between the darker and lighter areas on the ruler
to the left of Column A to change the Left margin.
A screen tip tells you what the margin size is. In some versions the areas can be hard to tell apart! - Drag the boundary on the ruler at the right of the last column on the page to change the Right margin.
- Drag the boundary on the ruler above row 1 to change the Top margin.
- Drag the boundary on the ruler below the last row on the
page to change the bottom margin.
- Drag the boundary between two column headings (just below the ruler) to make a column wider. Then make it narrower. Which column changed?
- Drag a boundary between two row headings taller or shorter. Which
row changed?
Notice that all of these changes affect all of the pages, not just the one with the ruler showing. You cannot have different settings for different pages of the same sheet. You can have completely different settings for different sheets in the same workbook.
-
When you are ready to continue...
Reset the margins to 1" top and bottom, 0.75" left and right, 0.5" header and footer.It can be difficult to drag to these exact values. If you have trouble, use the Page Setup dialog instead. Be sure to select the whole value in the spin box. There may be more decimal places in the number than the box can show.
- Hover over a margin boundary on the ruler to see a screen tip with name and
size.
Margins: Print Preview
When margin lines are shown in Print Preview, you can drag them to adjust the sizes.
- Open the Print Preview.
- Show margins on the preview:
 Excel 2007: Click the check box Show Margins in
the ribbon.
Excel 2007: Click the check box Show Margins in
the ribbon.


 Excel 2010, 2013, 2016: Click the Margins button
  on the Status bar, bottom right.
This toggles on and off a set of lines that mark the margins and the header and footer. Across the top you can see the column widths.
The margins and column widths can be adjusted while in Print Preview. You cannot edit the cell contents in this view.
Problem:
Print Preview shows Landscape orientation
You saved changes in the last lesson.
Solution: Change orientation to Portrait.
Which margins are which?
The header and footer areas have their own margins which can be set differently from the margins of the page as a whole. It's a "feature", except when you forget and your header or footer does not line up the way you expected.


- Experiment: Dragging margins
- With the margin lines showing, move the mouse pointer over one of the
horizontal dotted lines until it turns
into
 the vertical resize shape.
- Carefully hold down the left mouse button.
Excel 2007: On the Status bar
there is a message identifying the area you are changing and its current
value.
- Drag the mouse to change the margin sizes. Have some fun!
-
When you are ready to continue... change margins back to 1" top and bottom and 0.75" left and right.
If you have trouble getting those values by dragging, use the Page Setup dialog instead. Be sure to select the whole value in the spin box. There may be more decimal places in the number than the box can show. Margins Error: If you set the Header larger than the Top margin, or the Footer
larger than the Bottom margin, or if your text size is too big to fit in the
space, your header or footer may print on top of your data cells. In the illustration below, the header contains my
name, formatted to a large font size. It overlaps the first row of cells in the spreadsheet. Your header and footer will print, come what may! You may get a message about this problem, but it won't insist on your fixing it. If the top row or two of your spreadsheet happens to be blank, you
may not notice the effect.
Example of the Problem: Header text on top of sheet data
Top margin should be bigger than the Header! Excel
2007: The default left and right margin inside the header and footer is 0.75 " no matter what margins you set for the rest of
the page. If your header or footer text starts at the margin, it may not
line up with the data. You have to change this margin separately. Another strange "feature".
Excel 2010, 2013, and 2016 do not do this!
- With the margin lines showing, move the mouse pointer over one of the
horizontal dotted lines until it turns
into
- Close Print Preview and return to Page Layout view.
Center on Page
To make small spreadsheets and ranges print more attractively, you can center the print area horizontally or vertically or both. This can only be done in the Page Setup dialog.
- Open the Page Setup dialog again to the Margins tab.
-

 Click on the check boxes to center Horizontally and Vertically and then on OK to close the dialog.
The preview document on the Margins tab moves to show the change. You won't notice this centering unless the range that is printed is smaller than the width or height of the page.
The preview in the dialog
is not a thumbnail of your actual document.Page Layout view does NOT show a change.
-
 Change to Print
Preview.
Change to Print
Preview.
Check both pages. Can you see the difference that centering horizontally and vertically made?
This sheet fills the vertical space already so there is not much change, if any at all. But on page 2, you can see a definite difference! The cells no longer start at the left margin.
 Save
As: budget-2010-centered-Lastname-Firstname.xlsx to the excel project2 folder on your Class disk. Create this folder, if necessary.
Save
As: budget-2010-centered-Lastname-Firstname.xlsx to the excel project2 folder on your Class disk. Create this folder, if necessary. - Close the workbook.
|
|
| © 1997-2017 Jan Smith All Rights Reserved |
Site Map What's New |
Privacy Policy Terms of Service Copyright Acknowledgements |
~~ 1 Cor. 10:31 ...whatever you do, do it all for the glory of God. ~~
Last updated: March 22, 2017