
Jan's Working with Presentations
Basics: Interface: Views:
Normal - Slide Pane
The Normal View is where you will do most of your work. The Normal view usually shows three panes: Navigation, Slide, and Notes.
First we will take a closer look at the Slide Pane.
Slide Pane
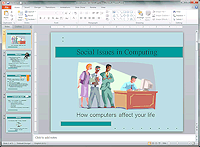
A large version of the selected slide in the Navigation Pane appears in the Slide Pane.
You will do most of your editing and format changes directly on the slide.
What's On A Slide?
Most slides have placeholders to hold your text. A placeholder is a special kind of text box.
![]() Only placeholder text appears in the outline
Only placeholder text appears in the outline
PowerPoint creates placeholders when you
apply a slide layout to a slide. Text in those placeholders is what shows in the outline of the presentation. The outline will not see text that you
put in a text box that you created yourself.
Example Slide Layouts with Placeholders:
A selected placeholder looks like a text box. It shows a thin border with circles for resizing handles.
|
|
 Title
Slide: Title
Slide: Placeholders for the title and subtitle of the whole presentation |
 Title
& Content: Title
& Content:Placeholders for slide title and bullet list (the default layout for a new slide) |
What can you do directly on a slide?
- Enter and edit text.
- Insert a picture, chart, table, text box, or other object.
- Resize or move an object or placeholder.
- Add an AutoShape, with or without its own text.
| |
Step-by-Step: Slide Pane |
|
| What you will learn: | to select, resize, and move placeholders to AutoFit text in placeholder to edit text to save with Save As |
Start with:![]() , socialissues-Lastname-Firstname.pptx from your Class disk
, socialissues-Lastname-Firstname.pptx from your Class disk
Slide Pane: Title Placeholder
AutoFit will change the size of the Title only by 1 size (in the Font Size drop list) as you resize the placeholder. If the text won't fit in the placeholder, it will lie outside the placeholder. An odd effect!
-
 If
necessary, open the presentation socialissues-Lastname-Firstname.pptx from the list of recent documents.
If
necessary, open the presentation socialissues-Lastname-Firstname.pptx from the list of recent documents.
(Your list will probably look different from the illustrations.)
 PowerPoint 2007: Office button
  > Recent Documents list

 PowerPoint 2010: File tab >
Recent > Recent Presentations
PowerPoint 2010: File tab >
Recent > Recent Presentations
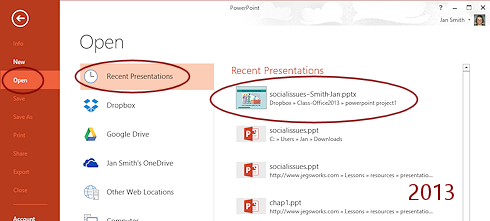
 PowerPoint 2013: File tab >
Open > Recent Presentations
PowerPoint 2013: File tab >
Open > Recent Presentations
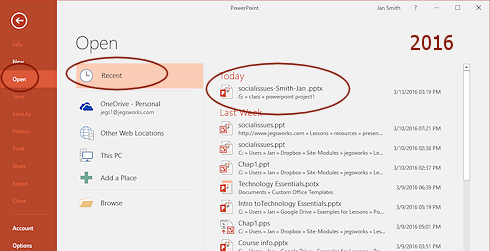
 PowerPoint 2016: File tab >
Open > Recent
PowerPoint 2016: File tab >
Open > Recent
-
 Select
placeholder:
Select
placeholder:
- Click on the title, "Social Issues in Computing".
The placeholder border is displayed with handles at the corners and centers of the sides for resizing.
What kind of border do you see?
 Border - dashes = edit the text
Border - solid = move or resize placeholder
- Click the border of the placeholder.
The border changes to a solid line. Now the placeholder is ready for you to move or resize it.
- Click on the title, "Social Issues in Computing".
-
 Experiment: Resize placeholder
- Move your mouse pointer over one of the handles on the left
side of the placeholder.
The pointer shape changes to one of the Resize shapes


 or
or 


 .
. -
Drag inward to make the placeholder smaller.
As the placeholder gets smaller, the text wraps. Text can fall outside the placeholder! In other programs text is hidden if it won't fit inside the text box.
- Drag in various directions with different handles and observe
the changes.
- Move your mouse pointer over one of the handles on the left
side of the placeholder.
- Experiment: Move placeholder
- Move your mouse pointer over the placeholder's border until
the pointer
changes to the Move shape
 .
. - Drag to change the position of the placeholder.
- Move your mouse pointer over the placeholder's border until
the pointer
changes to the Move shape
- Undo all your changes by clicking the Undo button until it is
grayed out.
 Problem:
Can't Undo enough steps
Problem:
Can't Undo enough steps
If you set the number of Undo steps for PowerPoint to remember too low, you may not be able to get back to where you started!
Solution: You may want to increase the numbers of Undo steps saved for the future. (Office button or File tab > Options > Advanced > Editing options)
For this lesson, just close the presentation and re-open it to get back to the original state of the presentation.
Slide Pane: Auto Fit Text
AutoFit changes the text size to make it fit in a normal placeholder. This behavior can be set in three different places in PowerPoint:
- AutoCorrect dialog > AutoFit As You Type tab
- Normal View: Select placeholder > Format Shape dialog or pane > Text box
This choice applies only to the current slide. - Slide Master View: Select placeholder > Format Shape dialog or pane > Text box
This choice applies to all slides that use the current layout in the Master view.
So you may have to look in three places if your placeholders are not behaving the way you want!
In the steps below you will work with a placeholder that has AutoFit turned on.
-
 Click in the subtitle text to make the borders of its placeholder appear.
- Move your mouse pointer over the middle handle on the left side
of the placeholder.
The pointer turns into a double-headed Resize arrow.
-
 Drag to the right.
As you drag, a highlight shows the placeholder size if you drop. The text moves and flows outside the placeholder. -
 When the new size for the placeholder is very small, drop.
This placeholder was formatted in the Slide Master to resize the text to fit the shape. All of the text shrinks to fit the new small placeholder. -
 Click in the subtitle placeholder.
The AutoFit Options button appears.
-
 Move your mouse pointer to hover over the AutoFit Options button.
An arrow appears.
- Click the arrow to see what those
options are.
You could choose to stop fitting the text for this placeholder if that works better for a particular slide.
You could change the settings in the AutoCorrect Options in the tab AutoFormat As You Type.
For now, you do not need to make any of these changes.
- Undo your change of the subtitle placeholder.
Slide Pane: Edit Text
It is quite easy to enter or edit text.
-
 Click in the Title placeholder again.
The border turns back to dashes, ready for your editing.
- Delete the word Social.
The text moves to recenter itself in the placeholder.
Save As
![]() Do not use the Save button on the Quick Access Toolbar this
time. That button
saves the file back where it came from, with the same name.
Do not use the Save button on the Quick Access Toolbar this
time. That button
saves the file back where it came from, with the same name.
 Click on the Office button or the File tab and then on Save As.
 -
Change the name of the presentation to issues-Lastname-Firstname.pptx and Save to your Class disk in the folder powerpoint project1.
Be sure to use your own first name and last name in the file name.
Be sure to check where the file will be saved! PowerPoint and most programs remember what folder you used last, not necessarily from when you used PowerPoint last! PowerPoint 2013 makes you pick a location before you enter a file name or pick a file type. 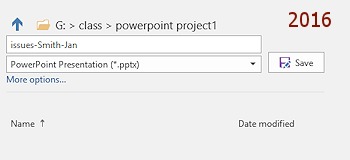 PowerPoint 2016, as updated in February 2016, shows text boxes for file name and file type between the path to the current folder and the list of that folder's contents. The blue up arrow changes the folder list to the next higher folder. Or you can navigate with the Browse button at the bottom of the list of locations in the middle pane.
![]() Problem:
Deleted Placeholder
Problem:
Deleted Placeholder
At some point you may delete a placeholder from a slide and want it back but Undo won't get you all the way back. A placeholder is not quite the same as a normal text box.
Solution 1- if you need the missing text to show in the outline or you want placeholder properties as in the original layout:
Apply the layout again: Home > Slides tab group > Layout > pick a layout.
You will have to add to the new placeholder any text or objects that were in the placeholder that you deleted earlier.
Solution 2- if you do not need outline text or properties:
Add a plain text box to your slide: Home tab > Drawing tab group > Text box.
|
|
| © 1997-2017 Jan Smith All Rights Reserved |
Site Map What's New |
Privacy Policy Terms of Service Copyright Acknowledgements |
~~ 1 Cor. 10:31 ...whatever you do, do it all for the glory of God. ~~
Last updated: March 22, 2017