
Jan's Working with Presentations
Basics: Getting Started: Settings
Your copy of PowerPoint and your computer may not be set up quite like mine. That can be confusing when you are trying to follow the directions to create and edit presentations. We need to check a few settings in:
|
  |
|
 |
|
 |
| |
Step-by-Step: Settings |
|
| What you will learn: | to change settings in Page Setup or Slide Size dialog to change settings in Options dialog
|
Start with: ![]() (PowerPoint open to a blank document)
(PowerPoint open to a blank document)

 Page Setup dialog

 Slide Size dialog
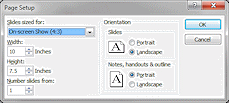
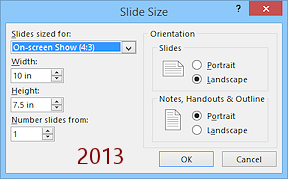
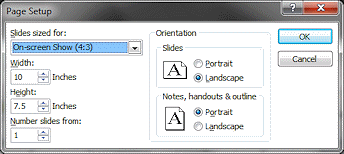
The Page Setup dialog is renamed as Slide Size in PowerPoint 2013 and 2016. The new name makes more sense! The choices in this dialog are not like what you normally see on in a Page Setup dialog. There are no settings for page margins or headers and footers.
The proportions of your slides will change depending on your choice in the Slides sized for: box. That affects the layout, sometimes quite a lot. If you change the size later, the position of some parts of the slides may not work well at all.
![]() Choices in the dialog apply only to the current
presentation.
Choices in the dialog apply only to the current
presentation.
![]() There
does not seem to be a way to change the margins on your print-outs.
There
does not seem to be a way to change the margins on your print-outs.
-
Open PowerPoint, if necessary, to a blank presentation.
- Open Page Setup or Slide Size dialog:
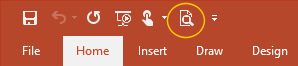
PowerPoint 2007, 2010:
 On
the Design ribbon tab, click the Page Setup button.
On
the Design ribbon tab, click the Page Setup button.
The Page Setup dialog appears with the default settings.
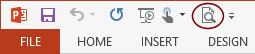
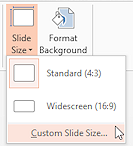 PowerPoint 2013, 2016: On the Design ribbon tab in the Customize tab group, click on the Slide Size button to expand its menu.
This button also appears on the ribbon in the three Master views.Click on Custom Slide Size...
 The Slide Size dialog opens with the default settings. This is similar to the Page Setup dialog of previous versions. But In PowerPoint 2013 and 2016 several of these settings also appear directly on the Master Views ribbons.
 Match your projector's size: When using a projector, the size the projector expects must match what the presentation uses. Otherwise the projector will refuse to show anything.. Very confusing!
The choice you make here for size will be used in slides, handouts, and notes.
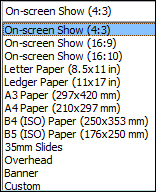 Slide proportions: The Slides sized for: choice changes the proportions of your slide, depending on what media you choose. The
default is On-screen Show. The dimensions
of the slide are important to your layout! Choose based on your primary use for the presentation - on
pull-down projector screen (4:3), on wide screen monitor (16:9 or 16:10), on paper, as 35mm slide,
), etc.
Slide proportions: The Slides sized for: choice changes the proportions of your slide, depending on what media you choose. The
default is On-screen Show. The dimensions
of the slide are important to your layout! Choose based on your primary use for the presentation - on
pull-down projector screen (4:3), on wide screen monitor (16:9 or 16:10), on paper, as 35mm slide,
), etc.Examples:

On-screen 4:3

Wide-screen 16:9
A4
35mm

Overhead

Banner
Printing: PowerPoint seems to set the margins on your paper to half an inch on all sides. There does not seem to be a way to adjust this.
- Click on Cancel to close the dialog and return to Normal view.
Options: Popular/General
The Options dialog has several pages. The default settings are usually fine. We will check on just some of the settings. The options are mostly the same for all three versions, but PowerPoint 2013 has a few more settings.
- Open the Options dialog:
PowerPoint 2007: Click the
Office button
 and then the PowerPoint Options button
  at the bottom right of the menu.
The Options dialog appears. PowerPoint 2010, 2013, 2016: Click the File tab and then on Options  .
.
The Options dialog appears. -
If necessary, select the first page, named Popular in PowerPoint 2007 and General in the other versions.
The choices shown the pane at the right of the dialog are very similar in all versions.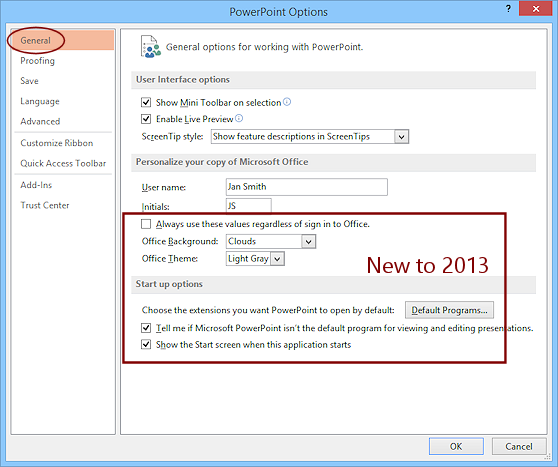 PowerPoint 2016 from Office 365: An additional option is on this page for Office 365 subscribers, Enable PowerPoint Designer. The new feature requires access to the Internet. When you add a picture to a slide, Designer will show you several options for making a great slide with that picture.
 -
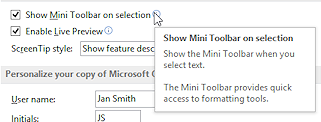 Hover over the Information circle
  at the end of 'Show Mini Toolbar on selection'.
A screen tip appears with information about the item.
-
Move the mouse somewhere else to close the screen tip.
-
Repeat for the information icon at the right of 'Enable Live Preview' to see what PowerPoint can tell you about it.
Be sure you have a check mark in these first two items on this page of the dialog.
-
Leave ScreenTip style as Show feature descriptions in ScreenTips.
-
Check that the User name is appropriate.
The default User name is from the Windows account that is currently logged in. This name is the default Author for the document.
Changing User name: If you change the User name here, you are changing it for
ALL new Office documents, not just this document and not just for
PowerPoint. You can change the author for the current document in the
Document Properties, which we will look at later. That's a better choice if this is not your personal computer. -
 Experiment: Options
Click on each of the page names on the left of the Options dialog and read through the choices on the right. There are many!When you have finished touring the dialog...
Next you will verify a few key options so that your copy of PowerPoint will behave like the directions expect.
PowerPoint behavior in
lessons: If your PowerPoint does not behave as described in the
lessons, it may be that there is a difference somewhere in the Options
dialog. It can take some detective work to figure out where!
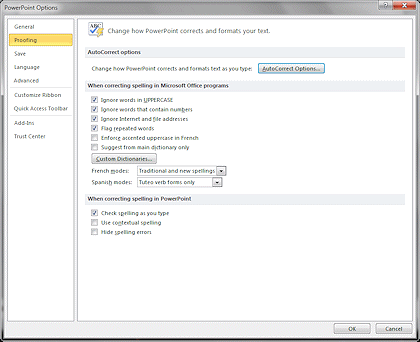
Options: Proofing
Proofing has to do with making corrections, especially to spelling and formatting. It can be quite startling when PowerPoint automatically makes changes if you are not aware of the AutoCorrect and AutoFormat features. These changes are included in the Undo list. But you have to notice that something changed!
-
Click on Proofing at the left of the dialog.
-
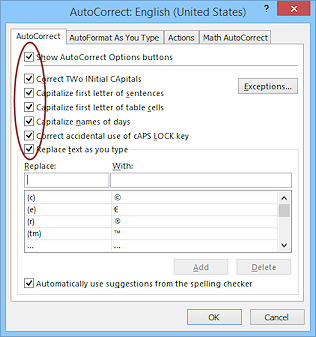
Check that your check boxes match the image - especially Check spelling as you type.

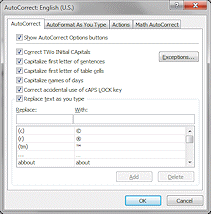
AutoCorrect Options
There are so many options for AutoCorrect that it has its own dialog.
-
 Click the button AutoCorrect
Options...
Click the button AutoCorrect
Options... at the top right of the Proofing page.
Another dialog appears, AutoCorrect.
-
If necessary, click on the tab AutoCorrect.
All boxes should be checked.Replacing
text: AutoCorrect is not just for spelling errors! You can put a
short piece of text in the Replace box and put a whole block of text in the With box.
That would let you automatically replace CompLit with Jan's Illustrated Computer Literacy 101.
-
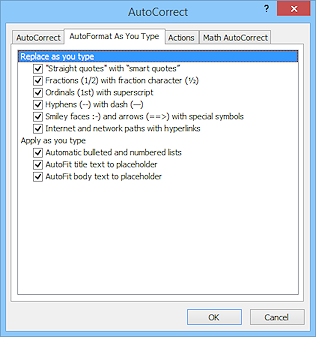 Click on the tab AutoFormat As You Type.
All boxes should be checked. Read these choices carefully so you won't be totally confused when PowerPoint automatically formats what you typed.Complications
with AutoFit: The settings here for AutoFit text to a placeholder
can be over-ridden in the Format Shape dialog for individual placeholders or
by the settings for a placeholder in a Master View. -
Click the OK button to accept any changes you had to make and to close the dialog.
You are back to the Options dialog.
Options: Advanced
The Advanced page has a LOT of choices.
-
Click on Advanced at the left of the Options dialog.
The Advanced page has a scrollbar because there are too many settings to fit in the dialog window.
Some of these settings apply only to the current document but most apply to all PowerPoint presentations.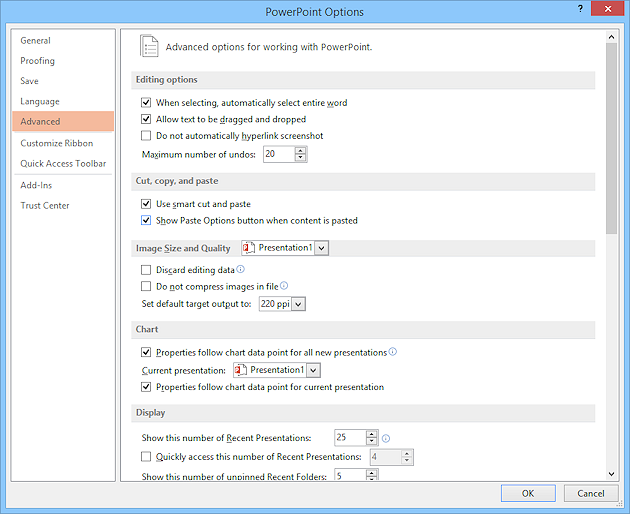
-
Match the settings in the illustration.
The number of unpinned Recent Folders has a default value of 20 in PowerPoint 2016.Maximum number of undo steps: The default of 20 may be OK for you, but you
can increase that to as high as 150 if you wish, assuming your computer can handle that many in its memory.
-
Scroll to see the rest of the Advanced options.

-
Match your settings to the illustration for the bottom half of the Advanced options.
Note that the Print section applies to all documents but the When printing this document section does not. The drop box lets you chose only a document that is already open.
Options: Customize Ribbon
PowerPoint 2010, 2013, and 2016 allow you to customize the ribbon by creating your own custom ribbons or by adding custom tab groups to an existing ribbon. You can add any commands you want to your new tab or tab group and arrange them to suit yourself. You cannot change the ribbons and tab groups that were installed with PowerPoint.
-
Click on Customize Ribbon at the left of the Options dialog.
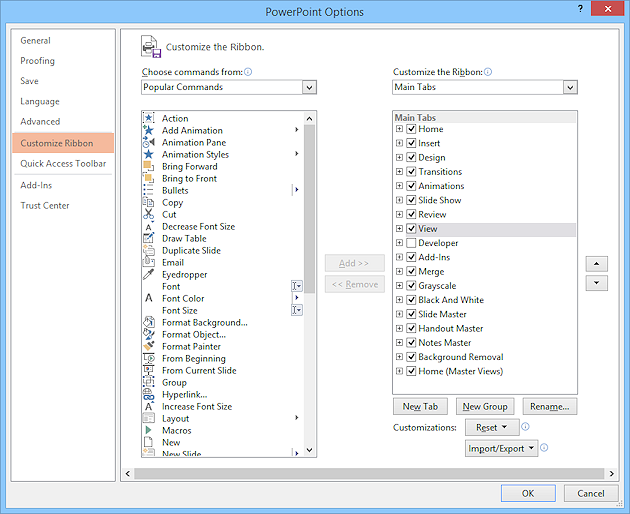
The first set of commands that you see on the left of the Customize Ribbon page come from what Microsoft rates as the most popular commands. There are MANY more!
-
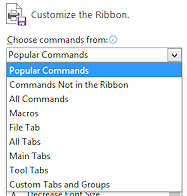 Click the arrow at the right
of Popular Commands to show the filter list.
Click the arrow at the right
of Popular Commands to show the filter list.
A list appears showing several groupings of commands that PowerPoint contains.Where
is that button? Open the All Commands or Commands Not in the Ribbon
list to look for a missing command. You can then add the command to a custom tab
or custom group or (in the next section of the lesson) to the Quick Access Toolbar. Many
commands are not on the ribbon because they are not used
very often. Some appear only in context-sensitive tabs, like Picture Tools and
Table Tools.
- Click on Commands Not in the
Ribbon.
-
Scroll the list of commands.
It's a fairly long list.
Do you see anything that looks useful for the way you work?
-
Change the list to All Commands and scroll this list.
Wow! Much longer list!!
Many of these commands are on ribbon tabs that show up only when needed, like Picture Tools and Table Tools.
![]() Reset
to Default: If you find later that your ribbon contains different items
from mine, you can use the Reset button at the bottom right of this Options
dialog page to return the whole ribbon or just one tab to its original state. Be courteous - Don't
throw out custom tabs or groups on a computer that is not yours!
Reset
to Default: If you find later that your ribbon contains different items
from mine, you can use the Reset button at the bottom right of this Options
dialog page to return the whole ribbon or just one tab to its original state. Be courteous - Don't
throw out custom tabs or groups on a computer that is not yours!
![]() Import/Export
customizations: With PowerPoint 2010, 2013, and 2016 you can export your
carefully crafted tabs, groups, and the Quick Access Toolbar and then
import those settings on another computer. Use the Import and Export
buttons on the Customize Ribbon page.
Import/Export
customizations: With PowerPoint 2010, 2013, and 2016 you can export your
carefully crafted tabs, groups, and the Quick Access Toolbar and then
import those settings on another computer. Use the Import and Export
buttons on the Customize Ribbon page.
Options: Quick Access Toolbar
![]()
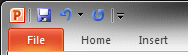 The Quick Access Toolbar is at the top left of the
PowerPoint window. It shows all the time. Its purpose is to hold the
commands that you use often so that you don't have to hunt around for them or change to a different ribbon tab.
It is especially helpful when you regularly need a command that is on a
different ribbon tab than the one that is active when you need that command. By
default, this toolbar contains Save, Undo, and Redo.
The Quick Access Toolbar is at the top left of the
PowerPoint window. It shows all the time. Its purpose is to hold the
commands that you use often so that you don't have to hunt around for them or change to a different ribbon tab.
It is especially helpful when you regularly need a command that is on a
different ribbon tab than the one that is active when you need that command. By
default, this toolbar contains Save, Undo, and Redo.
In PowerPoint 2013 and 2016 you will also see Start from Beginning (plays the slide show from slide 1) and Touch/Mouse Mode. In Touch mode the Title bar buttons are larger and further apart to make it easier to touch the correct one with your finger.
The Redo button
shows the Repeat shape ![]()
![]()
![]() when your most recent action can be repeated.
when your most recent action can be repeated.
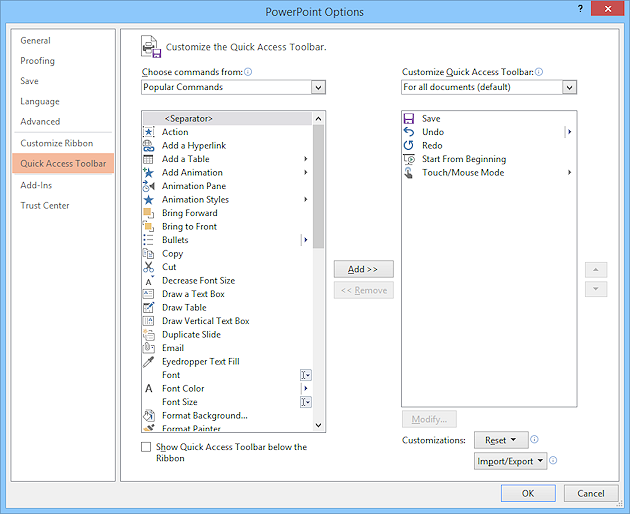
There is a drop list on the toolbar to add some commonly chosen commands, but the Options dialog gives you access to all of the commands that PowerPoint understands.
Example: When I create a presentation about an algebra lesson, I often write equations, like x2 + 4x - 8 = 0. So I need the superscript format command to put the power up high by the x. That command is not on the ribbon in PowerPoint, though it is in Word. I added that command to the Quick Access Toolbar. Problem solved!
-
Click in the Options dialog on the left on Quick Access Toolbar.
The page is very similar to the page for Customize Ribbon. Again, Popular Commands are showing in the list at the left.
-
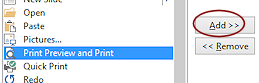 Scroll the list of
Popular Commands and click on Print Preview and Print.
Scroll the list of
Popular Commands and click on Print Preview and Print.
-
Click the Add >> button in the middle between the two columns of commands.
The selected command moves over to the end of the list on the right. You can use the up and down arrow buttons to the right of this list to change the order of the buttons on the toolbar.
-
Click on OK to save your changes and close the dialog.
-
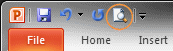
Look at the top left of your PowerPoint window.
The Print Preview and Print button

 shows at the end of the Quick Access Toolbar. Success!
|
|
| © 1997-2017 Jan Smith All Rights Reserved |
Site Map What's New |
Privacy Policy Terms of Service Copyright Acknowledgements |
~~ 1 Cor. 10:31 ...whatever you do, do it all for the glory of God. ~~
Last updated: March 22, 2017