
Jan's Working with Presentations
Basics: Interface: Views: Slide Show
The Slide Show View runs your presentation at full screen on your monitor, so you can see what your audience will see on the projector screen.
What can you do in Slide Show View?
-
See what your audience will see:
-
graphics
-
transitions and animations
-
timings for your transitions and animations
-
-
Rehearse your speech along with the slides.
-
Practice using the onscreen controls and keyboard shortcuts.
-
Practice marking onscreen during the presentation.
Start a Slide Show
- Status Bar: Slide Show button


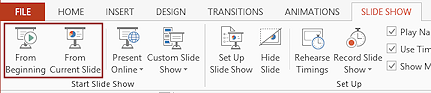 Slide Show ribbon tab: From the Beginning or From Current Slide buttons

 PowerPoint 2013, 2016: Quick Access Toolbar: From the Beginning

Controlling a Slide Show
 When you are using your slides to illustrate a speech, you probably want
the slides to change only when you tell them to! You DO want the slide to
match what you are saying, right?
When you are using your slides to illustrate a speech, you probably want
the slides to change only when you tell them to! You DO want the slide to
match what you are saying, right?
To shine your pretty slides onto the big screen for all to see, your presentation has to be on a computer that is connected to a projector.


You can usually control the slide show with the projector's own remote control. Even better is to use a wireless device, like a tablet computer or smart phone, that has software for controlling the computer that is running the presentation. You can, of course, also use the computer's mouse, keyboard, or touchpad. But your feet will be stuck in one place in that case, right beside the computer.
-
While a slide show is running, you can use keyboard shortcuts to control the presentation. Pressing the F1 key during a slide show brings up the Slide Show Help. This shows all the ways to control the show with the mouse, keyboard, and touch (PowerPoint 2013). Of course, you don't want to show this list to your audience! Learn them ahead of time or print a copy to have on hand. With Keyboard
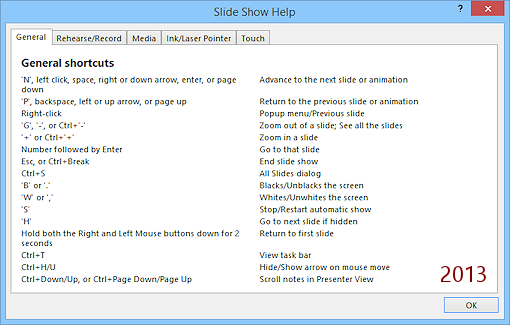
Slide Show Help: Keyboard Shortcuts for PowerPoint 2013
-
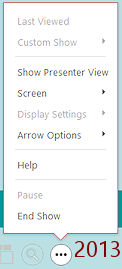
There is an onscreen menu for controlling your presentation when you don't know the keyboard shortcuts or when you are using a wireless device without a keyboard or stylus. When you move the mouse over the bottom left of the screen, controls appear. Or, you can right click anywhere on the screen to make the menu appear. The menu includes commands for navigating to specific slides, for changing the mouse pointer to a pen shape that you can draw with, for blanking out the screen, and for ending the show. With the Mouse
Onscreen Controls for the Mouse:

 PowerPoint 2007, 2010:
Buttons: Previous slide, Pen options, Menu, Next slide
PowerPoint 2013, 2016:
Buttons: Previous slide, Next slide, Pen options, Thumbnails, Zoom, Menu
These buttons can be hard to see with some backgrounds.
Presenter View
If your computer can use two monitors at once, as most can these days, you can use Presenter View.
While you are in Presenter view, the audience sees just the slides. But you see more - Notes, larger buttons.
![]()
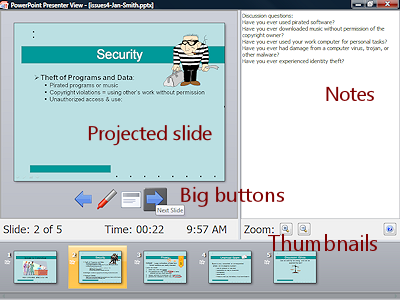
![]() PowerPoint 2007, 2010: A navigation pane shows thumbnails of the slides.
PowerPoint 2007, 2010: A navigation pane shows thumbnails of the slides.
PowerPoint may insist that you actually be connected to a second monitor or to a projector before it will allow Presenter view.
![]()
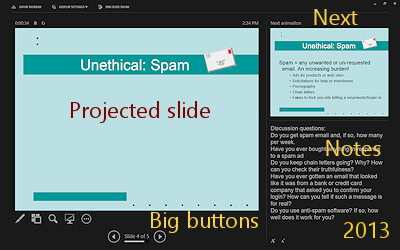
![]() PowerPoint 2013, 2016: No navigation pane. But at the right you can see the slide or animation that is coming next.
PowerPoint 2013, 2016: No navigation pane. But at the right you can see the slide or animation that is coming next.
Getting Out of a Slide Show
The Slide Show View will cover the whole screen. You will not be able to see the Windows Taskbar to switch to a different window, like your browser window for these lessons. You can, of course, use the onscreen menu above and select End Show. But there are other ways to get to a different window.
![]() End Show: The ESC key closes the Slide Show View and returns you to
the PowerPoint window. You can now get to the Taskbar if you need to get to
a different window.
End Show: The ESC key closes the Slide Show View and returns you to
the PowerPoint window. You can now get to the Taskbar if you need to get to
a different window.
![]()
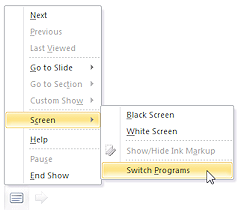
![]() Onscreen Menu: If you are using a remote controller, you can open the onscreen menu and select End Show or Screen > Switch Programs or Show Taskbar.
Onscreen Menu: If you are using a remote controller, you can open the onscreen menu and select End Show or Screen > Switch Programs or Show Taskbar.
![]() ALT+TAB: This key combo switches you to last active window. Keep holding the ALT key down and you see thumbnails for all of the currently open windows. TAB moves the selection through the list. Release both keys to switch to the selected window.
ALT+TAB: This key combo switches you to last active window. Keep holding the ALT key down and you see thumbnails for all of the currently open windows. TAB moves the selection through the list. Release both keys to switch to the selected window.
![]() Win + TAB: This key combo uses the Windows key
Win + TAB: This key combo uses the Windows key ![]() , which is between the CTRL and ALT keys on the left of most recent keyboards. The key combo brings up a set of thumbnails for the open programs and the Desktop. These thumbnails will stay in view until you click on one.
, which is between the CTRL and ALT keys on the left of most recent keyboards. The key combo brings up a set of thumbnails for the open programs and the Desktop. These thumbnails will stay in view until you click on one.

![]()
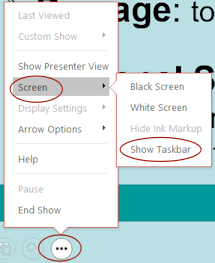
![]() PowerPoint 2013, 2016: Presenter View: Show Taskbar
PowerPoint 2013, 2016: Presenter View: Show Taskbar
![]()
At the top left in Presenter View is a button, Show Taskbar. Click this to show the Windows Taskbar and then click on the program or window that you want.
![]()
![]() PowerPoint 2013, 2016: Presenter View: End Slide Show
PowerPoint 2013, 2016: Presenter View: End Slide Show ![]()
At the top left in Presenter View is a button, End Show. Click this to exit the slide show.
| |
Step-by-Step: Slide Show |
|
| What you will learn: | to start a presentation as a slide show from the Views bar or ribbon to switch windows during a slide show to run and stop a slide show with the mouse to control and stop the slide show with:
to draw on screen during the show, manage ink, erase all or part of ink to save a presentation with your annotations |
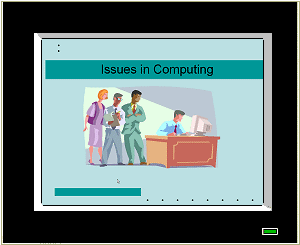
Start with:![]() , issues3-Lastname-Firstname.pptx from your Class disk
, issues3-Lastname-Firstname.pptx from your Class disk
Slide Show View: Views Bar or Ribbon
You will start a slide show of the current presentation. Remember that the ESC key stops the presentation. You will need to flip back and forth between the slide show and these directions with ALT + TAB, unless you can use a separate tablet or smartphone for these directions.
- With issues3-Lastname-Firstname.pptx open in PowerPoint, click on the first slide to select it.
 Save
As with the name issues4-Lastname-Firstname.pptx to the powerpoint project1 folder on your class disk.
Save
As with the name issues4-Lastname-Firstname.pptx to the powerpoint project1 folder on your class disk.
-
 Click on the
Slide Show button on the Views bar.
Click on the
Slide Show button on the Views bar.
The presentation opens full screen, starting with the selected slide.Alternate method: Slide Show ribbon tab > From Beginning button or From Current Slide button.
From this presentation the first slide will just sit there until you tell it to advance! Some presentations will automatically run through the slides. This is not good if you are going to speak butis great for a kiosk or online.
Switch Windows During a Slide Show
Method 1: ALT + TAB
- Hold the ALT key down and press the TAB key.
A set of thumbnails for open programs appears. The thumbnails vanish if you release the ALT key. Still keeping the ALT key down, press the TAB key multiple times to move the selection to different thumbnails.
- Release the ALT key and the window for the selected thumbnail appears on top of the others.
- Repeat to switch to a different window.
Method 2: Win + TAB
- Hold the Windows key
 down and press the TAB key.
A set of thumbanils for open programs appears and will not vanish if you release the Win key. - Click on a thumbnail to switch to that window.
When you are ready to continue, return to the slide show window.
Slide Show View: Run with Mouse
It will take a series of mouse clicks to work through this presentation as a slide show. The slides are set up as examples of different kinds of animations. It is NOT a good idea to do this except as an example!
Text on a slide might appear immediately or automatically based on time or only when you click. Each method has its place in different types of presentations or different parts of the presentation.
- Click on the slides or press the Spacebar on the keyboard to advance the slide show.
When you click the last black slide, the slide show ends and the PowerPoint editing window is back on top. Evaluate: Which way will
work better to accompany a speech - automatic reveals or clicking to
show the next part?
Evaluate: Will revealing all text at once work well when accompanying
a speech?
Evaluate: Which way will
work better to accompany a speech - automatic reveals or clicking to
show the next part?
Evaluate: Will revealing all text at once work well when accompanying
a speech?
Evaluate: Which was easier to read - all text showing at once or lines revealing themselves one at a time?
Slide Show View: Control with Keyboard
You can use the keyboard to advance through the slides or to back up or to jump around when you need to skip slides or return to a previous slide.
When the slides are a distraction to your speech or discussion or during a break, you can turn the screen black or white with a key combo.
| Action | Key(s) |
|---|---|
| Show first slide | Home |
| Show last slide | End |
| Advance one step | Page Down Down arrow Right arrow N (for Next) space ENTER |
| Back up one step | Page Up Up arrow Left arrow P (for Previous) BACKSPACE |
| Jump to slide | # of slide and press ENTER |
| Whites/unwhites screen | W , (comma) |
| Blacks/unblacks screen | B . (period) |
| Stop presentation and return to PowerPoint | ESC CTRL + BREAK - (hyphen) |
- From the Slide Show ribbon tab, click the button From Beginning
 , another way to run your presentation full screen.
-
 Experiment: Keyboard shortcuts
Try using the various navigation keys from the table above:- Starting and stopping the slide show.
- Jumping to first slide, last slide, particular number slide.
- Advancing.
- Backing up.
- Whiting out and blacking out the screen.
- Close the Slide Show and return to PowerPoint.
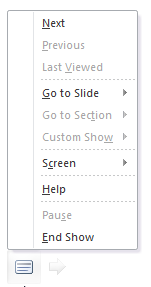
Slide Show View: Control with Onscreen Buttons
If you would rather use a mouse, or you cannot remember the keyboard shortcuts, there is an onscreen menu.
-
Move your mouse to the bottom left of the slide until the onscreen controls appear.
PowerPoint 2007, 2010:
PowerPoint 2013, 2016: These buttons change when you hover over them.
-
Experiment: Onscreen
controls
The choices are somewhat different between versions of PowerPoint.
 Try out the various onscreen buttons and the menu commands.
PowerPoint 2007, 2010: The Go to Slide menu in lists the slides by title.
Try out the various onscreen buttons and the menu commands.
PowerPoint 2007, 2010: The Go to Slide menu in lists the slides by title.
This presentation does not have any sections or any Custom Shows.Click on the menu button

 .
.
A menu of commands for controlling your presentation appears.
Some commands are inactive when you start. When
do the commands become active?
Presenter View
The Presenter view for PowerPoint 2013 and 2016 is somewhat different from PowerPoint 2007 and 2010. All show the notes for the slide and have bigger menu buttons.
![]() Two monitors needed: Your computer must be able to use two monitors at once for this feature to be available. In PowerPoint 2007 and 2010 you cannot use Presenter View unless there are two monitors actually connected to the computer. A projector counts as a monitor.
Two monitors needed: Your computer must be able to use two monitors at once for this feature to be available. In PowerPoint 2007 and 2010 you cannot use Presenter View unless there are two monitors actually connected to the computer. A projector counts as a monitor.
PowerPoint 2013 and 2016 are kinder and let you practice with Presenter View with just one monitor connected.
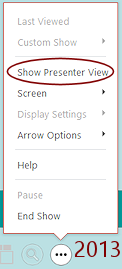 Click on the onscreen menu button .
-
Click on Show Presenter View.
The screen changes. Problem: Command is missing
You won't see the command Show Presenter View unless your computer can handle two monitors and (sometimes) there are two monitors connected. A projector counts as a monitor.You may also need to check the settings for the show - on the Slide Show ribbon tab, click the button Set Up Slide Show and look at the Monitors settings.
- Use the arrow buttons in Presenter View or on the keyboard to advance back and forth through the presentation.
Your audience will see the slides as usual. But you will see more! -
Open the onscreen menu again and select Hide Presenter View.
You are back in the normal Slide Show.
Slide Show View: Draw Onscreen
While you are giving your presentation, you may want to point out something on the screen. You could run up to the screen and point with your finger... if the screen is low enough to the ground! Or you could use a laser pointer, which shines a dot on the screen. But that means you have two devices to hold in your hands, the laser pointer and the remote for the projector or whatever you are using to control the presentation. Plus, the dot from a laser pointer does not stay put.
PowerPoint lets you draw on the screen during the slide show and leaves your scribbles on the slide until you erase them. You can even save the show with your additions if you wish.
You will need to change your mouse pointer to a Pen or a Highlighter and pick an ink color that will show well on the slide. The default color in PowerPoint 2007 is black but in PowerPoint 2010, 2013, and 2016, it is red for the pen and yellow for the highlighter. Unhappily, you cannot change the width of the marks.
 Use the onscreen menu to switch the Slide Show to the Privacy slide.
- If necessary, click enough times to reveal all of the text on this slide.
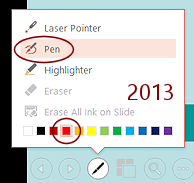
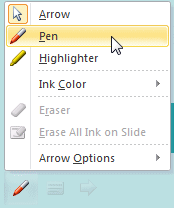
- Click the Pen button

 on the screen to open its menu
and select Pen.
on the screen to open its menu
and select Pen. - If necessary, change the color to Red with the Ink Color command (2007, 2010) or the palette of colors (2013, 2016).
-
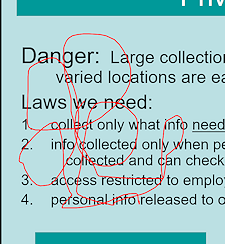 Drag around on the slide.
Whoa! Your pen make marks as long as you hold the left mouse button down.You can change the color with the Ink Color command so your marks will show well against what is already on the slide.
- Open the onscreen menu again and click Erase All Ink on Slide.
All your scribbles vanish.
- Experiment: Drawing in a Slide
Show
- Try out different colors and different pen choices.
- Draw different shapes.
- Underline or circle specific words or
phrases.
It gets easier with practice! It is also easier if you are using a tablet with a stylus to control your slide show. Drawing with the tablet's pen is very natural. Not so true for drawing with a mouse! - Sign your name on the slide.
- Erase part of your drawing with the Eraser command.
- When you are comfortable with drawing on a slide, erase all of your scribbles with the command Erase All Ink on Slide.
-
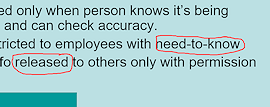 Draw an
oval around the word need-to-know and the word released.
Draw an
oval around the word need-to-know and the word released.
- Press the right arrow key on the keyboard to advance to the next slide and then press the left arrow key to return to Privacy.
Your drawings are still there. This is different from earlier versions of PowerPoint.
- Change the pointer shape back to the arrow using the onscreen menu:
PowerPoint 2007, 2010: Click the onscreen Pen button and then on the Pointer arrow. PowerPoint 2013, 2016: Click the onscreen Pen button and then on Pen to toggle it off.
Keep Annotations
-
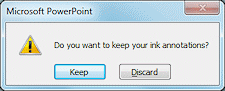 Use the onscreen menu command End Show to close the slide
show.
Use the onscreen menu command End Show to close the slide
show.
A message box appears asking if you want to keep your ink annotations.
- Click on Keep.
Your drawings may not be neat or artistic, but we are going to keep them for now.
- Switch to Normal view, if necessary.
Save
You added some ink annotations to the slide show so you need to save your presentation.
- Save.
[issues4-Lastname-Firstname.pptx]
|
|
| © 1997-2017 Jan Smith All Rights Reserved |
Site Map What's New |
Privacy Policy Terms of Service Copyright Acknowledgements |
~~ 1 Cor. 10:31 ...whatever you do, do it all for the glory of God. ~~
Last updated: March 22, 2017