
Jan's Working with the Web
HTML Code: Edit
Lets add some more information about Hector to his page and then print the source code. It is easy to add blank lines and new paragraphs and headings. Printing may not produce quite what you expected!
 Page Setup Dialog
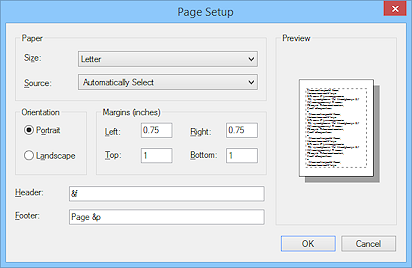
Your text editor will have choices for how a printed page will look - margins, page orientation, probably a header and footer. The illustration is for Notepad, with the default settings under Windows 7. Don't forget that Notepad remembers the settings and will use them for the next document you create.
The codes that work in the text boxes for Header and Footer in Notepad may not work in other editors.
| |
Step-by-Step: Edit |
|
| What you will learn: | to add Heading 3 to add paragraph text to open and change Page Setup to print source code from Notepad |
Start with: ![]() , hector4-Lastname-Firstname.htm,
Notepad
, hector4-Lastname-Firstname.htm,
Notepad
Add Heading 3
-
 Save As hector5-Lastname-Firstname.htm to your Class disk.
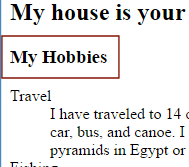
- Change the sentence Here are my hobbies. to simply My Hobbies
Don't forget to remove the period of the end of the sentence.
-
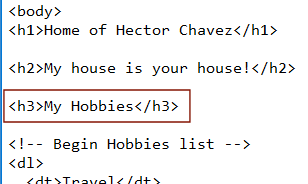 Put the cursor in the line My Hobbies.
 - Change the line to <h3>My Hobbies</h3>
This makes the line a Heading 3 instead of a simple paragraph.
- Save.
[hector5-Lastname-Firstname.htm]
-
 Open a browser and view the new page.
G:\class\web project2\hector5-Lastname-Firstname.htm
where you must replace G with the letter of your Class disk and 'Lastname-Firstname' with your own name, of course.
The formatting of the whole line changes.The text will wrap differently in your browser unless the window size is exactly the same as the window used for the illustration.
Add Paragraphs
Next you will add some information above the My Hobbies line. Do you have Word Wrap on or off? What you type will probably not wrap the same as what you see on this page.
- Add a blank line above My Hobbies
(With the cursor at the start of the line, press the ENTER key.)
- Starting on the blank line you just added, type:
<h3>My Job</h3>
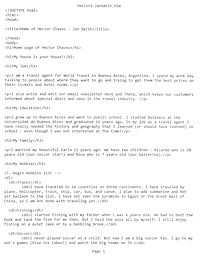
<p>I am a travel agent for World Travel in Buenos Aires, Argentina. I spend my work day talking to people about where they want to go and trying to get them the best prices on their tickets and hotel rooms.</p>
<p>I also write and edit our email newsletter Here and There, which keeps our customers informed about special deals and news in the travel industry. </p>
<h3>My Education</h3>
<p>I grew up in Buenos Aires and went to public school. I studied business at the Universidad de Buenos Aires and graduated 12 years ago. In my job as a travel agent I have really needed the history and geography that I learned (or should have learned) in school - even though I was not interested at the time!</p>
<h3>My Family</h3>
<p>I married my beautiful Carla 11 years ago. We have two children - Ricardo who is 10 years old (our soccer star!) and Rosa who is 7 years old (our ballerina).</p>
You have added three Heading 3 lines and three paragraphs with a blank line between them in the source code.
- Save.
[hector5-Lastname-Firstname.htm]
View Changes in Browser
-
 Switch to your browser window.
The old version of the page is still showing.
-
Refresh the browser window.
[Press the F5 key]
Now your window shows the new text. - Right click on the page and view the source code.
Depending on your browser, there may be color coding here. Does it make the code easier to read? Color-coding: If you have a
color printer, you might want to print the source code from here instead
of from Notepad sometimes.
Color-coding: If you have a
color printer, you might want to print the source code from here instead
of from Notepad sometimes. - Switch back to Notepad.
Dialog: Page Setup
![]() The settings
in this dialog apply to all pages printed from Notepad.
Remember to check the settings before printing.
The settings
in this dialog apply to all pages printed from Notepad.
Remember to check the settings before printing.
- From
the Notepad menu select >
The Page Setup dialog opens.
-
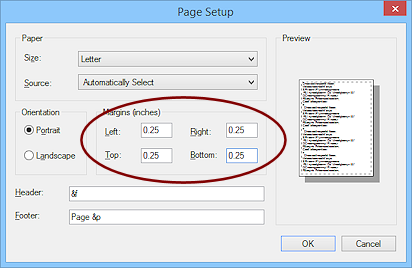 If necessary, change the settings in this
dialog to match the illustration:
If necessary, change the settings in this
dialog to match the illustration:
Margins: 0.25
Header: &f
Footer: Page &p
- Click on OK to close the dialog.
Notepad does NOT look any different, even if you changed the margins a lot! Notepad
remembers: The changes you made
to Page Setup will apply the next time you print a page from Notepad! Earlier versions of Notepad forgot your changes once Notepad was closed. Not any more!
Notepad
remembers: The changes you made
to Page Setup will apply the next time you print a page from Notepad! Earlier versions of Notepad forgot your changes once Notepad was closed. Not any more!
Print Source Code from Notepad
Notepad does not have a Print Preview feature. So sad!
-
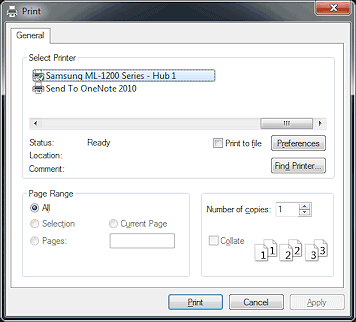 From Notepad's menu, >
The Print dialog opens.
- If necessary, select a printer.
The Page Range should be All. -
 Print.
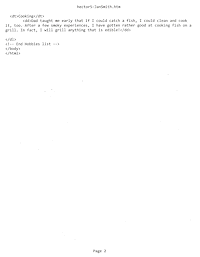
It takes two sheets now.
Remember that your print-out may not quite match the illustration, depending on exactly what you typed, including spaces and blank lines.More wrapping: The new margins make more lines wrap. This is not like what you are used to seeing in Word! Notepad was written for programming code where a line break can mean something special.
|
|
| © 1997-2017 Jan Smith All Rights Reserved |
Site Map What's New |
Privacy Policy Terms of Service Copyright Acknowledgements |
~~ 1 Cor. 10:31 ...whatever you do, do it all for the glory of God. ~~
Last updated: March 22, 2017