
Jan's Working with the Web
HTML Code: Code Example
The idea of HTML tags is easy to understand. You mark the logical parts of your document. But, when you put a bunch of text and tags together to make a whole page, things start looking complicated!
To make things worse, tags often have more stuff in between the < and > than just the name of the tag. Sometimes there's a LOT more.
What does a tag look like?
A simple case is the P tag (marking paragraphs). It often
includes a style for the paragraph, like:
<p style="text-align:justify">.
Such extra parts are called attributes. They set various characteristics for the tag. Each attribute has two or more possible values.
General form for a tag with attributes is like:
<tagname
    attribute="value">
In our example <p style="text-align:justify">, the attribute is STYLE. There are a
huge number of values that you can use with the STYLE attribute to format that tag. The property TEXT-ALIGN has four different values: LEFT, RIGHT, CENTER, and JUSTIFY. These
make text in the tag line up on the left of the space, the right, centered,
or justified (left and right edges are even like in many books and
magazines).
Next, you will look at a very simple web page and figure out what each part of the code is doing.
| |
Step-by-Step: Look at the Code |
|
| What you will learn: | to view source code to identify HTML tags in use to find attributes and values to find special characters how to code special characters to use Character Map |
Start with: ![]()
View Source Code
- Open a new browser window.
-
If you are connected to the Internet, type or copy and paste the path http://www.jegsworks.com/Lessons/web-2/start/html.htm in the browser's Address box.
OR
If you installed the resource files on your hard drive, you can navigate to Start folder in that location and double click the file html.htm.
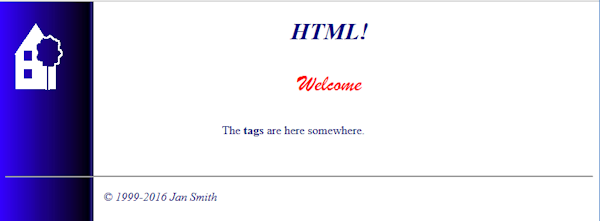
This is a very simple page with one image at the left, a background image, three lines of text, and a footer.

 Installed
Fonts: The
browser will display the text "Welcome" exactly as it is shown on the
illustration above only if your computer has the font Brush
Script MT installed. Otherwise, the browser's default font is used,
which is usually Times New Roman on a Windows computer. In the illustration at
the right, Brush Script MT is used for the first Welcome and Times New
Roman is used for the second. When you look at the code, you will see
what the tag is doing to choose a font.
Installed
Fonts: The
browser will display the text "Welcome" exactly as it is shown on the
illustration above only if your computer has the font Brush
Script MT installed. Otherwise, the browser's default font is used,
which is usually Times New Roman on a Windows computer. In the illustration at
the right, Brush Script MT is used for the first Welcome and Times New
Roman is used for the second. When you look at the code, you will see
what the tag is doing to choose a font.
-
Right click on the page and select:
 IE: View source . The source code shows in a pane below the page.
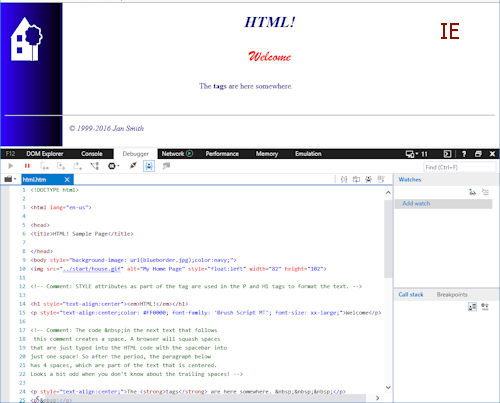
There is a button
 on the black bar at the far right that will open the page source in its own window.
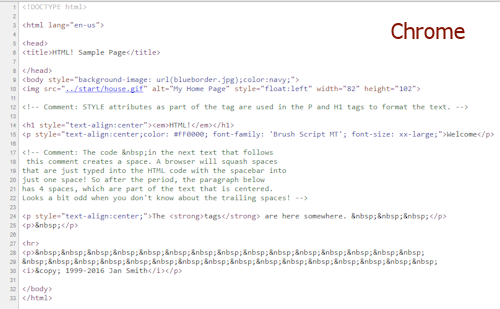
 Chrome: View page source. Opens in a new tab.
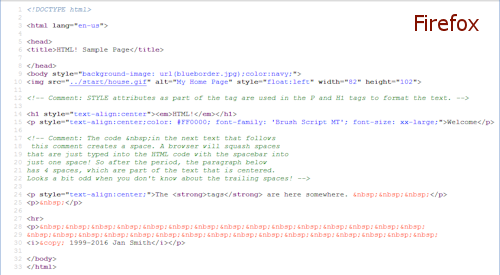
 Firefox: View Page Source. Opens in a new tab.
The source code (the HTML code) opens in a new browser window or tab for most browsers. Wherever it opens, you can copy from this view but you cannot make changes and save them here! That's why you need your own text editor.
Text wrapping: The illustrations show the viewers with text wrapping turned off.
Notice that each browser's viewer color-codes the HTML code a bit differently. These all show the comments in green. They all use three different colors for an HTML element (like H1), the attributes (like style), and the values (like text-align:center).
- Inspect the code.
Looks like quite a mess! So many lines to display such a short document!You will see many of the tags you learned about in the previous lesson. Some of them have a lot more between the angled brackets, < and >, than the we saw in the last lesson!
- Compare these lines with what is displayed in the browser. Can you tell what each code line is doing? Some do not seem to do anything! But all are important. (It may be easier to read if you print the code.)
Tag List: Identify HTML tags in use
The key feature of HTML is what lies between the symbols < and >. These are the tags. Some tags give information to the browser but do not show anything on the screen.
-
 Download taglist.doc from the web resources or
from your downloaded resource files.
Download taglist.doc from the web resources or
from your downloaded resource files. -
 Save your document as taglist-Lastname-Firstname.docx in the web project2 folder on your Class disk. If this folder does not exist, create it.
 - Open the Tag List document in Word.
- In the
Tag column, list all the different tags used in source code of the web page you are studying. You will
complete the table shortly.
Most tags come in pairs- an opening tag and a closing tag. Put them together in your list. The closing tag includes a forward slash / before the name of the tag. For example the opening tag
<html>has the matching closing tag</html>. This document also has some unpaired tags. -
Save.
[taglist-Lastname-Firstname.docx]
Tag Types and Attributes
-
In your table of tags, find the ones that do not match anything you see when you look at the page itself (not the source code) in your browser. Mark them in the Part column of your table as "hidden".
Every HTML document must include the paired tags
<html>and<body>. The DOCTYPE tag allows your code to be validated, that is, checked for errors by software. Some browsers change the way they display the page based on the DOCTYPE tag.
- In your table of tags, find the tags that surround the
text that actually showed in the browser. In the Part column
of your table, tell which part of the document that tag marks - paragraph, heading, etc.
-
Find in your table the tags that have more than just the tag name between the brackets, < and >.
These are the attributes of the tag. They set various characteristics for the tag. Each attribute has two or more possible values. For example, a heading or paragraph tag can have attributes that control the font, the font size, and the color of the text. For example, In this document you should see:
<p style="text-align:center;color: #FF0000; font-family: 'Brush Script MT'; font-size: xx-large;">Welcome</p>
-
List the attributes in column 3 for those tags in the page html.htm that have attributes.
Picking
Fonts: If the font
Brush Script MT is not
installed on the computer, the browser will use its default font, which
is Times New Roman for most Windows browsers. It is clearly not 'best
practices' to name just one font like this! You will learn how to handle
this issue in a later lesson. - Save.
[taglist-Lastname-Firstname.docx]
Special Codes: &xxxx;
There are more characters available to you than what you see on your keyboard. Each character has a special code. However, you must use a font that includes those characters.
You also need a special code to see more than one space. Your browser will only show 1 space no matter how much blank space is in the source code unless you use the code for a space.
All these special codes start with & (an ampersand) and end with ; (a semi-colon).
- Switch back to the browser window showing html.htm and inspect the last line of text shown on the page:
© 1999 - 2016 Jan Smith
- Spaces:
Switch to the source code view and find the code that produced that line.
You will see used many times. This is the HTML code for a blank space - a non-breaking space.
(By the way, this string of spaces is not a good example of good coding practice!) Spaces in HTML: In word processing you
get a space in the document for each time you press the spacebar. In HTML you
must use the code for each space you want to guarantee. A set of spaces in your source code will collapse to a single space in the displayed page. - Character not on keyboard:
Find the second special code in the sentence:©
This is the HTML code for the copyright symbol - © a circle around the letter C. Keyboard
characters by language: Most text fonts contain
letters from several languages and also symbols, like  .
Your keyboard will only have keys for the special characters that are
common in the language for which the keyboard was designed. English
keyboards show the first 8 characters in the list of symbols on keys. You can make
the browser display the characters that are not on your keyboard by
typing special codes for them.
.
Your keyboard will only have keys for the special characters that are
common in the language for which the keyboard was designed. English
keyboards show the first 8 characters in the list of symbols on keys. You can make
the browser display the characters that are not on your keyboard by
typing special codes for them.
Ways to Code Characters
There are three different ways to code a special characters: HTML code, ASCII code, and Unicode.
HTML Code: The HTML codes for special characters use an abbreviation of an
English description of the character, like í for í
and ñ for ñ.
ASCII Code: You can also use number codes for the
special characters, like í for í and ñ for ñ.
Unicode: Unicode uses í for í and ñ for ñ. Unicode has a much larger set of characters, running into thousands and includes characters for languages like Chinese and Hindi and Arabic. Unicode actually lets you use either a decimal number like 合 or a hexadecimal number like 合. This example produces the Chinese character 合.
Not all fonts have symbols for all of the possible Unicode characters, of course.
Sources for problems with display with Unicode:
- Incorrect code
- Browser does not support that part of Unicode.
- The font used does not include the character or has a different character in that spot in the font.
-
The META tag for the page that sets 'character encoding' does not support Unicode characters. Every HTML page should have a META tag that sets the character set. Your example page does not.
Example that works for Unicode:
<meta http-equiv="Content-Type" content="text/html;charset=UTF-8" />
What's that Code? >> Character Map
To find the code for a special character, you can use Character Map, which is a program that comes with Windows. Once you select a character, click the Copy button to load it into the Windows Clipboard. Then you can paste it into your document.
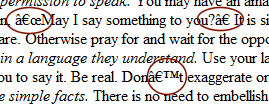
![]() Problem: Unexpected characters in a web page.
Problem: Unexpected characters in a web page.
Cause: A special character was
written with a font that your computer does not
have. Your default font has a different character with that code. Curly
quotation marks and curly apostrophes are common problem. The sample image shows odd characters when curly quotes and a curly apostrophe were used in the original document.
Solution: For the viewer: None
For
the author: Be careful! Avoid special characters when possible. Use HTML codes or ASCII codes instead. If the character is not in those codes, use an image if the symbol or character is very
important.
- Open the program Character Map:
Start > Programs or All apps > Accessories or Windows Accessories > Character Map
or (Win8, 8.1) Start screen and type charmap in the Search box and click on Character Map in the results.
or (Win10) Type character map in the Search box on the Taskbar and click on Character Map in the results. - If necessary,
 select
Arial in the Font drop list.
select
Arial in the Font drop list.
- Click on the copyright symbol ©, a circle with a C in
the middle.
A larger view of the characters pops up.
At the bottom right of the Character Map dialog you can see the keyboard combo for the selected character: ALT + 0169. This shows the ASCII code for the character. In a word processing document you would hold down the ALT key while typing the numbers to get the character. In the source code for a web page, you would type © or © to show the copyright character, ©.
At the bottom left of the dialog is the Unicode for the selected character. In your web page you would type © to show this character, ©.
 WinXP: To see the key combo to use, display the Advanced view by checking its box.
  Experiment: Character Map
- Scroll the list of characters in the font
Arial and click on several of them.
The Status bar at the bottom gives the Unicode for the character and a name, like Copyright Sign. Some characters have a keystroke.
- What characters do not have a key combo?
Can you figure out why?
- What languages have characters in this font?
The Latin alphabet covers not only Latin but also English, French, Spanish, and many other languages that use the same basic ABC alphabet plus other characters that are for just that language. Other languages, like Japanese, Chinese, Hindi, Hebrew and Arabic, require a whole different set of characters.
- Change the font to a different font and inspect the characters available.
Check out several fonts.
Text fonts have the same characters in the same places. They just look different.
- Select a symbol font like WingDings or Segue UI Symbol and scroll to inspect all of the characters.
Symbol fonts have wildly different characters in the grid! - Select a font that includes non-Latin characters, like Traditional Arabic, Batang, or PMingLiU and scroll
through the characters.
 Problem: Some characters do not show a keystroke combination.
Cause: The characters that are actually on a standard keyboard do not need combos. The keys are already there! Other characters do have a keystroke number, even if it does not show in the dialog.To
insert the character from Character Map:
Click the character, then click on Select, and then on Copy. Switch to your document and Paste.
This works in all kinds of programs, not just for HTML pages.
There are, however, situations where your character may not display as you planned.Font
in document: Your choice of font does make a difference. If you use a
symbol font, like Wingdings, instead of a text font, the same number codes that
made í and ñ produce instead little arrows:  ,
and instead of the copyright symbol you get
,
and instead of the copyright symbol you get  a 3-pointed star. How unexpected!
 The abbreviations are easier to remember than all these numbers!
Problem: Character is too small to see in Character Map.
Solution: Left click on the character. A larger version of the character pops up.
Problem: Typing on the keypad does not insert characters.
Solution: Press the NumLock key.
When NumLock key is OFF, the keypad works as navigation keys instead of typing numbers.
- Scroll the list of characters in the font
Arial and click on several of them.
How to include in text the characters that are part of HTML code
HTML code uses some characters itself: ampersand &, quotes ", left angled bracket <, right angled bracket >. What if you want those characters to show in your text for some reason? (Like in the previous sentence!)
To use these coding characters in normal text in an HTML page, you must use one of the special codes for them. (Getting a bit crazy here!) If you do not, the browser may try to interpret them as HTML code instead of text, which will do unhappy things to your web page.
| Symbol | To show as normal text, use: | Description |
|---|---|---|
|
a space |
| non-breaking space |
|
< |
< |
'Less than' sign, left angled bracket |
| > | > |
'Greater than' sign, right angled bracket |
| & | & | Ampersand |
| " | " | Double quote sign |
Now you have seen tags in action. Some of the attributes and special codes may not make sense to you yet, but you should have an idea of the general way HTML documents work.
|
|
| © 1997-2017 Jan Smith All Rights Reserved |
Site Map What's New |
Privacy Policy Terms of Service Copyright Acknowledgements |
~~ 1 Cor. 10:31 ...whatever you do, do it all for the glory of God. ~~
Last updated: March 22, 2017