
Jan's Working with the Web
Positioning: Table
Tables are used in two ways on web pages.
-
Data Table: Display data that logically falls into rows and columns
-
Positioning Table: To place elements on page (a hack but useful)
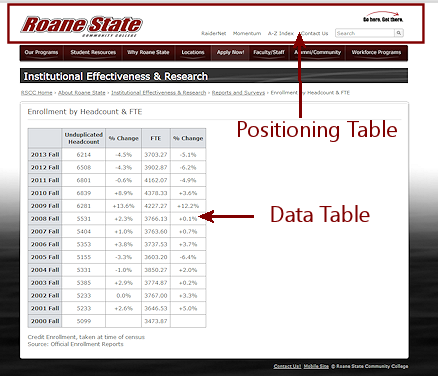
Credit: Roane State Community College
Positioning Tables
HTML was designed to give the browser a LOT of flexibility in how pages display. Text wrapping is a great strength of HTML, but it can also get in the way. Putting parts of a page in a table can make sure that the right parts stay in the right places.
Some web pages base the whole page on a single table. Others use positioning tables only for certain areas like the header, footer, and menus. In the example above, the header parts are placed inside a table with no borders.
| |
Step-by-Step: Positioning Table |
|
| What you will learn: | to create a table for positioning to move content into table cells to align content with inline styles |
Start with: ![]() , hector22-Lastname-Firstname.htm
, hector22-Lastname-Firstname.htm
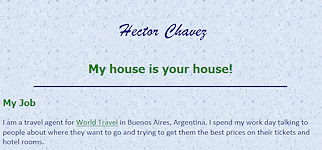
You will create a table to control the alignment of the top of Hector's page.
Create Table for Positioning
-
If necessary, open hector22-Lastname-Firstname.htm in your text editor.
-
 Save
as hector23-Lastname-Firstname.htm.
Save
as hector23-Lastname-Firstname.htm. -
 Put the cursor at the right of the
BODY tag and press ENTER to create a new blank line.
Put the cursor at the right of the
BODY tag and press ENTER to create a new blank line. -
Create a table with one row and two cells, using the code below.
The default is to not have a border, so you do not even have to include the border="0" attribute.<body>
<table>
<tr>
<td></td>
<td></td>
</tr>
</table> -
Save.
[hector23-Lastname-Firstname.htm] -
Switch to your browser and view hector23-Lastname-Firstname.htm.
You have to carefully compare to the previous version to see that everything on the page moved down a teeny bit.
Move Content into Table Cells
A table can hold images as well as text. You can copy and paste into the table, as long as you are careful where the cursor is! Pasting outside a table cell has unpredictible results!
-
Switch back to the text editor.
-
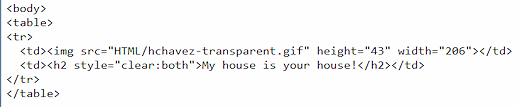 Cut the code for the signature
image and Paste it into the first cell (between the <td> and </td> tags.
Cut the code for the signature
image and Paste it into the first cell (between the <td> and </td> tags. -
Delete the H1 code that was left behind when you cut the IMG tag.
-
Cut the code for the whole H2 element, My house is your house, and Paste it into the second cell.
-
 Save.
Save.
[hector23-Lastname-Firstname.htm] -
Switch to your browser and Refresh.
Not lined up very well! The signature image is higher on the page that the text in the next cell.
Plus, the text on the right should be centered in the remaining space. It is in an H2 element, which has styling from the external style sheet, text-align:center. So, why isn't that text centered?
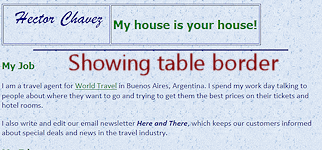 It is! But the
table does not have a set width. The cell is just wide enough to hold the text, so it does not LOOK
centered. This would have been obvious if we had shown the
borders. But position tables don't usually show borders. The viewer
should not know that a table is there at all!
It is! But the
table does not have a set width. The cell is just wide enough to hold the text, so it does not LOOK
centered. This would have been obvious if we had shown the
borders. But position tables don't usually show borders. The viewer
should not know that a table is there at all!
Align Content with Inline Styles
You need to add some styling to make the signature and the text line up neatly. Some days you must tweak and tweak and tweak again!
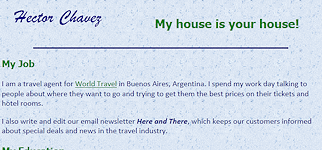
- Switch to your text editor and edit the TABLE tag
to make it use 100% of the width.
<table style="width:100%;">
-
 Save.
Save.
[hector23-Lastname-Firstname.htm] -
Switch to your browser and Refresh.
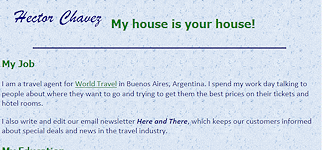
The text part lines up better but the signature image does not line up with the text.
The text seems to be in the vertical middle of the table cell but the image seems to be at the top of the cell.
-
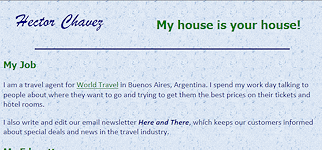
Switch back to your text editor and add the following inline STYLE to put the image in the middle of the cell:
<td style="vertical-align:middle;"><img src="HTML/hchavez-transparent.gif" height="43" width="206"></td> -
 Save.
Save.
[hector23-Lastname-Firstname.htm] -
Switch to your browser and Refresh.
Better, but the bottom edge of the signature z is what lines up with the bottom edge of the green letters. What we want is for the signature to look like it was written on the same line as the subtitle. Grrr! One more style to add.
-
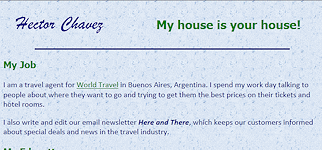
Switch back to your text editor and add the following inline STYLE to the IMG tag to push the image down a bit:
<td style="vertical-align:middle;"><img style="margin-top:10px" src="HTML/hchavez-transparent.gif" height="43" width="206"></td> -
 Switch to your browser and Refresh.
NOW the bottoms of the letters are on the same line. Whew! That took bit a work, but it does look neater now.
|
|
| © 1997-2017 Jan Smith All Rights Reserved |
Site Map What's New |
Privacy Policy Terms of Service Copyright Acknowledgements |
~~ 1 Cor. 10:31 ...whatever you do, do it all for the glory of God. ~~
Last updated: March 22, 2017
Disclaimer: The archived lessons use tables for positioning the whole page, which is no longer recommended. When I started writing, CSS positioning was not handled the same in different browsers. In particular, Netscape was quite popular then and used an entirely different method than other browsers. So I opted to use the more stable method using tables. The new layout for lessons uses mostly CSS positioning but I still use tables sometimes to position things side by side. For parts of the page that need to be hidden or need different format for printing, only DIVs will do!