
Jan's Working with Windows:
Dialogs: Display
Windows lets the user customize or personalize the look of the screen. For versions before Vista, the choices are grouped on the Display Properties dialog. Windows Vista, Windows 7 and Windows 8 put the choices on the Personalization dialog.

Dialogs for customizing Windows' look
While you are learning about Windows' Display Properties, you will also be practicing with different kinds of dialog inputs. Isn't this sneaky? Learning two things at the same time!
[If your computer is on a network, you may not be able to change some or any of the Display properties.]
|
|
Step-by-Step: Display Dialog |
|
| What you will learn: | to customize the look of Windows: Theme Background Screen saver Appearance Return to the default settings Display Settings |
Start with: ![]() Desktop and Taskbar showing
Desktop and Taskbar showing
Dialog: Display Properties or Personalization
![]() If your computer has different user accounts, the changes that you make
in the Display dialog will apply only to the current user.
If your computer has different user accounts, the changes that you make
in the Display dialog will apply only to the current user.
-
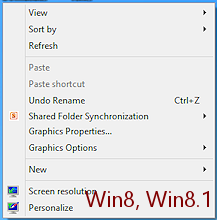
 Right click on a blank area of the desktop to get the
context-sensitive menu.
Right click on a blank area of the desktop to get the
context-sensitive menu.
 Click on Properties
or Personalize.
Click on Properties
or Personalize. 
 WinXP:
You
will see a dialog box for Display Properties. Here is where you can customize
how the display on your monitor works.
WinXP:
You
will see a dialog box for Display Properties. Here is where you can customize
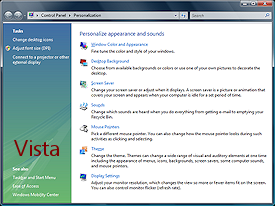
how the display on your monitor works.  Vista: The Personalization dialog opens with a list of links to other dialogs.

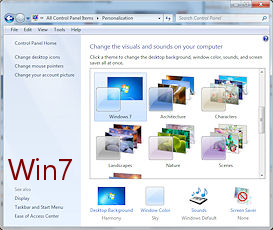
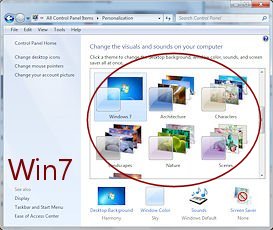
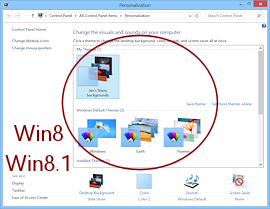
 Win7, Win8, Win8.1: The Personalization dialog shows themes and has links at the
bottom and left for other choices.
Win7, Win8, Win8.1: The Personalization dialog shows themes and has links at the
bottom and left for other choices. 
![]() There may
be different choices, depending on what
video drivers your computer uses and on which exact version of Windows you have.
There may
be different choices, depending on what
video drivers your computer uses and on which exact version of Windows you have.
To Save or Discard Changes
![]() In a dialog that has a lot of choices, you may see an Apply button in
addition to the expected OK and Cancel buttons. If you click
Apply, your changes will be remembered but the dialog does not close. This lets you
continue making other choices.
In a dialog that has a lot of choices, you may see an Apply button in
addition to the expected OK and Cancel buttons. If you click
Apply, your changes will be remembered but the dialog does not close. This lets you
continue making other choices.
The Apply button will be grayed out (not available) until you actually make a change.
Themes
A theme is a matched set of colors, background, screen saver, pointer shapes, sounds, and Desktop icons. These are all related to the same topic or style: space, the sea, nature, Star Wars, or Sherlock Holmes, for example. Windows itself comes with just a few, a default theme, perhaps a Classic theme, and high contrast theme(s) to help users with vision problems. You can create your own combinations and save them as a theme. You can also download themes created by others.
The dialog for a theme does not show you all of the changes that may be included. Some themes change just a few items, like the colors and desktop background. You cannot edit the theme from this tab/dialog. You make your choices in other places and then save the whole set as a theme.
![]()
![]()
![]() Win7, Win8, Win8.1: Opens Personalization dialog directly into a display of thumbnails for the
available themes.
Win7, Win8, Win8.1: Opens Personalization dialog directly into a display of thumbnails for the
available themes.
![]() Reset theme: The 'Windows' theme for your version
will return you to the default colors and appearance. This is handy if you made
a lot of choices and don't remember what the original settings were.
Reset theme: The 'Windows' theme for your version
will return you to the default colors and appearance. This is handy if you made
a lot of choices and don't remember what the original settings were.
![]() Save your theme: If you customize the colors and
appearance, go to Themes and use the Save As button to save your adjustments
under a new name.
Then, if you (or someone else!) make changes later, it is easy to get back to
the look you liked by just applying the correct theme.
Save your theme: If you customize the colors and
appearance, go to Themes and use the Save As button to save your adjustments
under a new name.
Then, if you (or someone else!) make changes later, it is easy to get back to
the look you liked by just applying the correct theme.
![]() Vista: Will list the Windows Vista theme only if the computer can handle
the Aero graphics features. If it cannot, you will see
the theme Windows Vista Basic instead.
Vista: Will list the Windows Vista theme only if the computer can handle
the Aero graphics features. If it cannot, you will see
the theme Windows Vista Basic instead.
Background
The background of the Desktop can be a solid color, a repeating pattern, or a single image. Here are some definitions:
Pattern = design that replaces the solid color background on the desktop.
It uses a fairly small repeated image.
Wallpaper = a picture that replaces the solid color background on the desktop.
Tile = repeats a picture (usually small) until the whole desktop is covered.
Center
= puts the picture in the center of the screen.
Stretch or Size to Fit =
stretch or shrink an image to fit the screen. This can result in a very
distorted image.
You can choose to use both a pattern or a solid color along with a wallpaper. Usually the wallpaper hides the pattern, but you may see it in the labels of desktop icons or around a centered wallpaper image.
-
Desktop Background:
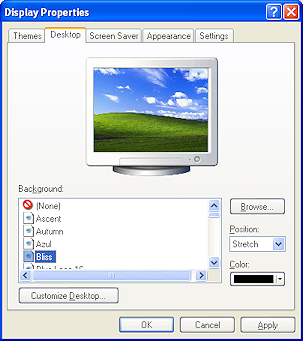 WinXP:
Click on the Desktop tab to bring it to the front, if
necessary.
WinXP:
Click on the Desktop tab to bring it to the front, if
necessary. This tab has a list of backgrounds that Windows knows about, but you can Browse to any image on your computer. The monitor image at the top of the tab page will change to show how your choice will look.
The Color you choose from the Color drop list will show only if the image does not fill the screen.
 Vista: Click
on the link Desktop Background.
Vista: Click
on the link Desktop Background.The page shows thumbnails of pictures in the location picked in the Picture Location box. You can browse for other pictures.
Below the thumbnails you can choose how you want the image to be used - Stretch to fill the screen, Tile (repeat in rows to fill the screen) or Center on the screen.
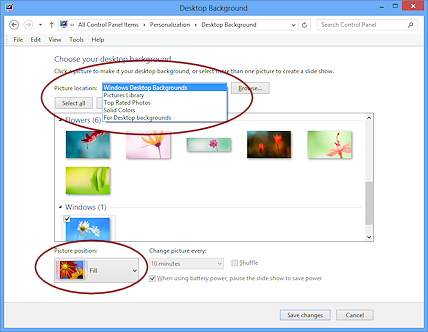 Win7, Win8, Win8.1:
Click on the link at the bottom of the Personalization dialog, Desktop Background.
Win7, Win8, Win8.1:
Click on the link at the bottom of the Personalization dialog, Desktop Background.

Picture Location: The page shows thumbnails of images in the Picture location picked at the top. You can browse to use a picture that is not in one of the locations.
Picture Position: Below the thumbnails you can use the Picture position drop list to pick how you want the picture to be used. You can let Windows change the image on a time schedule, using the images in a particular folder.
-
 Experiment with some of the choices.
Scroll the lists to see all of the choices. You can use any image that you have on your computer as wallpaper. The Browse button will open a dialog for you to look for images on your computer. WinXP: The effect will show in the small monitor in the dialog box.Versions besides WinXP: Live Preview will change your actual Desktop temporarily when you select an image. You must save your changes to make those choices stick. You may need to move or minimize the window to see the effect on the Desktop.
- Save or discard your choices:
Versions besides XP: WinXP:
Click on Apply to
save your change without closing the dialog or click on the next tab, Screen Saver.
Click on OK or 'Save changes' to save your changes or click on Cancel if you do not want to save
the changes. The window closes. The Personalization window is still open.
Screen Saver
-
Click on the Screen Saver
tab or link.
A screen saver is a moving design or image that comes on after a set amount of time passes with no activity on the monitor. Its purpose to keep your screen from sitting too long with one picture on it. This can cause a permanent shadow on older monitors. Of course, screen savers are also a lot of fun!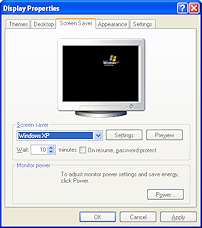
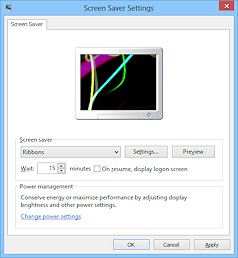
WinXP, Win7, Win8
- Experiment with different screen savers.
Select one from the drop list. Then click on Settings to see if there are changes you can make.
The Preview button will run the screen saver in the small monitor in the dialog box.
- Save or discard your choices:
Click on Apply or click on the next
tab to keep your changes without closing the dialog.
Click on OK to save your changes and close the dialog. Click on Cancel if you do not want to save
the changes and close the dialog. The window closes. The Personalization window is still open.
Appearance
- Get to the Appearance settings:
 WinXP: Click on the
Appearance tab.
WinXP: Click on the
Appearance tab.
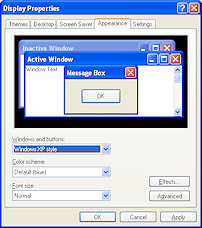
In this dialog you can change the colors of the parts of a window, either one item at a time or by selecting a scheme.
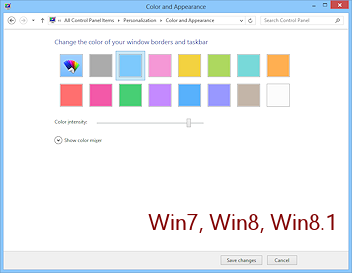
Versions after WinXP:
Click on the link Window Color and Appearance or Window Color or Color, in the Personalization window.
[If Aero is not available on your Vista or Win7 computer, the Appearance Settings dialog will open instead of the Window Color and Appearance window.] -
Experiment: Window Colors
Versions after WinXP: Select different colors and intensities. Live Preview will show the effect on your actual Desktop.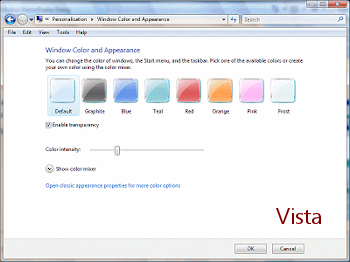
-
Experiment: Changing settings for appearance of a window
WinXP: Click on parts of the sample windows and change their characteristics
with the controls at the bottom of the dialog. Vista: Click on the link Open classic appearance properties for more color
options to see the Appearance dialog. Select various color schemes and see how they change the various types of windows in the preview in the dialog.
Vista: Click on the link Open classic appearance properties for more color
options to see the Appearance dialog. Select various color schemes and see how they change the various types of windows in the preview in the dialog. These pre-designed sets are not available in Windows 7.
Click on the Advanced button to open a dialog for custom choices for parts
of the sample windows. Try various changes with the controls
at the bottom of the dialog.
 Win7: Click on the link Advanced appearance
settings... to see the dialog for changing more color and font
features.
Win7: Click on the link Advanced appearance
settings... to see the dialog for changing more color and font
features.
 Win8, Win8.1:
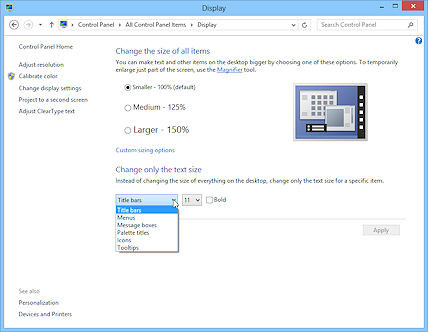
Click on Personalization in the Address Box at the top of the window. Click on the item Display on the left of the window.The Display dialog lets you make just a few of the changes that earlier versions of Windows allowed.
This dialog has three sizes for enlarging what you see on the screen - all of it at once. You must log out and log back in for the change to be applied.
If you want to change only the text size, choose from drop lists for which parts of the interface you can adjust and the point size.
Unlike previous versions, Windows 8 does not make it easy to change the font used for text in the interface. It can be done by making some changes in the Registry. That's not a task for novices!
- Save or discard your choices:
WinXP:
Click on Apply to save your change without closing the dialog or click on the next
tab.
Vista, Win7:
Click on OK to save your changes or click on Cancel if you do not want to save
the changes. The window closes. The Personalization window is still open. Win8, Win8.1: Click on Apply to save changes. You may have to log out and back in. There is no Cancel button in the Display dialog. The Display window is still open.
Return to Default
If you applied changes and want to get back to the original look, apply the Windows theme in the Themes dialog.
Settings
You will not be making any changes to the display settings but you do need to see what choices are available.
- From the Display Properties or Personalization window, open the Display Properties/Display Settings:
Click on the Settings
tab or Display Settings or Screen Resolution (on the left of the window).
From this dialog, if your video card, monitor, and permissions allow it, you can change the color depth and/or resolution of your screen. You may have to reboot the computer for your changes to take effect. It depends on your video card.
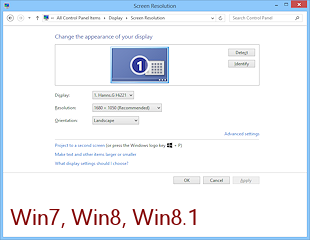
The choices in the dialog are the choices that Windows thinks will work for the equipment and drivers being used. You may not have any choices!
The Advanced Properties/Settings button leads you to a dialog for changing the video driver and the type of monitor. You should not usually need to make changes there.
 Do not change the Advanced Display Properties settings unless you KNOW what you are doing will work! The wrong settings here can make your screen unreadable and might even keep Windows from starting.
 LCD
monitors and resolution: It is particularly important on an
LCD monitor (the skinny flat ones) to use the resolution recommended
by the manufacturer as the "native" resolution. With other
resolutions the image on the screen will not be as crisp and clear.
This resolution is usually the largest available in the slide bar -
IF the monitor has been correctly identified by Windows. You have to
go into the Advanced settings to see a tab for Monitor.
LCD
monitors and resolution: It is particularly important on an
LCD monitor (the skinny flat ones) to use the resolution recommended
by the manufacturer as the "native" resolution. With other
resolutions the image on the screen will not be as crisp and clear.
This resolution is usually the largest available in the slide bar -
IF the monitor has been correctly identified by Windows. You have to
go into the Advanced settings to see a tab for Monitor.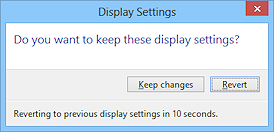 Safety
net for video changes:
Safety
net for video changes:
If you change the color palette (i.e. color depth) or the resolution/desktop area and click on the Apply button, Windows will make a temporary change to your actual display (not the example preview in the dialog). A confirmation dialog appears. If you like what you see, you can click on Yes in the confirmation dialog to accept the changes. If the result is a big, unreadable mess, you can click on No to dump the change. If you cannot see or read the message box, just wait a few seconds and Windows will automatically change back to the previous settings.For changes to Display Settings to take effect you may have to restart the computer.
- Click on the Cancel button to close
the dialog.
- Close the window.
|
|
| © 1997-2017 Jan Smith All Rights Reserved |
Site Map What's New |
Privacy Policy Terms of Service Copyright Acknowledgements |
~~ 1 Cor. 10:31 ...whatever you do, do it all for the glory of God. ~~
Last updated: March 24, 2017