
Jan's Working with Words
AutoTools: Make Changes: Add Text
When adding new text to existing text, you normally want to insert the new words. Sometimes your typing just types right over the existing words, erasing what you had! What happened?? You had overtyping turned on. Whoops!
Overtyping
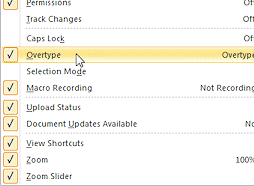
How do you tell if Overtyping is on? Look at the Status bar of the Word
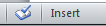
window. Do you see Insert ![]()
![]() or Overtype
or Overtype ![]()
![]() ?
Clicking the word toggles typing to the other mode.
?
Clicking the word toggles typing to the other mode.
 If
neither of these show (and it is off by default), you can make them
show. Right click on the Status bar. A list of items that can show on
the Status bar appears. Click on the item Overtype to put a check mark
by it. The current status of most items shows at the right of the list.
If
neither of these show (and it is off by default), you can make them
show. Right click on the Status bar. A list of items that can show on
the Status bar appears. Click on the item Overtype to put a check mark
by it. The current status of most items shows at the right of the list.
![]() Confusion: INSERT key
Confusion: INSERT key
Pressing
the INSERT key on your keyboard in previous versions of Word toggled Overtyping on and off.
For Word 2007, 2010, 2013, and 2016, this is not the default action. That means you do not have to worry about accidentally hitting the Insert key. The Word Options dialog has a setting for this feature on the Advanced page in
the Editing Options section.
| |
Step-by-Step: Add Text |
|
| What you will learn: | to set up the Status bar display to add a paragraph to insert text what Overtyping does to toggle Overtyping on and off |
Start with: ![]() ,
, ![]() , trip.docx from resource files
, trip.docx from resource files
World Travel Inc. wants to create a document to help customers plan their Special Anniversaries trip to Tahiti.
- Open Word with
the method of your choice.
- Open the document named trip. docx in your resource files in
the words resources folder on your hard drive. Or download it, trip.docx
 , and then open it in Word.
-
 If
necessary, insert your Class storage device.
If
necessary, insert your Class storage device.
- Use to save this document:
- File name: trip_planner-Lastname-Firstname
These lessons will not use spaces in file names in case you need to upload your files using course management software that refuses file names with spaces. - Location: word project2 folder on your Class device.
- File Type: Word document (*.docx)
 If you do not save your files as docx type, some features of Word may not be
available for this document.
If you do not save your files as docx type, some features of Word may not be
available for this document.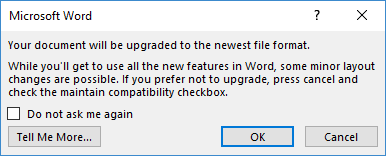 Message when saving: You may see a message about saving as a new file format, even though the downloaded file has the newer extension. Click on OK. The message tells you what to do if you want to keep the older format, which you do not want to do this time. Apparently there are minor differences even among versions of Word that use the docx extension. Confusing!
 - File name: trip_planner-Lastname-Firstname
- If necessary, click on the Show/Hide Marks button
 to display the
marks.
to display the
marks.
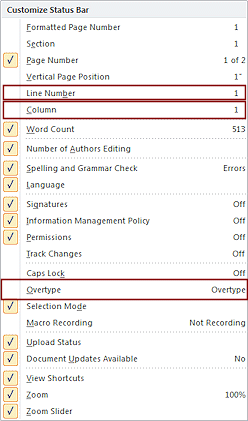
Set Up Status Bar
The Status Bar shows some information by default but you need to add a few features for these lessons.
-
 Right click on the Status bar.
A list of items that can show on the Status bar appears.
A check mark means that the feature is displayed on the Status bar.
The value at the right shows the current status of the feature. -
If necessary, click on the following to add them:
- Line Number
- Overtype
- Column
- Line Number
-
If necessary, click on the following items that should show by default:
- Page Number
- Word Count
- Spelling and Grammar Check
- Zoom
- Zoom Slider
- Click in the document to close the list.
Add Paragraph
You need to add a paragraph.
- Move the
cursor to the blank line 19. A paragraph was omitted here.
 Problem:
How do I know which line I'm on?
Problem:
How do I know which line I'm on?
The Status bar shows which line your cursor is on.
- Press the ENTER key to add a paragraph
break.
- To add more text type the following, with only one space between
sentences:
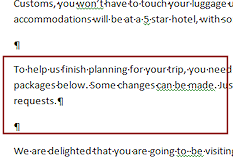
To help us finish planning for your trip, you need to make some choices. Please choose one of the packages below. Some changes can be made. Just let us know as soon as possible if you have special requests.
-
 Press the ENTER key again only after the final period in
the paragraph. You should have blank areas before and after the new paragraph.
Press the ENTER key again only after the final period in
the paragraph. You should have blank areas before and after the new paragraph.
![]() Problem:Wrong font showing
Problem:Wrong font showing
You opened the file trip.doc instead of trip.docx.
The document is in Compatibility Mode which blocks new features.
Solution: Close the document without saving and open the correct startup file.
Add Words: Overtype/Insert
- Move your cursor to line 6 in front of the word week .

 If necessary, turn on Overtyping by clicking Insert on the Status bar.
-
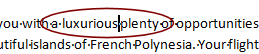 Type the word luxurious in front of week .
Whoops! With Overtyping on you are losing the existing text! 
 Turn off Overtyping by clicking
Overtype on the Status bar
again.
Turn off Overtyping by clicking
Overtype on the Status bar
again.
Your typing will now be inserted.
 Use the key combo CTRL + Z
repeatedly to undo the typing of each
letter that you just typed.
Use the key combo CTRL + Z
repeatedly to undo the typing of each
letter that you just typed.
- Type the
word luxurious again.
This time it should be inserted in between the existing words. Have only one space before and after the word luxurious .
-
 Press the right arrow key 5 times to move the cursor past the
word week and one space more.
Press the right arrow key 5 times to move the cursor past the
word week and one space more.
- Type the words of sun and
surf after the word week .
Use only one space on each end of your new phrase.
- Press the down arrow key to move the cursor down a line
at a time until the cursor is on the line "tour of the Tahiti", which is in the Package 1 list.
(Watch the line numbers on the Status bar. If you press the arrow key quickly, the display will not refresh until you pause.)
- Press the left arrow key to move the cursor to the left of the word Tahiti . The
Status bar will show Col 13.
-
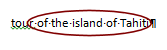 Type the words island
of in front of the word Tahiti .
Type the words island
of in front of the word Tahiti .
Use one space between of and Tahiti .
-
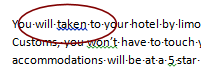 Use the arrow keys to move the cursor to page 1, line 16, where a word was left out.
You should see a squiggle underneath part of the sentence, which shows that Word thinks there may be an error here. Word 2007 has somewhat different wavy lines than Word 2010 and 2013. -
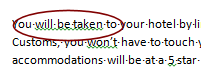 Use the arrow keys to move
the cursor to between will and taken and type the word be.
Use the arrow keys to move
the cursor to between will and taken and type the word be.
A green squiggle may show up again. If you right click on this error, you will see that it is a style issue, using Passive Voice. Don't worry about it!
- Save.
[trip_planner-Lastname-Firstname.docx]
|
|
| © 1997-2017 Jan Smith All Rights Reserved |
Site Map What's New |
Privacy Policy Terms of Service Copyright Acknowledgements |
~~ 1 Cor. 10:31 ...whatever you do, do it all for the glory of God. ~~
Last updated: March 22, 2017