
Jan's Working with Words
AutoTools: Margins & Breaks:
Adjust Columns
 Once you have created a set of columns, you
may need make some adjustments to get the layout you want. Funny things can happen to the text wrapping and alignment. If your columns flow over onto another page, you might need to revise in some way to get all the material on the same page.
Once you have created a set of columns, you
may need make some adjustments to get the layout you want. Funny things can happen to the text wrapping and alignment. If your columns flow over onto another page, you might need to revise in some way to get all the material on the same page.
There are a number of adjustments you might make:
- column margins
- column indentions
- page margins
- blank lines
- header/footer height
In the exercise below you will practice with the first two of these using the Columns dialog and the ruler.
|
|
Step-by-Step: Adjust Columns |
|
| What you will learn: |
to adjust columns with the Columns dialog to adjust indentions with ruler to adjust text flow with line break |
Start with:![]() ,
trip_planner10-Lastname-Firstname.docx
,
trip_planner10-Lastname-Firstname.docx
Create Unequal Columns: Columns Dialog
With the Columns dialog you have more control over the columns you create, if you know exactly what you want, or if you are trying to duplicate the layout of another set of columns. It's always good to know what you can and cannot adjust.
In several bullet paragraphs on this page, there is a single word on a line by itself. Not good form! It looks like there is plenty of white space for these words. Perhaps you can make adjust the spacing or the column width to fix this. Let's try.
![]() Warning:
New Problems - Fixing one problem can create another one... especially with columns!
Warning:
New Problems - Fixing one problem can create another one... especially with columns!
![]() Warning:
Variations - Your columns and text may behave
somewhat differently if you have done things in a different order along
the way somewhere. It can be quite exasperating! Before this lesson is
complete, you will check and fix any differences.
Warning:
Variations - Your columns and text may behave
somewhat differently if you have done things in a different order along
the way somewhere. It can be quite exasperating! Before this lesson is
complete, you will check and fix any differences.
-
 Save
as trip_planner11-Lastname-Firstname.docx in
the word project2 folder on your Class
disk.
Save
as trip_planner11-Lastname-Firstname.docx in
the word project2 folder on your Class
disk. 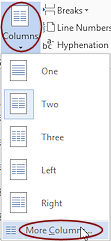 Click in the first item of the list for Package 4.
-
On the Page Layout tab, click the Columns button and click on More
Columns...
The Columns dialog opens.
- If necessary, click on the thumbnail for Two columns.
- Uncheck the box Equal column width.
-
Click the up arrow for the width of the first column to increase the
width to 3.1".
(You can also type in numbers.)
The second column's width is automatically reduced but the spacing between columns stays the same.
-
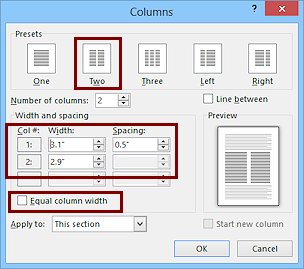 Click on OK to close the dialog and
apply your changes.
Click on OK to close the dialog and
apply your changes. -
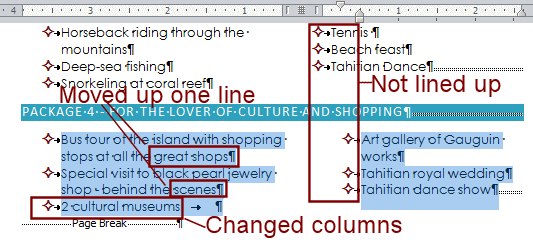
Inspect the list item.
Not quite enough to get those words up one line.
- Open the Columns dialog again and change the width of the first column to by another tenth of an inch.
- Close the dialog and inspect again.
- Repeat until the first two items in
Package 4 fit onto 2 lines each.
What changed and why:
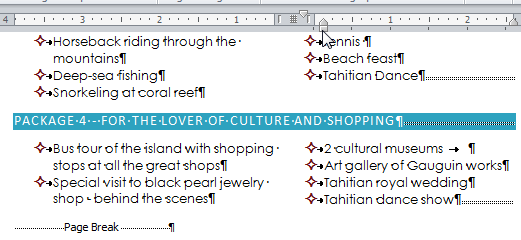
- The first two items in Package 4's list now fit on two lines instead of three. Success!
- The third list item moved from column 2 to column 1. Word automatically rebalanced the two columns. Surprise!
-
New problem: Column 2 does not line up with the lists above on the page any more. A wider column 1 shoved column 2 over to the right. This is a good example of how fixing one issue can create another problem to fix!!
-
Save.
[trip_planner11-Lastname-Firstname.docx]
Adjust Item: Left Indention
Looking at the Package 4 list, there seems to be space for the items in column 2 to move left a bit so they will line up with the other column 2 bullets on the page.
You don't want to change the margin for the column. That would make Column 1 narrower and undo what you just did to get the first column items to fit onto two lines.
What you can do is change the indention for all of the items in the column at once.
-
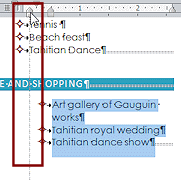 Drag
to select
just
the three bullet items in column 2 for Package 4.
Drag
to select
just
the three bullet items in column 2 for Package 4.
Unlike in a table, there is no way to select a whole newspaper column directly. Warning: Changing an
indention will apply only to the selected items!
Warning: Changing an
indention will apply only to the selected items! - On the ruler above column 2, drag the
Left Indent
box to the left until the dotted line is barely left of the
text for the Package 3 list items.
Be careful to drag the box and not just the arrow above the box.
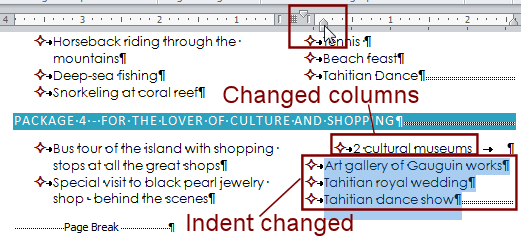
What changed and why:
- Selected items moved left because left indention was reduced.
- Item #3, "2 cultural museums", moved back to column 2.
Why? Because the next item, 'Art gallery of Gauguin works', is now on one line instead of on two lines. - New Problem: The item that moved back to
column 2 is still using the old indention.
 Put the cursor at the in the item at the top of Column
2, '2 cultural museums'.
Put the cursor at the in the item at the top of Column
2, '2 cultural museums'.
-
Drag the Left Indent box on the ruler to the left to match the other items in Column 2.
(You may need to do this twice to get it to take. Dragging incorrectly can create a new tab stop instead of moving the indention box.)
-
Save.
[trip_planner11-Lastname-Firstname.docx]
Adjust Item: Right Indention
Looking at the other lists, there are a few spots that could be cleaned up to read more easily or look better. You have to be careful since fixing one issue can easily create other issues.
Let's use the ruler again, since Live Preview shows what will happen and you can make adjustments to individual items. With the Columns dialog, you have to make guesses and close the dialog to see how good your guess was.
- Set the Zoom to show the
whole page.
- Inspect all of the bullet lists.
What changes are needed?- In Package 1, the first item would look better if the word "days" was on the first line and if "reef" was not on a line by itself.
- In Package 1,in the second item the phrase in parentheses would look better if it was on the next line by itself.
- In Package 2, the second item has a single word, 'reef', on a line by
itself.
These issues can be fixed by changing the right indention for individual items and adding a line break.
- Click in the first item for Package 1.
-
 On the ruler for Column 1, drag the
right indent arrow slightly to the right into the margin area, until the word "days"
moves up to the first line.
On the ruler for Column 1, drag the
right indent arrow slightly to the right into the margin area, until the word "days"
moves up to the first line.
No other items change. The indention applies only to the current paragraph.You may see blue wavy lines under the list item. Word thinks you should change the list characteristics instead of formatting individual items.
 Click in the second item for Package 1 just to the left of the first parenthesis.
- Create a line break with the key combo SHIFT + ENTER.
Now the phrase in parentheses takes two lines. You fixed one problem and created another! - Drag the right indent arrow on the ruler to get the whole phrase between parentheses onto one line.
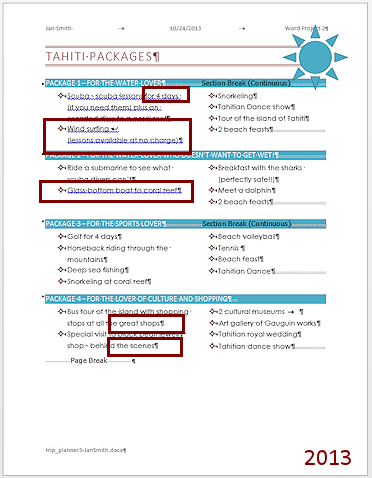
Similarly, for item 2 in Package 2, adjust the right indent arrow to make the word "reef" in the second item move up a line.
- If necessary, fix any other text wrapping issues or list alignment issues.
-
Save.
[trip_planner11-Lastname-Firstname.docx] Ruler and Column Margins: We did not use the ruler to change a column margins. That works fine for the outside margins, but Word may not let you drag on the ruler to change the inside margins, which changes the space between columns. Use the Columns dialog in that case.
|
|
| © 1997-2017 Jan Smith All Rights Reserved |
Site Map What's New |
Privacy Policy Terms of Service Copyright Acknowledgements |
~~ 1 Cor. 10:31 ...whatever you do, do it all for the glory of God. ~~
Last updated: March 22, 2017