
Jan's Working with Words
Templates: Tabbed Table
You now have the basic letter created but it needs some work.
You will turn those odd lines of text into a set of tabbed columns to look like a table. In a later lesson you will work with actual tables.
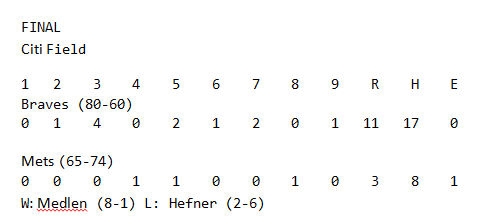
Example: Tabbed table of baseball game stats
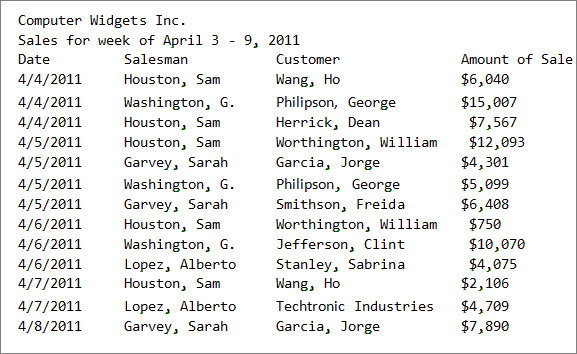
Example: Tabbed table of sales
Step-by-Step: Tabbed Table |
|
| What you will learn: | to add a tab stop to the ruler to adjust a tab stop on the ruler to create a columns effect with tab stops to use borders to create a row effect |
Start with: ![]() ,
letter1-Lastname-Firstname.docx
,
letter1-Lastname-Firstname.docx
Create Manual Tab Stops
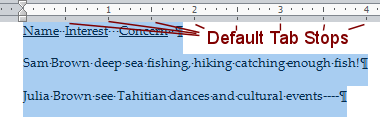
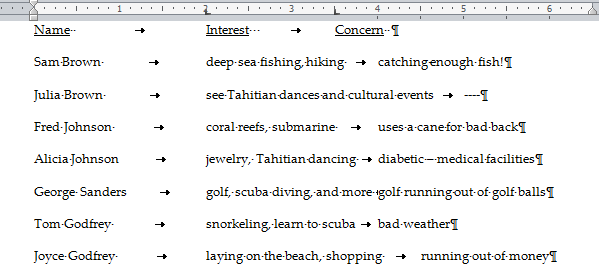
Part of this letter is a real mess! The middle section (lines 19 - 26) needs to be in three columns to make any sense. You can arrange such short phrases into columns using tab stops. The steps below will show you how to create your own tab stops and line up the text with them. Tab stops position items going across the page.
By using the same stops on other lines, you can create the effect of columns in a table.
![]() Current line or selection only: When you create a new tab stop, it only exists for the
lines that are currently selected. Select first, then add the tab stop!
Current line or selection only: When you create a new tab stop, it only exists for the
lines that are currently selected. Select first, then add the tab stop!
-
 Save
As letter2-Lastname-Firstname.docx in your
word project 2 folder.
Save
As letter2-Lastname-Firstname.docx in your
word project 2 folder. - If the horizontal ruler is
not displayed, on the View tab, check the box for
the Ruler.
- Select
from line 19 that starts with Name through line 26, which
starts with Joyce Godfrey.
 If necessary,
click in the box at the left of the ruler until the left tab
shape
If necessary,
click in the box at the left of the ruler until the left tab
shape
 shows.
 The
default tab stops are set every half-inch. You can change the default
spacing using the Tabs dialog, which opens from a button on the
Paragraph dialog.
The
default tab stops are set every half-inch. You can change the default
spacing using the Tabs dialog, which opens from a button on the
Paragraph dialog.
 Word 2013, 2016: The small marks below the ruler for default tab stops do not show in Word 2013 and 2016.
-
 Click at the 2" and 3.5" ruler marks. This
inserts manual tab stops for the selected paragraphs only. It automatically clears the default tabs to the left of the
manual tab stops.
Click at the 2" and 3.5" ruler marks. This
inserts manual tab stops for the selected paragraphs only. It automatically clears the default tabs to the left of the
manual tab stops.  Click at the beginning of line 19 (which starts with
Name) and use the key combo CTRL +
right arrow to move your cursor in front of the word Interest.
Click at the beginning of line 19 (which starts with
Name) and use the key combo CTRL +
right arrow to move your cursor in front of the word Interest.
- Press the
TAB key. The text shifts over to the first tab stop.
- Use the key combo CTRL + right arrow
to move your cursor in front
of the word Concern.
- Press the TAB key.
The text jumps to the second tab stop.
- Continue, moving the text on the other lines
into columns by using the TAB key and arrow keys until all lines are arranged as shown below. Can
you see how these phrases are related to the labels in line 19?
-
Save.
[letter2-Lastname-Firstname.docx]
Adjusting Tab Stops
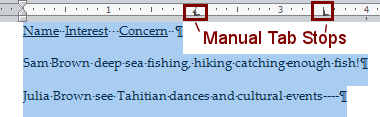
These columns are still not lined up nicely. The space between columns 1
and 2 is too wide and column
3 is uneven. Our first guess on where to put the tab stops
was not that great. Not a problem!
- Select
the lines again.
- On the ruler, drag the tab at the 2" mark back over to 1.5".
 If
you drag the tab off the ruler, you will erase it. Just make a new one.
If
you drag the tab off the ruler, you will erase it. Just make a new one.
- Drag the
second tab (at the 3.5" mark on the ruler) to the right to 4".
-
Click on
 the Show Marks button to turn
off the display of marks to see how the letter looks. Much better looking! Now you have columns you can
read!!
the Show Marks button to turn
off the display of marks to see how the letter looks. Much better looking! Now you have columns you can
read!!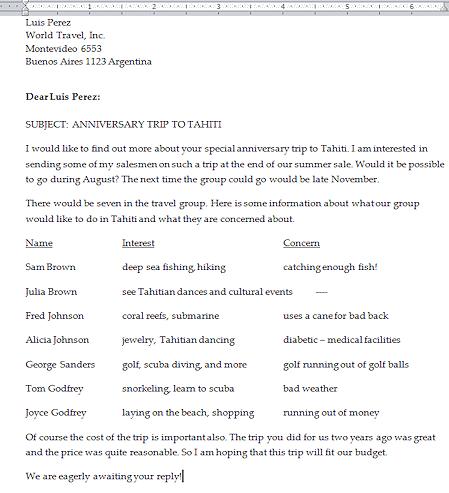
 Problem: Some marks still show when Show Marks button is off
 The Word Options dialog lets you pick certain marks to show ALL the time, even when the show Marks button is off.
Solution: Open the Word Options dialog to the Advanced page and uncheck boxes for those marks that you want to hide when Show Marks is off.
- Show the marks again.
- Save.
[letter2-Lastname-Firstname.docx]
Border Rows
The tabbed columns are rather hard to read all the way across. Some lines would help and would set this information off from the rest of the letter. You will use the Borders gallery to do this.
- If necessary, select the lines 19 through 26 again.
-
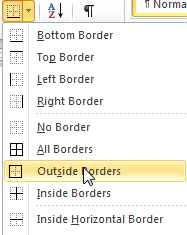 On the
Home tab, click the arrow
beside the Borders button to open the gallery.
On the
Home tab, click the arrow
beside the Borders button to open the gallery.
- Click on Outside Borders.
A border appears around the selection as a whole. - With the paragraphs still selected, open the Borders gallery again and click Inside Horizontal Border.
-
Save.
[letter2-Lastname-Firstname.docx]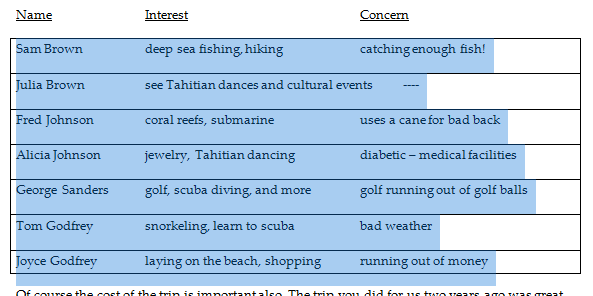
Adjust Spacing
The last row of the table is not as tall as the others. This is
because the Normal paragraph style adds blank space after each
line, but the outside border didn't recognize such spacing. You can see that the highlighting extends well below the bottom border. You can fix
this with a Line Break, which starts a new line of text but does not
create a new paragraph.
-
Place your cursor at the end the last row, after the word money .
-
Insert a line break with the key combo SHIFT + ENTER. The
line spacing looks better now but the bottom row is taller than the others.

 Drag to select the paragraph mark below 'Joyce Godfrey'.
- On the Home ribbon tab, click the Decrease Font Size button
 two or three times.
This is close to the same height as the other rows. - Click on Show/Hide Marks to hide the marks and look at your
letter at Zoom = 2 pages or Multiple Pages.
It's looking pretty good!
- Save.
[letter2-Lastname-Firstname.docx]
|
|
| © 1997-2017 Jan Smith All Rights Reserved |
Site Map What's New |
Privacy Policy Terms of Service Copyright Acknowledgements |
~~ 1 Cor. 10:31 ...whatever you do, do it all for the glory of God. ~~
Last updated: March 22, 2017