
Jan's Working with Words
Interface: Document Views
Depending on what you are doing, you may need to change how you see your document.
On the View tab and on the Status bar you will find buttons for several of the views available. The 'look' is a bit different for each version, of course!
-
 Print Layout
 -
 Full Screen Reading
 -
 Web Layout
 -
 Outline
 -
 Draft
Draft
Additional views that are useful are:
- Print Preview
- Split
View Tab:
The View tab has buttons to control how your document displays. There are subtle differences between the versions of the View ribbon but all contain the same commands.
![]() Word 2007
Word 2007

![]() Word 2010
Word 2010

![]() Word 2013
Word 2013
![]() Word 2016
Word 2016

View Buttons on Status Bar:
![]()
![]()
![]() Word 2007, 2010:
Word 2007, 2010:
The buttons for the views are on the right end of the Status bar: Print Layout, Full Screen Reading, Web Layout, Outline, and Draft.
![]()
![]() Word 2013, 2016:
Word 2013, 2016:
Word 2016:
Only three view buttons: Read Mode, Print Layout, and Web Layout.
The Views
 Print Layout:
Default view.
Shows
how the page will look when printed.
This view is good for adjusting margins and columns, headers and footers, and for working with drawing objects, text boxes, and frames. This view may look slightly different from the Print Preview, depending on your printer.
 Web Layout:
Shows how your document looks when viewed as a web page.
In a web page text wraps to the window rather than wrapping to the page.
Navigation Pane: The illustration shows an additional feature on the left, the Document Map (2007), also called the Navigation Pane (2010, 2013). If you click an item in the document map, you are moved to that spot in the document on the right. You must assign heading paragraph styles to your text to see anything in the Navigation pane.
Outline:
 The document's paragraph styles are used to create an outline.
In this view it is easy to reorganize whole sections of a long document by collapsing the outline section and dragging it to a new location. This is an advantage over the Page Layout and Draft views where large amounts of text are hard to select. But, you must assign paragraph styles to your text carefully for this to work.
A feature of the outline view is creating a master document by combining several Word documents. This is useful for long documents with several chapters or sections or for documents that have different parts written by different people. The view looks like the Outline view but the entries are coming from more than one document.
Full Screen Reading or Read Mode:

![]()
![]() Word 2007, 2010: Full Screen Reading uses the whole screen to show your document in a larger size without
the ribbon, Status bar, Taskbar, etc. At the top you have only the
Reading and the Review tools, like adding comments or highlighting.
Word 2007, 2010: Full Screen Reading uses the whole screen to show your document in a larger size without
the ribbon, Status bar, Taskbar, etc. At the top you have only the
Reading and the Review tools, like adding comments or highlighting.
At the upper right of the screen is a button for View Options, which drops a list of choices. You can increase the font size temporarily for easy reading but the size of the "page" does not change. You can turn on editing for this view by selecting . This will allow you to make changes, including moving text or images.
![]()
![]() Word 2013, 2016: Read Mode uses the whole window by default and hides the ribbon. Only File, Tools, and View ribbon tabs are showing. The Status Bar remains in view.
Word 2013, 2016: Read Mode uses the whole window by default and hides the ribbon. Only File, Tools, and View ribbon tabs are showing. The Status Bar remains in view.
At the top right is a button ![]() to change to Full Screen.
to change to Full Screen.
Large images on the page may not fit this view. Pages with columns or large tables may be easier to read in Print Layout.
The "pages" are screen pages, NOT how the document will print!
Draft:
 Default
view in earlier versions of Word.
Default
view in earlier versions of Word.
You can clearly see what you are typing and editing in Draft view. But, you will not see the full formatting. You may see placeholders for the pictures, tables, text boxes, and frames.
This view was useful in the very early days of word processors. It took a lot of time for the computer to calculate where everything went. For every change, it had to re-calculate. Painfully slow! Most people found it easier to enter all of the text first and then arrange it all and do most of the formatting and adding of images afterwards.
Nowadays computers are fast enough to make it easy to format and position things as you go. So the Print Layout view is the default view in Word 2007, 2010, 2013, and 2016.
Print Preview:
Though it is not on the View ribbon, Print Preview is a very important view. It displays exactly how the document will look after being printed. At least it usually does! Print Preview can be subtly different from the Print Layout view, especially with headers and footers. Occasionally, a header or footer will not completely print, even though they displayed fine in the Print Preview.
You open Print Preview with:
![]() Word 2007
Word 2007 ![]() Office
button > >
Office
button > >
![]() Word 2007: Editing in Print Preview:
In Word 2007 and earlier versions, you can actually edit while in Print
Preview. This is great for making small corrections. In Word 2007, uncheck
the Magnifier box to turn on editing. Now you can edit right on the preview.
Word 2007: Editing in Print Preview:
In Word 2007 and earlier versions, you can actually edit while in Print
Preview. This is great for making small corrections. In Word 2007, uncheck
the Magnifier box to turn on editing. Now you can edit right on the preview.
![]()
![]()
![]() Word 2010, 2013, 2016: File >
Word 2010, 2013, 2016: File >
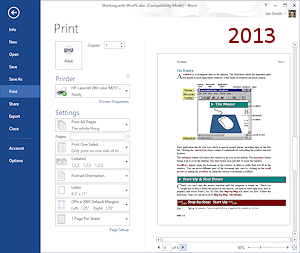
Print Preview is in the right side of the Print pane that hides your document. You can make all of your choices about how you want to print here - what pages, orientation, number of copies, etc.
No editing anymore
The ability
to edit in Print Preview was deprecated starting with Word 2010, which means the feature is not there at all.
The idea is for this Print pane to control everything about how your document will print, but nothing about what is in the document.
Split:
 This view shows two parts of the same document at once.
Each horizontal section has its own scrollbar. You can even use a different style view for each split.
 To create a split:
Method 1: ![]()
![]() Word 2007, 2010 - Split Box
Word 2007, 2010 - Split Box
Point with the mouse pointer to the split box at the top of the scrollbar. The pointer changes to a resize shape ![]() .
Drag downward and the document window splits horizontally.
.
Drag downward and the document window splits horizontally.
(Word 2013 does not have a split box.)
Method 2: All versions - Split button
Click the Split button ![]() on the
View ribbon. A split bar appears in the middle of the window. Drag the Split bar up and down to adjust the sizes and click
the left mouse button to accept the sizes.
on the
View ribbon. A split bar appears in the middle of the window. Drag the Split bar up and down to adjust the sizes and click
the left mouse button to accept the sizes.
Zoom in any view:
 Whatever
view you are in, you can
use the Zoom button on the View tab or the Zoom slider on the Status bar to enlarge or reduce what you see. You can even show several pages at a time.
Whatever
view you are in, you can
use the Zoom button on the View tab or the Zoom slider on the Status bar to enlarge or reduce what you see. You can even show several pages at a time.
Useful for:
- Spotting unplanned blank pages easily!
- Selecting a large selection
- Moving a selection between pages.
|
|
| © 1997-2017 Jan Smith All Rights Reserved |
Site Map What's New |
Privacy Policy Terms of Service Copyright Acknowledgements |
~~ 1 Cor. 10:31 ...whatever you do, do it all for the glory of God. ~~
Last updated: March 27, 2017