
Jan's Working with Words
Images
A text-only document is a bland and boring thing. You can use images to make your document look better and even to explain things to your readers more clearly.
Most word processors can accept images in a number of different file formats. There are two categories of file formats for images: bitmap and vector.
Bitmap formats define the color of each pixel in the image. A pixel is the smallest dot in the image, on the screen, or that the printer can print. Photos are in some kind of bitmap format.
Vector formats use equations to define areas so these formats works best for images with made of areas that are a single color like cartoons or line drawings.
Some image formats come in several different versions themselves. Your software may not accept images in some formats or some versions of a particular format. This can be very confusing!
The formats gif, jpg, and png are the most commonly used formats for images on web pages.
Cameras can usually save in several different formats, such as jpeg, jfif, exif, raw. Different cameras may use different versions of raw.
When you use an existing image, you import it into your document. Except for basic bitmap images, you must have the right import filter installed for Word to be able to import the image. But, there are image formats that Word just cannot work with. <sigh>
Images from Inside Word
Word 2007, 2010, 2013, and 2016 all allow you to search for an image without leaving Word. Very handy! There are separate choices depending on whether you want to look on your local computer or online.
Microsoft Office used to install quite a number of images but the number has gone down with each new version. With Word 2013 and 2016 there are no images installed locally (onto your own computer) at all.
 Clip art is now the term for images that are intended to be placed into documents. The image can be either a photo or a drawing.
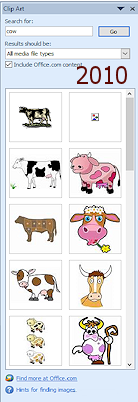
Word 2007 and 2010 use a Clip Art pane, which stays open until you close it. You can choose to search for photos, illustrations, sounds, or videos or a combination.
Word 2013 and 2016 use a dialog that lets you search your OneDrive folder or use Bing to search the web for images.
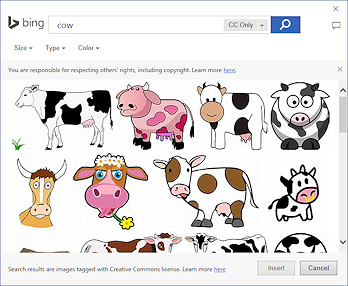
In all of these versions searching the web is done by Bing. The default Bing results only include images that are Public Domain or that are released under Creative Commons licensing. Public Domain means that no one owns the image so it is free for you to use and modify in any way for any purpose. With other types of licenses restrictions may apply, especially for commercial use (meaning you are using the image to make money in some way)!
It is your responsibility to check the permissions allowed for the image. Office 2013 and 2016 make this easier. Hover over an image in the results and a ScreenTip provides a link to the web site for the image. The web page should provide info about licensing.
![]() Online
Images: Save a local copy of online images that you might want to use
again later.
Online
Images: Save a local copy of online images that you might want to use
again later.
What you find online changes over time, so an image you found a few months ago may not be on the same page in the gallery of images. It might not even be there at all!
If you look online for an image from a previous version of Office, you may be out of luck. If you have the old installation discs, you can copy images to your hard disk, if you can figure out where the images are on the discs! Really old versions of Office and PowerPoint included a CD dedicated to images.

 Managing Images: Clip Organizer
 Microsoft
Office 2007 and 2010 usually install a clip art management program, Microsoft Clip Organizer. This program only knows about the images that came with Office to start with. You can tell it about other images but you must add keywords yourself.
Microsoft
Office 2007 and 2010 usually install a clip art management program, Microsoft Clip Organizer. This program only knows about the images that came with Office to start with. You can tell it about other images but you must add keywords yourself.
![]() Images
from previous Office versions: The Clip Art Organizer
will automatically show images you have downloaded from Microsoft's online collections. It will not automatically include any clip art you already have on your computer, even the images that came with previous versions of Office. You can make it find those piles of images
and include them in its display.
Images
from previous Office versions: The Clip Art Organizer
will automatically show images you have downloaded from Microsoft's online collections. It will not automatically include any clip art you already have on your computer, even the images that came with previous versions of Office. You can make it find those piles of images
and include them in its display.
![]()
![]() Word 2013 and 2016 do NOT install clip art and do NOT install Clip Organizer. Instead you search for online images with the built-in Online Pictures tool.
Word 2013 and 2016 do NOT install clip art and do NOT install Clip Organizer. Instead you search for online images with the built-in Online Pictures tool.
Keywords: You can search for images in the Clip Art Pane or Online Pictures dialog based on keywords. For example, if you need a picture of dairy cow, you would type the keyword "cow" into a search text box.
You can use multiple words to narrow the search, like 'cow eating grass'. Note that your results may be quite different if you search for 'cow grass' or 'cow eating' or 'cow grazing''. A picture of a cow eating grass might not have 'eating' or 'grass' as keywords at all.
Searching your own computer: Windows Search in File Explorer can find images on your own computer, if they are named wisely. Windows Search looks at the file name, the folder name, tags, and other properties. BUT the results will not include a file if the keyword is buried in the middle. For example, a file named mycow.jpg will not show in the results if you search on 'cow'. Files that would show in the results include my-cow.jpg, my_cow.jpg, and my cow.jpg. More on searching at Working with Windows: Search and Demos
Clearly, someone has to spend some time labeling images with logical keywords. You can add keywords in Clip Art Organizer or add a tag in Windows File Explorer, if the file type allows it. Include words that describe the image but you can also include things like the name of the project or document you used the image in.
Thumbnails: The search results show you a thumbnail picture of each image.
Other Sources for Images


 There are many other sources for images for your documents.
- Graphics Software:
Most graphics programs come with some images. - Image collections:
Collections of images are widely sold in stores and online. Some specialize in clip art drawings and others in photographs or images for web pages. - Image Web Sites:
There are many web sites that offer access to images that you can download - at a price. They may also have some images that are free to download. They hope you will like them and buy others. Read carefully what the site says about what you are allowed to do with the image. Some images may not allow commercial use. -
Create your own:
You can create your own images, of course. Taking your own photos is the easiest way!With patience you can create very useful and even elaborate images using a graphics program, even one as simple as Paint. These programs either work with bitmap images, like Paint does, or with vector images, like the AutoShapes you can insert in Office programs.
Managing Images from Other Sources
- Add to Clip Art Organizer:
Word 2007, 2010: The only way to get the images to show in the Clip Art
pane in your Office programs is to add them to the Clip Art Organizer. You must add your own keywords to describe
each image so it can be found when searching. (What a pain that is!) You also need to assign
it to a category like Education, Transportation, or People. - Save image to Pictures Library:
Current Windows versions have a special Library folder called Pictures. (Not to be confused with the Pictures folder in the folders in your user account!) You can assign any folder on the hard disk to the Pictures library or you can copy your images into the default Pictures library. A nicely named set of folders can make it easy to find what you want inside that folder. At least you will know where to look for that photo you took ten vacations ago. - Add to other management program:
Many other image management programs are on the market. Some include the ability to convert an image to a different format and even to do some image editing tasks like cropping or changing colors. Digital cameras often come with software for editing the photos you take and creating albums to show them off. - Online Services:
There are several online photo services for uploading and managing images, especially photos. You can create albums and add keywords. Many have free accounts as well as paid accounts which have more space or more features like making it easy to get a professional print of a photo. Flickr, Snapfish, Shutterfly, and Picassa, for example, are services that have different advantages and disadvantages. All have more features than Facebook, but Facebook makes it really, really easy to share with your Facebook friends.
Copyrights ©
You are restricted by copyright laws as to what you can do with the images that were created by someone else. The creator must grant permission before you can do anything at all with the images, so the situation varies a lot.
Image rights are almost always in one of the following categories:
-
Royalty free: The creator keeps ownership of the image but allows free use for some/most uses. This varies a lot! Usually you are OK to use the image for most personal, educational, or non-profit uses. You certainly could not sell the image yourself!
-
Rights managed: The creator will issue specific permission for your particular use and will usually charge you a fee, called a royalty.
-
Public domain: No one has ownership of the image.
Commercial clip art and photos are sold, usually in collections, with permission automatically granted for certain kinds of use. You have to read the documentation that came with the collection. You can generally use such images to create handouts, memos, letters, advertising brochures, presentations, and the like. But commercial images can never be resold or given away to others in any way without specific permission.
If you copied an image from the Internet or scanned a picture from book or magazine, you do not automatically have the legal right to use it yourself. Internet images are sometimes made available by their creators for free use by all, or perhaps free for non-commercial use (meaning that you aren't to sell the image or make money with it in any way). Unless the web site tells you differently, you must assume that the images are NOT available for your use. (This may be the most ignored rule in the world!)
|
|
| © 1997-2017 Jan Smith All Rights Reserved |
Site Map What's New |
Privacy Policy Terms of Service Copyright Acknowledgements |
~~ 1 Cor. 10:31 ...whatever you do, do it all for the glory of God. ~~
Last updated: March 27, 2017
Update December, 2015: Office 2007 and 2010 now show Bing results in the Clip Art pane along with local images. Microsoft shut down its online images through Office.com. My laptop with Office 2007 has shown those only occasionally. I do not know if that is a laptop problem or an Office 2007 problem.
Update February, 2016: The Online Pictures results from Bing now let you filter the results using Size, Type, or Color. Also, the search box lets you choose All Images instead of just CC Only, which is images released under Creative Commons license.