
Jan's Working with Words
Formatting: Words
You can format individual words and phrases separately from the formatting you applied to paragraphs.

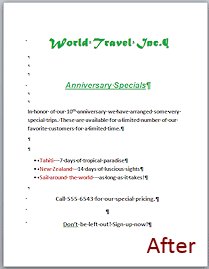
Flyer before and after this lesson - words formatted
You can save your formatting choices as a style which will be listed in the Styles gallery, but we will wait awhile to learn how to do that.
| |
Step-by-Step: Format Words |
|
| What you will learn: | to select single words and phrases to format selection with the ribbon and the Mini-Toolbar to use Format Painter to use AutoFormat on a selection to use AutoFormat on a whole document and review changes to open a recent document from inside Word |
Start with:![]() flyer-World Travel Inc-Lastname-Firstname.docx
flyer-World Travel Inc-Lastname-Firstname.docx
Select a Single Word: Double-Click
-
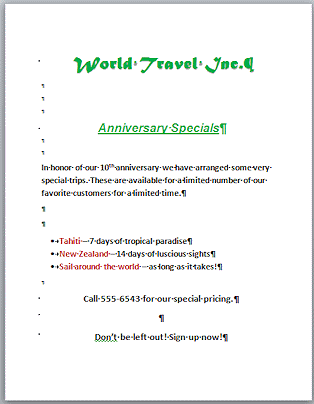
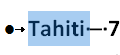 Point to the word Tahiti and double-click it.
The word and the space following it are selected and the Mini-Toolbar appears.
Format Words: Font Color Gallery
The gallery of colors is the same whether you open it from the Font Color button on the ribbon or in the Mini-Toolbar.
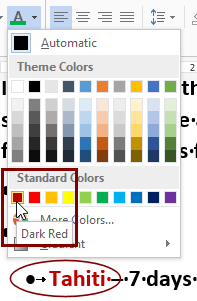 While Tahiti is still selected, click the arrow at the right of the Font Color button to open the gallery of colors.
- Click on the color Dark Red in the Standard
Colors.
The selected text changes color.
The Font Color button now shows dark red color across the bottom.
- Click somewhere else in the document to remove the highlighting.
Wasn't that easy?
Format Words: Select by Dragging and Font Color Button
- Position the cursor at the beginning of the phrase New Zealand .
- Select the
words "New Zealand" by dragging to the right of the last letter.
Sometimes it is easier to start at the right end of a phrase and drag left. It is easy to pick up an extra space, word or line if you aren't very precise in your dragging motion.
- Click on the Font Color button ,
which is now showing dark red on the button.
Dark red color is applied to the selected words. Simple!
Format Words: Format Painter
-
 While New Zealand is still selected, on the Home tab in the Clipboard group, click on
  the Format Painter button. This copies the formatting of the selected text and changes the pointer shape to
  a paint brush with I-beam.
- Drag across the phrase Sail around the world and release the mouse button to apply the same formatting to it.
 Save.
Save.
[flyer-World Travel Inc-Lastname-Firstname.docx]
Format Words: AutoFormat Selection
Recall that in the AutoCorrect dialog there were two similar tabs: AutoFormat and AutoFormat As You Type. In the last lesson you turned off the feature to automatically superscript things like 1st into 1st.
- Open the AutoCorrect dialog.
> > >
-
Check the tab and the .
Be sure that Ordinals (1st) with superscript is checked in the AutoFormat tab and unchecked in AutoFormat As You Type. You made that change in the previous lesson.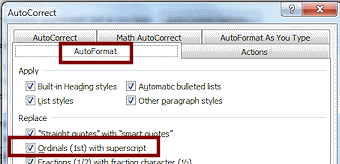
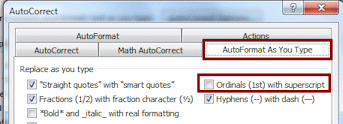
- Click on OK to close the AutoCorrect dialog
and on OK again to close the Word Options dialog.
- Select the word 10th in
line 8.
-
 On
the Quick Access Toolbar click the AutoFormat
button
On
the Quick Access Toolbar click the AutoFormat
button  that you added to the toolbar in an earlier lesson.
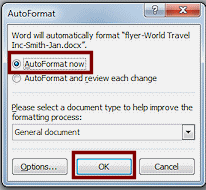
The AutoFormat dialog opens with the choice selected that was used last.AutoFormat Now applies the settings from the AutoFormat tab of the AutoCorrect dialog to your selected text.
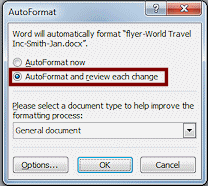
The other choice lets you review each suggested change and accept or reject it. This is a better choice if you are trying to apply AutoFormat to a whole document or a large amount of text where there might be several changes.
- Click on OK.
10th turns into 10th and the dialog closes. - Save.
[flyer-World Travel Inc-Lastname-Firstname.docx]
AutoFormat: Document
For long documents that use heading styles, AutoFormat can help a lot. For short documents like this flyer, not so much!
- Use the key combo CTRL + HOME key to move the
cursor to the top left of the document.
Nothing should be selected.
-
 Click the AutoFormat Dialog button on
the Quick Access Toolbar again.
Click the AutoFormat Dialog button on
the Quick Access Toolbar again.
The dialog opens. - Click on AutoFormat and review each
change to change the selection.
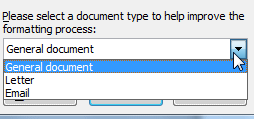
- Click the down arrow at the
right of the text box to see the choices for type of document.
Word can automatically format a letter or an email in addition to
a general document.
Leave the choice as 'General document'.
-
 Click on OK. You will
see another dialog about AutoFormat.
Click on OK. You will
see another dialog about AutoFormat.
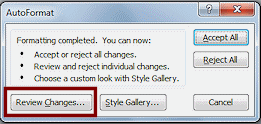
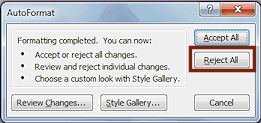
- Click on the button Review Changes...
Wow! This looks different! The document has review bubbles with the changes that AutoFormat suggests.
What a lot of changes. Do we want all of these?? Word does not seem to have done a particularly good job on this document, perhaps because it is so short and has very few actual sentences.You can look at each revision AutoFormat came up with. You can accept or reject any or all of them.
 Problem: Review dialog is on top on the bubbles
Solution: Drag the dialog by its title bar to a new position. Problem: Review dialog vanished
It is hiding underneath the Word window.
Solution: Minimize Word and then click on the Word icon on the Taskbar to make it appear again.
-
Inspect the text bubbles that show the changes.
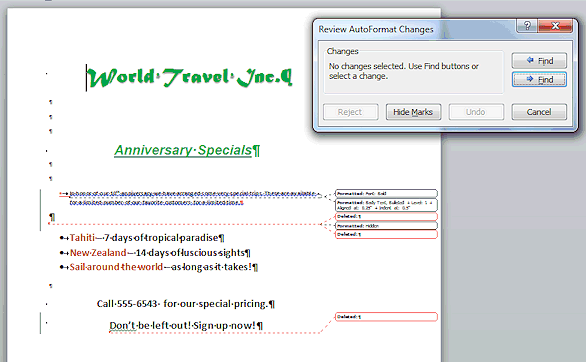
A dotted line connects the explanation to the spot that was changed. Red borders and red dotted lines mark something that was deleted. Some locations have more than one change.
- Click on the first bubble, Formatted: Font: Bold
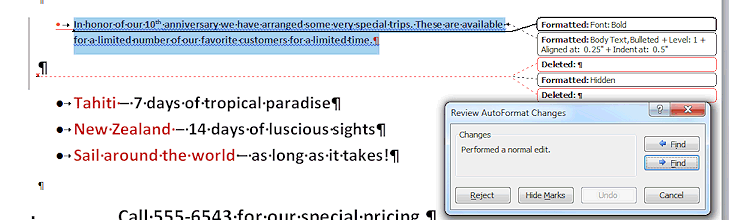
The location that was changed is highlighted and the line to it from the bubble is now solid instead of dotted.The bubble says "Formatted: Font: Bold" but the dialog says only "Performed a normal edit". So the bubble tells you more.
- Click on Find
forward
 to go to the next bubble.
Read each bubble and compare to what the dialog says.
The third change highlights the paragraph mark at the end of the sentence, but does not have a solid line anywhere.Paragraph marks are formatted to show the underlying paragraph style so the previous change is what actually changed the look of this symbol.
Did you notice that the change you made earlier to 10th is not mentioned in this list. This is different from earlier versions of Word.
- Continue advancing through
each of the formatting changes by clicking the Find button.
Watch how the lines change and exactly what styles or formatting was applied and what was deleted.
-
 When you have reached the end of the list, a message box
appears.
When you have reached the end of the list, a message box
appears.
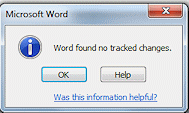 Click on No since you started from the beginning of the document.
Another message may appeas: Word found no tracked changes.
This just means that from the last change, there are no more changes. Well, duh! We are at the end of the document!
- Click on OK.
The message closes.
-
 Click on the Cancel button to quit checking on individual changes.
We are back to the AutoFormat dialog with the Accept All and Reject All choices.
- Click on the button Reject All to reject all of the revisions.
We will delete some blank lines later, but the rest of the changes are not good for this document.
- Save.
[flyer-World Travel Inc-Lastname-Firstname.docx]
 Use the Close command on the Office menu or File tab to close
the document, but not Word itself.
Use the Close command on the Office menu or File tab to close
the document, but not Word itself.
![]() Selecting
carefully: Sometimes you want to include in your selection the space or period or paragraph mark at the end of your selection and sometimes you don't! You must look carefully to see what you've caught with your selecting.
Selecting
carefully: Sometimes you want to include in your selection the space or period or paragraph mark at the end of your selection and sometimes you don't! You must look carefully to see what you've caught with your selecting.
![]() Paragraph marks are
formatted: Look at the paragraph marks in your flyer. They
are different depending on the font and styling. The formatting of the paragraph mark is applied to the bullets and numbers in automatic lists. You can't select the bullet itself or the numbers. It can be quite infuriating when the formatting is wrong and you forget this.
Paragraph marks are
formatted: Look at the paragraph marks in your flyer. They
are different depending on the font and styling. The formatting of the paragraph mark is applied to the bullets and numbers in automatic lists. You can't select the bullet itself or the numbers. It can be quite infuriating when the formatting is wrong and you forget this.
Open a Recent Document from Inside Word
Start with: ![]() no document or a blank document
no document or a blank document
-
 Word 2007: Click on the Office button
 .
.
The menu drops and shows recent documents at the right.

 Word 2010, 2013, 2016: Click on the File tab.
The Backstage View pane opens to the Open command, which shows places and Recent Documents. That's because you had a blank document open. Your flyer should be the most recent document.
- Click on your file flyer-World Travel Inc-Lastname-Firstname.docx
The document opens. If you had a blank document open, it closes.
|
|
| © 1997-2017 Jan Smith All Rights Reserved |
Site Map What's New |
Privacy Policy Terms of Service Copyright Acknowledgements |
~~ 1 Cor. 10:31 ...whatever you do, do it all for the glory of God. ~~
Last updated: March 27, 2017