
Jan's Working with Words
Printing: Page Layout
There are entirely too many ways to mess up your lovely document when you try to print it. You can waste a lot of ink and paper if you don't check your settings carefully.
The Page Layout ribbon (just Layout in Word 2016) gives direct access to features you might need to adjust, especially margins and orientation.

The Page Setup dialog is the old fashioned way to control the layout of your pages - orientation, margin sizes, paper size and some less common adjustments. This dialog appears when you click the Dialog Box Launcher button for the Page Setup group.
Page Setup dialog has 3 tabs of settings.
| |
Step-by-Step: Page Layout |
|
| What you will learn: | to use the ribbon tab groups Page Setup, Themes, and Page Background to inspect the Page Setup Dialog to create your own layout |
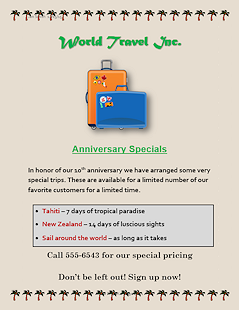
Start with:![]() , flyer-World Travel Inc-Lastname-Firstname.docx
, flyer-World Travel Inc-Lastname-Firstname.docx
Page Layout: Ribbon
- If necessary, click on the ribbon on the Page Layout tab.
-
Inspect the choices on this tab.

 Word 2007, 2010:
 Word 2013, 2016:

Word 2016 calls changes the name to just Layout.
-
 Experiment: Page Layout tab (Word 2007, 2010) and Design tab (Word 2013, 2016)
Hover over each button in the tab groups Themes, Page Background, and Page Setup to see the ScreenTip about it.
(Word 2013 and 2016 have the Themes and Page Background tab groups in the Design ribbon tab.)
Try the various buttons and galleries. Which ones use Live Preview? Which seem the most useful to you?
A page color can show how the document will look when printed on colored paper.
A page border can get in the way or can tie things together.Changing the margins can change the look a lot!
Play around to get familiar with all of these features.
-
Change the page layout to create a different look for this document,
Get creative!! Use choices on this ribbon to change (improve??) the look of the document.
Change the fonts, font color, background color. Does a border help?
We will look at themes later.
Examples: Change the look of the page
Your image may be different, of course.
-
 Save your finished version with a new name: flyer-World Travel Inc-Lastname-Firstname-layout.docx
 The name in the title bar changes. You are now working with the freshly saved document.
Check with your instructor about whether or not to print this document.
Page Layout: Inspect the Page Setup Dialog
For more advanced choices about page layout, you need to use the Page Setup Dialog. You can get really specific here, but it's usually only helpful for long, complicated documents. Let's take a look at what choices are in the dialog.
- Click on the Office button
 or File tab.
- From the Recent Documents, click on your
previous flyer version:
flyer-World Travel Inc-Lastname-Firstname.docx
This is the version before you played around with themes and borders opens.
- On the Page Layout tab, click the Dialog Launcher button
 for the Page Setup group.
The Page Setup dialog opens. -
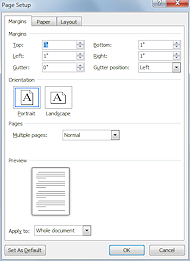
If
necessary, click on the Margins tab to show it.
Word's default margins are 1" for all. The default orientation is Portrait.
 Some
features are not on the ribbon at all.
Some
features are not on the ribbon at all.
Notice, at the bottom of the dialog, the Apply to: box. It shows "Whole document". When you have a document with different sections, you can make different choices in the dialog for each section! That allows you have have different margins and even orientation for the index pages or a section of charts or the table of contents. You can not do this from the ribbon, only in the Page Setup dialog.
-
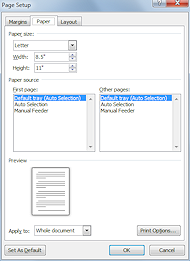
Click on the Paper tab and
check out its features.
You can change the size of the paper. This is important to change when you print envelopes or on legal-size paper. Setting different paper sizes for different parts of the document can work... if you are careful to print only the pages that fit on the paper that is currently in the printer!
-
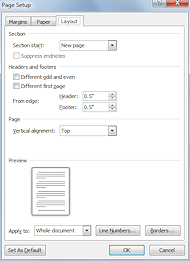
Click on the Layout tab and see what is there.
These choices are mostly used only for documents with many pages.
The Vertical alignment option in the middle, however, is most useful for a one page document.
- Close the dialog.
Analyze and Create
You now have created several versions of this flyer using different images and other settings. Which do you think is most attractive? Which do you think would motivate a customer to follow-up? What would you do differently?? Here's your chance!
- Save your document with a new name before you start changing it:
flyer-World Travel Inc-Lastname-Firstname-mine.docx -
Revise this flyer in any way that you can think of to make it better. Prettier is good but turning readers into buyers is the goal!
You can change the image, use multiple images, change the fonts, font colors, shading, borders, page color, orientation, anything that your brain can come up with! Just be sure to use the skills that you learned in these lessons.
- Save when you are satisfied.
Check with your instructor about whether or not to print this document.
Examples (Do something different!)
|
|
| © 1997-2017 Jan Smith All Rights Reserved |
Site Map What's New |
Privacy Policy Terms of Service Copyright Acknowledgements |
~~ 1 Cor. 10:31 ...whatever you do, do it all for the glory of God. ~~
Last updated: March 27, 2017