
Jan's Working with Words
Report: Exercise Word 4-2
 In this exercise you will modify a previous
document and create a table to show the team standings after the City
Soccer League's season.
In this exercise you will modify a previous
document and create a table to show the team standings after the City
Soccer League's season.
This lets you use the header that you created earlier. That saves a lot of effort!
Exercise Word 4-2: Table - Soccer Standings
| What you will do: | Modify an existing document Create a table Format a table |
Start with:![]()
![]() ,
ex2-3-letter-soccer-Lastname-Firstname.docx from your word project2 folder on your Class disk
,
ex2-3-letter-soccer-Lastname-Firstname.docx from your word project2 folder on your Class disk
- Open the document ex2-3-letter-soccer-Lastname-Firstname.docx from your Class disk in the word project2 folder.
You created this letter in the exercises for project 2. You will use the letterhead for the current exercise.
- Save As ex4-2-soccerstandings-Lastname-Firstname.docx on your Class disk.
-
Delete the body of the letter. Be careful not to delete the anchors for the letterhead objects. When you delete whole lines, any anchors attached to those lines go, too. Be sure that you have deleted any blank rows left after deleting the text.
At this point you have only the letterhead material left.
[You could save this as a template if you expected to write a lot of letters that included the letterhead.]
- Change the page header to show Exercise Word 4-2.
-
Update the date below the image of the soccer player to today's date.
If you have trouble clicking the date because the image is in the way, click below the date and use the arrow key to move the cursor up into the cell. Click the arrow beside the date to see the calendar widget. Select today's date.
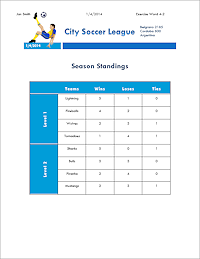
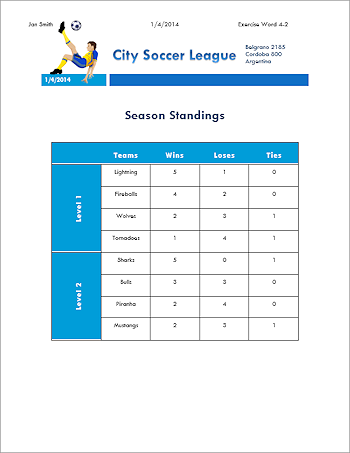
- Add Title: In the first line below the letterhead table, type Season
Standings and press ENTER.
- Format the text you just typed with Heading 1 - 24 pt, Center. No border.
You may need to open the Styles Pane to find Heading 1. If you don't see it, use the key combo CTRL + ALT + 1.
-
Draw a table well below the heading, about 4” tall and 4.5" wide, with 4 columns and 9 rows. Set the first column to about 1.5” wide and the other columns to about 1” wide. Distribute the rows to be evenly sized.
Be careful to draw below the title and not catch part of the letterhead table or you will be adding to the existing table instead of creating a separate table!
The top row will be your table headings and the rest will list teams.
- Center the table on the page with all borders showing.
- Column heading text: In the first row enter Teams , Wins , Losses , Ties .
- Format the first row:
Shading = Accent 2
Paragraph style = Heading 2
Font color = White
Font size = 14 pt
Alignment = Center and Center Vertically.
- Format the first row:
- Enter Data: Type in the team records shown below, where the order is Wins/Losses/Ties:
Fireballs - 4/2/0As you add data, the table may enlarge and flow over to a second page. You will resize it shortly.
Lightning - 5/1/0
Tornadoes - 1/4/1
Wolves - 2/3/1
Sharks - 5/0/1
Piranha - 2/4/0
Bulls - 3/3/0
Mustangs - 2/3/1
- Align: Select all cells below the header row and use Align Center on the Table Tools: Layout ribbon tab to center text in the cells both horizontally and vertically.
- Row Height: While the cells are still selected, set the row height to 0.5".
- Sort: Select the Wins
cells for the first 4 teams, which are all in Level 1.
Sort Descending.
Only the first 4 rows are sorted, based on the number of wins.
Select the last 4 rows and repeat the Sort.
Only the last 4 rows are rearranged to put the team with the highest number of wins in row 4.
- Add a column on the left of the table.
- Merge cells in the new column for the first four data rows. These teams are in the same level.
Type Level 1 into the merged cell and format to match the column headers.
Change text direction to Bottom to Top.
Align Center, if necessary.
(You cannot sort once you have cells that are merged between rows.)
- Create and format a Level 2 label for the last 4
rows in the same way.
- Borders: Change the bottom
border for the heading row, the Tornadoes row, and the bottom row to a width of 2¼ while leaving the other borders at ½. Do this separately for the
cells containing Level 1 and Level 2 since they are merged cells.
[Be careful that your changes are applied to cells and not to the whole table!] - If necessary, remove the side borders between the cells in the first row, the column headings.
- Add Outside Border for the whole table.
The previous size of 2 ¼" border is remembered and applied around the outside of the table. - Adjust widths and heights: Evenly distribute the rows and the columns so that all are the same height and width.
[Your table may have somewhat different dimensions than the illustration.]
 Save.
Save.
[ex2-soccerstandings-Lastname-Firstname.docx]
 Print.
-
Inspect the printed page and compare the two blues used in the header with what the screen shows.
Print may be different from screen:
My color laser printer made the lighter blue background color much darker than it looked on the screen.My printed page had a border above the white area to the right of the date. My screen showed a white line running across the bottom of the colored cells in the header but that line did not print.
|
|
| © 1997-2017 Jan Smith All Rights Reserved |
Site Map What's New |
Privacy Policy Terms of Service Copyright Acknowledgements |
~~ 1 Cor. 10:31 ...whatever you do, do it all for the glory of God. ~~
Last updated: March 27, 2017