 |
 |
Step-by-Step: Print Preview |
 |
|
What you will learn: |
to use Print Preview
to make corrections while in Print
Preview
to adjust the header/footer height
to use Shrink
to Fit
|
Start with: ,
flyer-World Travel Inc.doc ,
flyer-World Travel Inc.doc
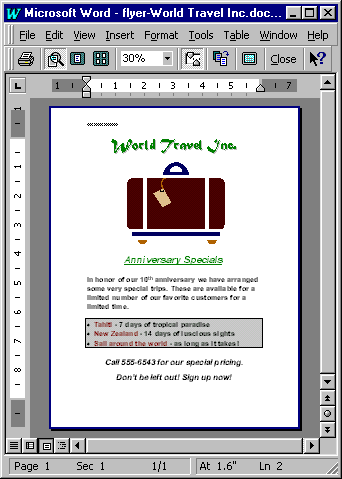
General Inspection
- Click
 the Print Preview button
to change to that view. Does your document look the way you wanted? the Print Preview button
to change to that view. Does your document look the way you wanted?
- Compare your flyer to the picture of the finished version. If you find
errors, you can correct them in this same view, but you must first click
on the
 button in the Print Preview
toolbar to toggle the pointer
from button in the Print Preview
toolbar to toggle the pointer
from
 Zoom to its regular shape. Zoom to its regular shape.
You will not see the marks, like for paragraphs and tabs, in this
view.

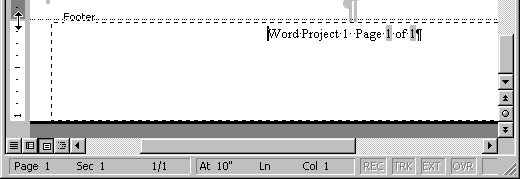
The footer is not showing in the image of Print Preview above! This is a problem with
this printer's no-print area. (You may not have a problem with this
document since your printer is probably different from mine. You need to
learn how to handle it anyway.) You can fix that easily. The hard part is
noticing that there is a problem.
- Switch the pointer back to
 the Zoom
shape, if necessary, and click on the document to
enlarge the view. the Zoom
shape, if necessary, and click on the document to
enlarge the view.
- Check that your header and footer are showing completely
in the Print Preview. Be sure you can actually
read the text. The top or bottom edge of your characters can be cut off, which is hard to see in the
reduced views. You may need to change the zoom percentage using the menu to get
the page large enough to read.

Some word processors will warn you if you have text in a header or
footer that won't print. But sometimes your printer does not communicate
well with the word processor. So always LOOK.
-
If your header or footer doesn't show completely, you
must make an adjustment somewhere. The missing part is either in the
printer's no-print zone or you didn't set the margin and footer tall
enough for your text.
How close to the edge of the paper
can a printer print?
Commonly, a printer cannot print in the top and
bottom 0.5 inch and the left and right 0.25 inch
of the paper. However, some commonly used printers have
different limits on the no-print area. For example, the printer used for
many of the illustrations in these lessons was an HP500C, which has no-print areas in the
top .33 inch and the bottom .67 inch. You must check this out for each
printer that you use.
Margin includes the
no-print area and the space you need outside the text area for the
header and footer plus any additional blank space you want around the
edges of the paper. The header or footer must fit inside the margin but
cannot be in the no-print part. Tricky!
On the printer used in the illustrations, the footer
did not show in the Print Preview at this point. The footer and/or
margin needs to be resized.
Resizing
header or footer area

- While in Print Preview or Layout view, from the menu
choose | .
 If you
can't see your footer on the screen, switch to the footer with the If you
can't see your footer on the screen, switch to the footer with the
 button on the Headers and Footers toolbar. button on the Headers and Footers toolbar.
- Move your pointer to the line between the white
and gray areas at the bottom of the vertical ruler. The pointer shape
changes to the
 Vertical Resize shape. Vertical Resize shape.
- Press your left mouse button down but don't
release yet. A line pops up across the bottom of your page.
- Drag upwards until the vertical ruler nearly
shows a 1 in the white area at the bottom. You have increased
the footer's height to nearly 1 inch, the distance of the
footer from the edge of the paper. It should now be in the printable
area.
- Check for success by closing the Headers and
Footers toolbar. If you are in Layout view, go to Print Preview. If
you are in Print Preview already, switch to another view and then back
to Print Preview. This will refresh the screen.
- If the footer still isn't showing in the Print Preview,
drag upwards a little
bit again on the ruler and then refresh the
view by
exiting Print Preview and returning to it. Keep trying until you get
the footer space to the size you need.
 Another technique to move your header or
footer into the printable area: Use the Page Setup dialog to change
the settings for
Header and Footer distance from the edge of the paper. You can't actually
see the effect within the dialog box. (What a pain!) You must
close the dialog and see if your change fixed things. Most of the time
it will be easier to use the ruler since you can see the effect
of your changes. Another technique to move your header or
footer into the printable area: Use the Page Setup dialog to change
the settings for
Header and Footer distance from the edge of the paper. You can't actually
see the effect within the dialog box. (What a pain!) You must
close the dialog and see if your change fixed things. Most of the time
it will be easier to use the ruler since you can see the effect
of your changes.
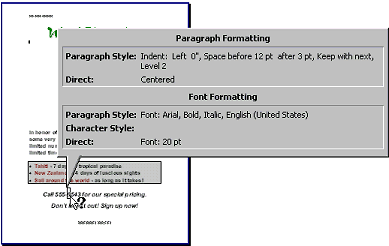
- Inspect the formatting of your text
while in Print Preview.
 You cannot tell for sure if the formatting is correct. You cannot tell for sure if the formatting is correct.


 Click the
 Help button on
the Print Preview toolbar to change the pointer shape to Help button on
the Print Preview toolbar to change the pointer shape to
 and then click on a part of the document. and then click on a part of the document.

 A
popup box shows you the formatting that has been applied to this part -
both the underlying paragraph style as well as the formatting you added
directly as paragraph, character, and font formatting. This is very
helpful when you want certain parts to be a certain style or you want
certain parts to be styled the same. A
popup box shows you the formatting that has been applied to this part -
both the underlying paragraph style as well as the formatting you added
directly as paragraph, character, and font formatting. This is very
helpful when you want certain parts to be a certain style or you want
certain parts to be styled the same.

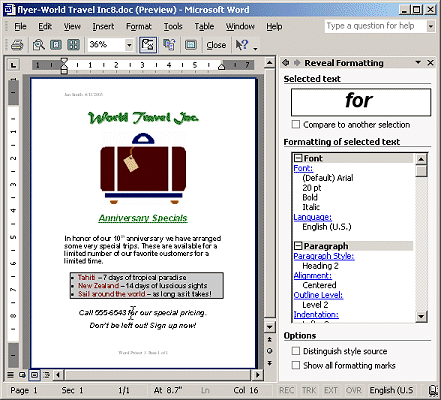
 The
Task Pane switches to show the Reveal Formatting pane. The pane shows
the styles applied as well as the formatting you applied yourself. The
pane will change to show the details for whatever you select in the
document. Click on the The
Task Pane switches to show the Reveal Formatting pane. The pane shows
the styles applied as well as the formatting you applied yourself. The
pane will change to show the details for whatever you select in the
document. Click on the
 Zoom button when you need to change the
cursor to the editing cursor for several tasks, or click Zoom button when you need to change the
cursor to the editing cursor for several tasks, or click
 Context Sensitive Help again.

 Word
2003 does not have the Word
2003 does not have the
 Help button. You must open the Reveal Formatting pane yourself. Format |
Reveal Formatting, or the key combo SHIFT + F1, or select Reveal
Formatting from the drop list of panes at the top of the task pane.
- Turn off the format help, or close the Task Pane.
(Click the button
again or press the ESC key to turn off the format help)
- When you are satisfied with the layout of the page,
check the number of pages in the document by looking at
the numbers on the Status bar. You should have 1
page in this document. Changing the footer may have put those last lines
on page 2 again. <Sigh!>
- Reducing length by one page: If
your document has run over onto an extra page, you have several
choices. Use whichever suits your situation best.
- Print only the first page, if only
blank lines are on page 2.
- Use
 the Shrink to
Fit button. When there is not too much extra, or when the
problem is width rather than length, this can work well. The size of
everything on the page - text and graphics - will be reduced so that
it all fits into one page less than before. Text may get too small to
read in some cases. the Shrink to
Fit button. When there is not too much extra, or when the
problem is width rather than length, this can work well. The size of
everything on the page - text and graphics - will be reduced so that
it all fits into one page less than before. Text may get too small to
read in some cases.
- Edit the document so that it is not so long, which is what you did
previously. You can make blank areas smaller or
revise your text or make images smaller.
|

