
Jan's Working with Databases
Basics: Access Objects: Print Form
Producing a useful, readable print-out of a form or report takes some planning.
The Page Setup dialog, the Property Sheet pane, and the Print dialog are where you can make choices to get your form or report printed just right.
Page Setup Dialog
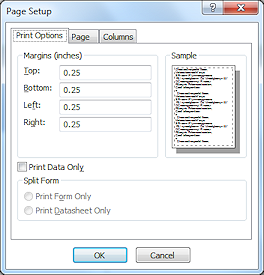
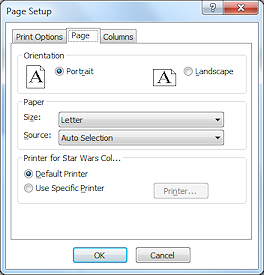
The Page Setup dialog has so many options for forms and reports that it uses three tabs. You can control the margins, orientation of the paper, the size of the paper, and which printer.
On the Columns tab you can, with care, set your document to print in more than one column on a page, like newspaper columns. But you must get the widths exactly right. We won't do that just yet!
Property Sheet
The whole form or report, each section, and each control has many properties. Only a few properties are about how the object will print.
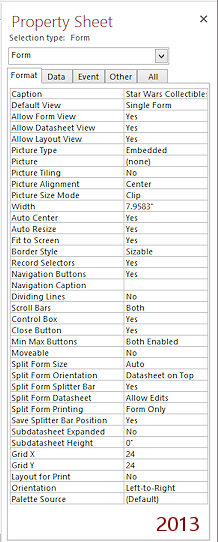 Properties related to printing:
Width for a form or report is a the width of the content, NOT of the physical page. The width of the physical paper you are going to use must be larger than Width plus the left and right margins. So if you are printing in Portrait orientation and the paper is 8½ by 11 inches and the margins are ½" left and right, then the Width property has to be 8" or less to fit on the paper.
Can Grow and Can Shrink allow a control or section to get taller or shorter depending on whether the amount of text. This makes some records take more space than others. But it keeps you from wasting a lot of space in those records with a small amount of text just because there are a few with a lot more text. Another plus is that you don't have to know ahead of time exactly how much space to provide. This is a VERY helpful property!
Detail Section: Keep Together can be set for the Detail section to keep a record from being split between pages. This can create empty space at the bottom of a page.
Page Header and Page Footer appear on printed pages. For a report, these can be set to show on all of the pages or not on the page with the Report Header or the Report Footer, or both.
Print Dialog
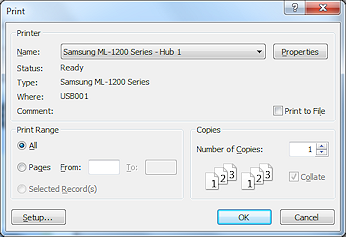 The Print dialog lets you choose a printer, what part of the object to print, and the number of copies.
The Properties button at the top right of the Print dialog opens a dialog that comes with the selected printer. Use that dialog to access special features of your printer, especially when using special paper like card stock or photo paper or envelopes.
| |
Step-by-Step: Print Form |
|
| What you will learn: | to view form's Print Preview to edit form and properties to select the whole form to select multiple controls by dragging to add a page header and footer to hide the page header to add and position a new label to print a form - all pages |
Start with: mytrips-Lastname-Firstname.accdb from a previous lesson
Form: Print Preview
The Property Sheet often has choices that affect the way the form or report behaves. Other properties affect only the appearance.
Can Grow and Can Shrink Properties for text boxes and Detail section:
By setting these properties to Yes for the controls for Memo/Long text fields and for the Detail section, the
controls can expand and contract to fit the amount of text.
The Detail section will also expand to hold the controls.
Keep Together Property for Detail section:
By setting this property to Yes, all of a record's controls will print
together and will not be split between two pages. However, if the form is too wide for the paper, a second page will print before the next record is
printed.
Of course if the record will not fit on one page, another page will print.
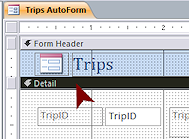
 Open the form Trips AutoForm.
 Switch to Print Preview.
 Access 2007:
 > Print > Print Preview

 Access 2010, 2013, 2016: File > Print > Print Preview
-
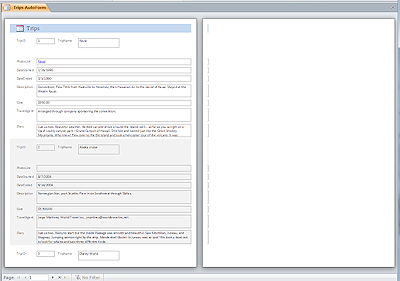
 Click the Two Pages button.
The Navigation buttons are not grayed out, so not all of the pages are showing.
The first page holds two complete records and the top part of a third.
The second page is nearly blank! All that is showing is a thin slice of the form that did not fit on the first page.
What needs fixing?
- The form width is just a bit too large to fit on the paper with the current margins. That creates pages that are mostly blank, except for the thin slice that would not fit on the page.
(Your form may have a different width if you accidentally changed it while trying to resize the controls earlier.)
-
The Diary field is cut short in the first record.
- The page header and page footer are blank.
- The background color will print.
- There is empty space below the TripID and TripName controls.
Happily, you can make changes that will help.
- The form width is just a bit too large to fit on the paper with the current margins. That creates pages that are mostly blank, except for the thin slice that would not fit on the page.
Form: Edit Properties
 Switch to Form Design View.
 -
If necessary, open the Property Sheet by clicking

 the
Property Sheet button on the ribbon tab Form Design Tools: Design. This should be the current ribbon tab.
the
Property Sheet button on the ribbon tab Form Design Tools: Design. This should be the current ribbon tab.
 Problem:
Property Sheet vanished
Problem:
Property Sheet vanished
You clicked the Property Sheet button when the pane was already open. That action closed it.
Solution: Click the button again and it will reappear.
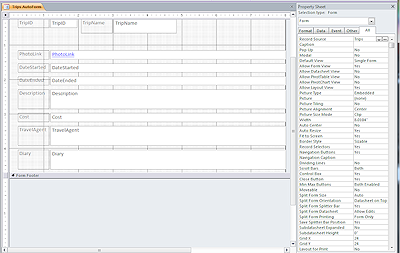
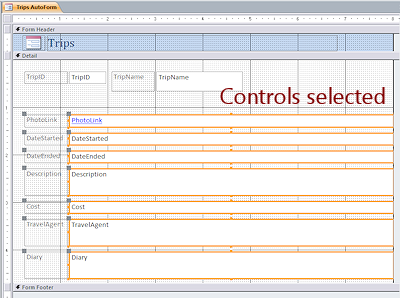
 Click on the control Description, which
is a Memo/Long Text field.
Click on the control Description, which
is a Memo/Long Text field.
The control shows orange borders as a selected control.
-
Hold the SHIFT key down and click on the TravelAgent and Diary controls.
All three controls are selected at the same time.
 The top of the Property Sheet shows
Multiple selection:
The top of the Property Sheet shows
Multiple selection:
-
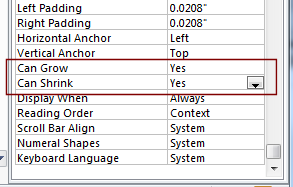 Can Grow/Can Shrink:
- In the Property Sheet, click on the Format tab
- Scroll to the bottom of the list,
- Change the Can Grow and Can Shrink properties to Yes.
(These properties are also found on the All tab, which lists all of the properties on the other tabs.)
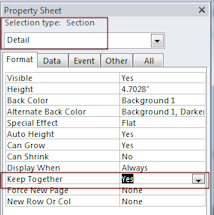
 Keep Together:
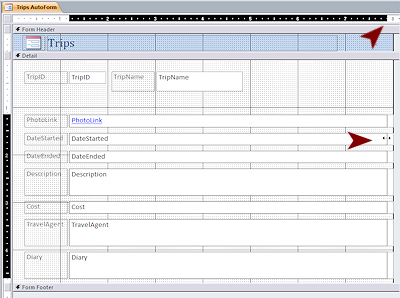
- Click on the Detail bar to select the Detail section (the part that
has the form's controls in it).
The Detail bar turns black. The Property Sheet changes to show that Detail is selected. - On the Format tab, change the Keep Together property to Yes.
- Click on the Detail bar to select the Detail section (the part that
has the form's controls in it).
- Width:
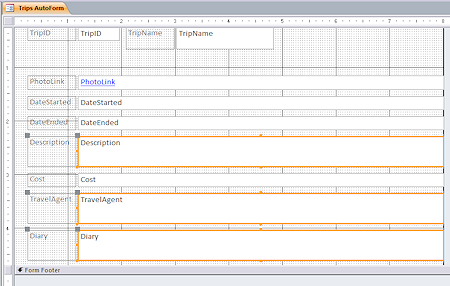
- Click on the box at the top left corner of the Design View, to the left of the horizontal ruler.
This selects the whole form. - Find the Width property in the Format tab or All tab.
- Enter the value 8" and press the ENTER key.
The value resets! Resetting the form's width won't resize or move any controls. The AutoForm process made the controls run a bit past the 8" line. You must revise the form so that all of the controls are to the left of the 8" grid line. -
Drag across the wide controls to select all that you touch.
You just have to touch a control with the outline to include the control in your selection.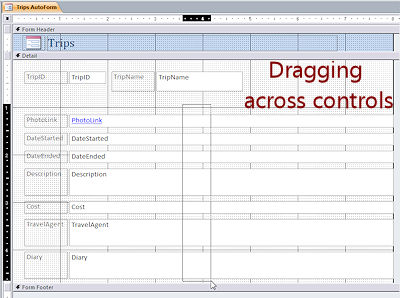
 If necessary, scroll to show the right edge of the form.
- Move the mouse pointer to the right edge of a selected control until the pointer changes to the Resize Horizontal shape,
 .
.
- Drag to the left until the indicator on the ruler is just inside the 8" mark. Drop.
All selected controls are resized.
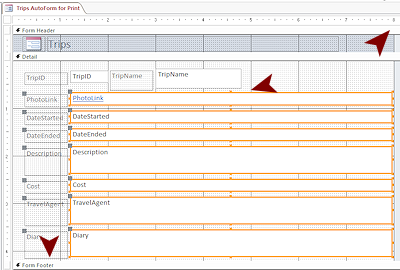 While the controls are still selected, drag up next to the TripID and TripName controls and drop. Leave two rows of dots visible below the TripName control.
- Drag the Form Footer bar up to remove the empty space below the Diary control.
- Select the whole form again.
- Change the Width property in the Property Sheet to 8" and press the ENTER key.
This time the value is accepted!
- Click on the box at the top left corner of the Design View, to the left of the horizontal ruler.
- Switch to Form View and navigate through the records.
No changes! Why not??
These particular properties apply to the printed version of the form.
 Save Object As: with a new name - Trips AutoForm for Print.
- Open Print Preview again.
 Navigate through the pages. Do you see changes now??
- The first page no longer has part of record #3.
- The Memo/Long Text controls are shrinking and expanding to fit the text.
- No records are split between pages.
- It takes 5 pages to print these records.
Hurrah!
Notice that there is nothing in the header or footer of the page. The AutoForm wizard does not put anything there, but you can.
Form: Page Header/Footer
The AutoForm wizard did not include a page header or footer for this form. A form can have both form header and footer and page header and footer.
Form header or footer: Shows in the window all the time as you navigate to each record. When printed, the form header and footer appear only once! The form header prints at the top of page 1 and the form footer prints after the last record on the last page.
Page header or footer: Appears on each printed page. The page header appears below the form header. The page footer appears at the bottom of the page. This may not be quite what you expected!
The wizard did not put page numbers in Print Preview for the form. You will create a page footer and add a control to show the page number. Access 2007 has a button on the ribbon to add the page number but Access 2010, 2013, and 2016 do not. You could add that command to the Quick Access Toolbar or to a custom tab group or custom ribbon. This time you will use a Copy-and-Paste work-around to get the control that you need.
- Switch to Form Design View.
-
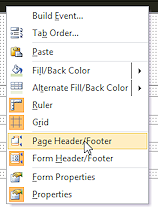 Right click on a section bar or in a blank area of the form and select from the context menu.
 Two new sections appear in the Form Design View.
- Click on the Page Footer.
The Page Footer section bar turns to black to show that the section is currently selected.
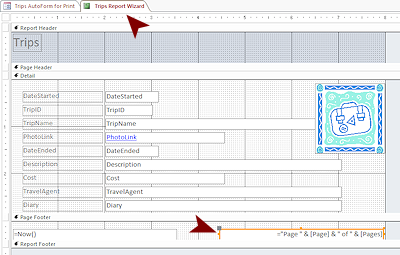 Open the report named Trips Report Wizard in Design View.
- Click on the control in the Page Footer that shows the page number.
This control shows the expression, ="Page " & [Page] & " of " & [Pages], that produces text like "Page 2 of 12". We will learn more about expressions later. - Use the key combo CTRL + C to copy this control.
- Switch back to the form Trips AutoForm for Print in Design View.
- Click in the Page Footer area.
- Use the key combo CTRL + V to paste the control.
-
If necessary, drag the control to position it at the right of the Page Footer, lined up with the right edge of the controls in the Detail section.
Since we aren't putting anything in the Page Header, that section can be hidden.
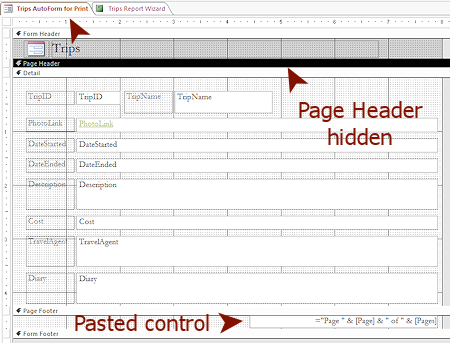 Click on the Page Header bar to select that section.
-
In the Property Sheet, change the Height value to 0 and press ENTER.
Alternate Method: Move the mouse pointer over the bottom edge of the Page Header section until the pointer changes to the Resize shape
 . Drag the bottom edge of the Page Header section up to meet the section bar.
- Save the form and keep it open.
[Trips AutoForm for Print]
Form: Add and Position Label
For class you need to have your name on every document you print. You will put your name in a new label in the footer. In the Page Footer there is one control on the right, which creates the page number and aligns its result to the right. That leaves a lot of space in the middle for your name.
- On the Form Design Tools: Design tab in the gallery of controls, click on Label

 .
.
- Move the mouse pointer over the Page Footer to the left of the page number control.
The shape of the pointer changes shape to the Add Label shape .
.  Click.
A very narrow text box appears.- Type your name.
The text box expands to hold what you type.
If your name is long, the text box will overlap the control on the right. That's OK for now. 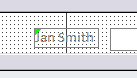 Click out in a blank area to deselect your new label.
A green error triangle appears at the top left of the label.- Click the control to select it and make the Error Options Tag appear.
- Hover over the Error Options Tag to make the down arrow appear.
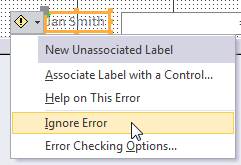 Click on the arrow to make the menu appear.
Access likes labels to be bound to controls, but some labels just hold words you want to see on the page.- Click on Ignore Error.
The triangle vanishes. -
If necessary, drag the new label to center it in the Page Footer horizontally and to line it up with the other control.
Remember, the pointer must be in the Move shape to drag the control.
(There is no command that will automatically center a control horizontally on the page.)If your name is long, the label may need to overlap the control to get it centered on the page. That should be OK. The actual values that show on the page are far to the side. It takes a really, really long name to overlap the text.
 Centering Control: The grid lines are there to help you position objects. The report is 8" wide, so the middle of the width is the grid line at 4". The resizing handle in the middle of the top edge of the label should be lined up with the 4" grid line. That will center the control on the 4" line. You may not be able to get that handle exactly on top of the grid line. Very close works just fine.
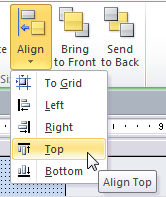 Aligning with other controls: To get several controls lined up with each other, you must first select them all. (Click on one, hold SHIFT down, click on each of the others. Or drag across all of them.) Then you can use choices on the Align button on the Form Design Tools: Arrange tab or on the right click menu.
Form: Print
Forms are normally designed for use on screen instead of in print. But you may run into situations where it is convenient to print a form instead of creating a report for that same information.
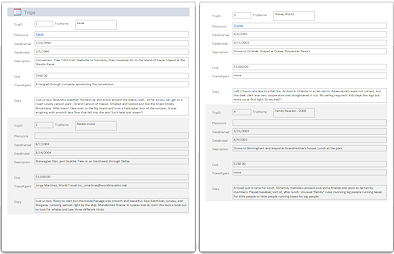
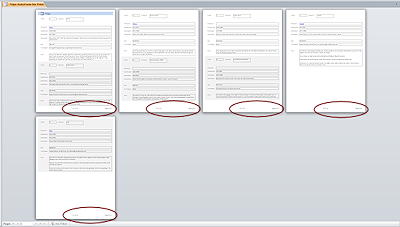 Open the form in Print Preview. Page numbers are showing at the bottom right of each page and your name is in the middle.
The illustration shows Print Preview after choosing to show 8 pages. Only 5 sheets of paper are needed.
If you don't hide the Page Header section, the print-out has 6 pages. A small change makes a big difference!
There are more changes you could make, like removing the alternating background color or rearranging the controls. In Project 3: Forms and Reports you will dig deeper into creating and editing. For now, it's time to print.
 In Print Preview, click the Print button
 to open the Print dialog.
Select the printer you want to use. Select to print All pages. Click on OK to print.- Switch to Form View.
- Select record #3 by clicking its record selector bar on the left.
- Switch to Print Preview again.
All records are showing. 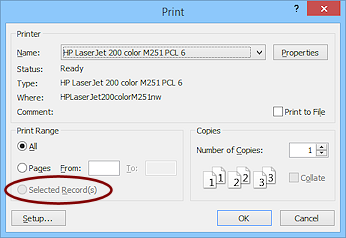 Click on the Print button.
The options to print Selected records(s) is grayed out! Printing selected record(s): To print only a selected record, you must select it and then go directly to the Print dialog. CTRL + P
That way the option to print Selected Record(s) is available. Not an obvious method!- Return to Form View.
- Use the key combo CTRL + P to open the Print dialog.
- Click on the options Selected Record(s) and then click on OK.
Only record 3 prints. - Evaluate: Did the alternating background color create problems with the print-out with your particular printer? Did it take longer to print each page?
|
|
| © 1997-2017 Jan Smith All Rights Reserved |
Site Map What's New |
Privacy Policy Terms of Service Copyright Acknowledgements |
~~ 1 Cor. 10:31 ...whatever you do, do it all for the glory of God. ~~
Last updated: March 22, 2017