
Jan's Working with Databases
Forms & Reports: Special Types:
Custom Dialog
Sometimes you have a form or report that is based on a parameter query. The automatic parameter window is boring and cannot be configured. You can create your own custom dialog, with a little help from some Visual Basic code or macros. This is especially helpful if the query has several parameters, but it can be useful for even one parameter.
Advantages of a Custom Dialog:
-
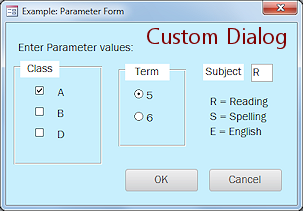 You can see all of the parameters at once.
 - You can include explanations or directions.
- All choices submit at once so you can change your mind about a parameter before submitting.
- You can list a large number of choices.
- You can change the choices available for one parameter based on the choice for another, which can not be done at all with a normal parameter query.
To Create a Custom Dialog
To be able to use a dialog to accept values for your parameters, you need several things:
- Form or Report Source: A source for a form or report that will accept the parameter values from the custom dialog instead of normal query parameters.
- Form or Report
- Parameter Form: A custom dialog with unbound controls to accept the values. Set the form's properties appropriately for a dialog. (See below)
- Macro or Code:
- In OnOpen property of form/report, open the custom dialog when the form/report opens.
- In OnClick property of a button on
the custom
dialog, open form/report and then hide (but not close) the custom dialog.
The dialog must be open for the form or report to see the values that you entered. - In OnClose property of form/report, close the hidden custom dialog when you close the form/report.
In the parameter query, instead of a parameter with directions, like [Enter a Class (A, B, or D):], you must refer to the control on the custom dialog form, like [Forms]![ChooseAssignments]![WhichClass] where ChooseAssignments is the name of your custom dialog form and WhichClass is the name of the control where you enter or pick a value. The exclamation points in the expression are important! (When reading such expression aloud, read the ! as "bang".)
Properties of a Custom Dialog
A custom dialog does not look like a normal window and usually behaves differently, too.
Appearance: The following properties on the Format tab of the Property Sheet for a form create the look of a dialog:
- BorderStyle property = Dialog
- RecordSelectors property = No
- NavigationButtons property = No
- DividingLines property = No
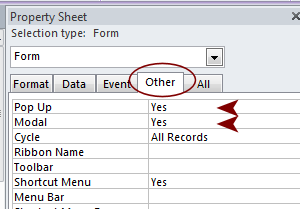
Behavior: Dialogs are usually popup, modal windows. These properties are on the Other tab in the Property Sheet for the form.
- Pop Up property = Yes
- Modal property = Yes
A popup window stays on top of all other windows until you close it. You can switch to another window, assuming that your popup window is not covering the whole screen. Some Help windows behave this way.
A modal window keeps you from switching to a different window until you close the modal window, either by clicking its Close button or by completing the choices in the window and clicking its Submit or OK button. Dialogs are often modal windows.
A modeless window (Modal = No) is an ordinary window. You can switch to other windows as you wish.
Macro
A macro is a way to do a bit of programming without having to know any programming!
Access provides a Macro window with a drop list of possible actions. At the right is a list of these actions. It is quite long! We will not be getting too deep into macros in these lessons.
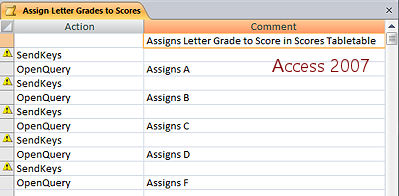
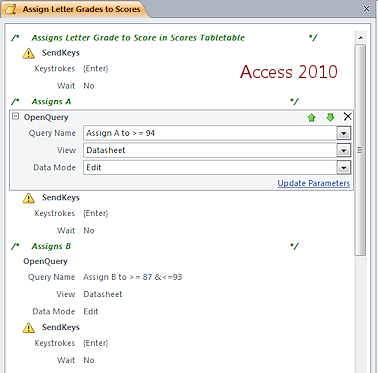
Access 2007 uses the same dialog for macros as previous versions. Access 2010, 2013, and 2016 use a new look that puts the arguments for each part of the macro sequence with the step. Very helpful.
What do you do with a macro?
In a Property Sheet, you can assign a macro to any of the events for the object, such as OnOpen or OnClose or OnClick or OnFormat or OnPrint.
For example, you could assign a macro to the OnClick event of a command button on a form. The macro could open another form or a report or it could run an action query of some sort.
The macro in the illustration is from the Language Arts Classes database. It runs a sequence of update queries to update a table with letter grades based on scores. This macro was not attached to any other object. I just ran it directly when I needed to convert scores to letter grades at the end of each grading period.
 Most actions have arguments. In Access 2007 these show in the bottom of the window when an action is selected. In Access 2010, 2013, and 2016 the arguments show in the bottom part of the entry.
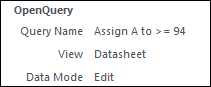
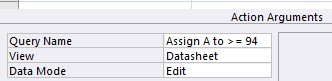
For example, the action OpenQuery has 3 arguments: the name of the query to run, what view to show it in (Datasheet, Design, Print Preview, PivotTable, PivotChart), and what mode (add, edit, or read-only).
The action SendKeys is used to do automatically what you would normally do with the keyboard. This should be used only for automating keyboard responses like pressing the ENTER key or selecting a particular item on a form.
![]() AutoExec macro: Any macro saved
with the name AutoExec will automatically
run whenever the database is opened. You could use such a macro to
immediately open a switchboard dialog or to open the form or report that you need first every day.
AutoExec macro: Any macro saved
with the name AutoExec will automatically
run whenever the database is opened. You could use such a macro to
immediately open a switchboard dialog or to open the form or report that you need first every day.
Step-by-Step: Custom Dialog |
|
| What you will learn: | to create a select query, a simple report, and a custom form to modify a form to choose values for the Parameter query to use List Box Wizard to use the Command Button Wizard to edit a query to use form values as parameters to test query, form, report interaction to add a macro to OnOpen event of report to open form for parameters to add a macro to OnClose event of report to close hidden form to add a macro to OnClick event of command button to hide form |
Start with: ![]() , resource files, worldtravel-Lastname-Firstname.accdb from folder databases project4 as updated in the previous lesson
, resource files, worldtravel-Lastname-Firstname.accdb from folder databases project4 as updated in the previous lesson
In a previous lesson you created and saved a parameter query, QStaff-WhatCountry. This query required you to type in the name of a country or region and the query would then produce a datasheet of staff members from that country/region. If you mistyped the country name, the query would find no records. To be able to select a country from a list of the existing countries would certainly help! You will create a form that uses a list box to show the possible countries. If the list were longer than 6 or so, you might want to use a combo box instead.
Remember, you need several parts to wind up with a report that uses a custom dialog.
- Parameter Query
- Report
- Form to use as custom dialog
- Code to connect them all together
You will create a simple report that will show the Staff info and takes its parameters from your custom form. You will need some macros and event procedures (programming code) to handle the form and the resulting report.
Create the Initial Query
- Copy and paste the query
QFullName-Staff, using for the new name QStaff-parameter Country -
 Open the new query in Design View.
The original query was designed to put the name parts together. Problem: Field name start with Expr1: or similar
Access lost track along the way of what table the fields came from
Solution:Just delete the extra characters.
- Drag the field Country from the field list to the grid.
-
Uncheck the Show buttons so that only SFullName and Country will show in the results.
The sorting will still work.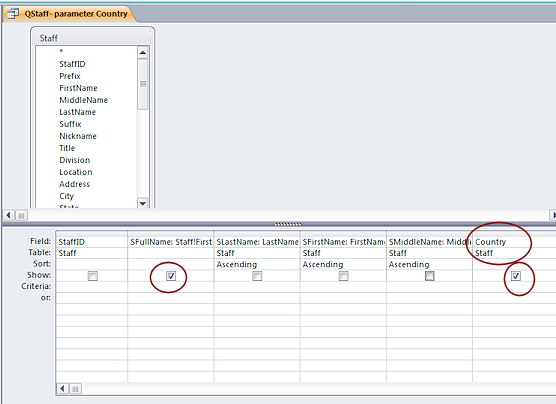
-
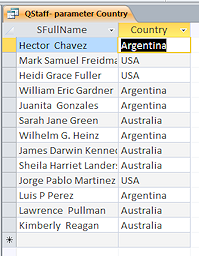
 Run the query to verify your design.
 -
 Save the query and close it.
This is not a parameter query yet, but it will be! The query must be closed to be used as the source of a new report.You have to wait until after the form is created because you need to know the name of the form and name of the control on the form in order to create the parameter.
Create the Report
You will create a report and later change it to use a parameter form first. We are thinking ahead for some of the formatting choices, which work better when only one Country group shows.
- In the Navigation Pane, select the query QStaff- parameter Country.
-
On the Create ribbon tab, click the Report button to create an autoreport based on this query.
 A simple report opens in Layout View. It uses a table to position the controls.
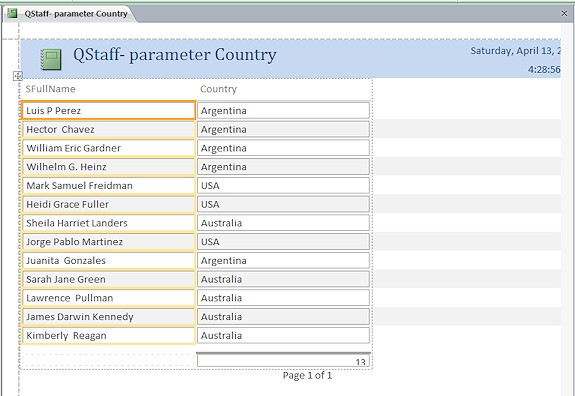
- Save the new report as Staff- select Country.
- Switch to Design View.
- Group on the Country field and show a group header.
- Cut and Paste the Country control to the group header.
- Delete the labels Country and SFullName from the Page Header.
-
Format the Country control in the group header as Bold and Blue.
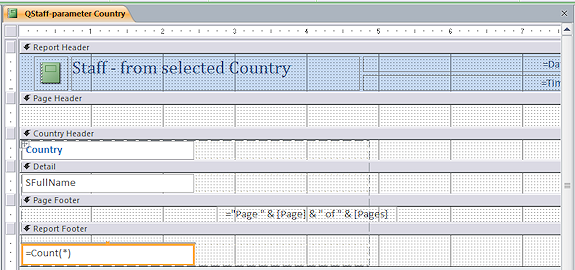
- If necessary, drag the SFullName control to the left column of the layout table.
- Edit the title to read Staff - from selected
Country
- Resize the Total control in the Report Footer by dragging its bottom edge down to allow the whole to show.
It is odd that the autoreport does such a bad job with the height of this control. - Drag across the control for the total and the dividing line above it.
The dividing line is not selected! It is not an object but just the top border of a table cell. AutoReport set the border style to Solid instead of Transparent to have a line above the total value in the cell. How smart! - Drag the control for the total to the left.
It pops into the table cell immediately. - With the control for total selected, set
Gridline Style Top = Solid
Gridline Width Top = 2pt - Select each of the cells on the same table row and set Gridline Style Top = Transparent.
This removes the horizontal line from those cells. 

 Access 2010, 2013, 2016:
- Change the Border Style property for the Country, SFullName, and Access Totals Country controls to Transparent.
- Change the Alternate Back Color for the group header and the Detail section to No Color.
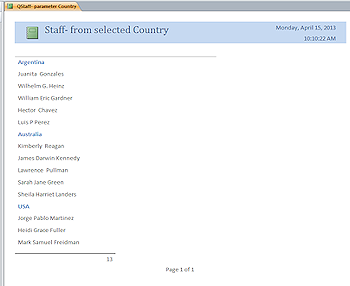
 Switch to Report View and verify that all is correct.
 - Save the report as Staff-select Country.
- Close the report.
Create Custom Form
Next you will create an unbound form that will collect parameter information. "Unbound" means that it is not tied to any table or query. You must add controls using tools from the Controls palette on the ribbon.
 Open a new blank form in Design View.
(Create ribbon tab > Form Design View)
- With
the Label tool

 , add a label at the top of the Detail section.
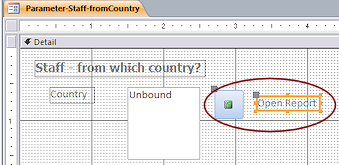
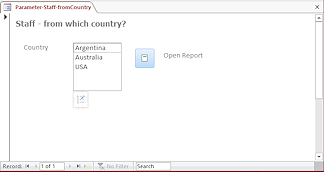
 - Enter the text Staff - from which country?
- Format the label as:
Tahoma
12 pt.
Bold - Resize the label to Best Fit.
Use List Box Wizard
A list box shows a list of items in a fixed-size box. If the control is too short to show the whole list, a scroll bar appears. It is useful for short lists because it does not have to be held open with the mouse like a combo box does.
You can only choose one item from a list box.
![]() Source for the List: You can type in the items you want to see easily. But, if the list could be used by
several different forms, you can create a table as the
source of the list box. That lets you update the list in just one spot, the table.
Source for the List: You can type in the items you want to see easily. But, if the list could be used by
several different forms, you can create a table as the
source of the list box. That lets you update the list in just one spot, the table.
- On the Form Design Tools: Design ribbon tab, click the down arrow that opens the Controls palette
 .
. - If the button Use Control Wizards is not highlighted already, click the command Use Control Wizards.
This lets Access give you dialogs to walk you through the setup of the more complex controls. - Click on the List Box tool
 .
.
You may have to open the palette again to see this tool.
The mouse pointer changes shape .
.
-
Click in the Detail section, at the left underneath the label you just created.
 A control appears and the List Box wizard starts to help you with this control.
Problem:
Wizard does not start
The command to use Control Wizards is off.
Solution: Delete the blank list box. Repeat the steps above to click on the command, Use Control Wizards, to turn it on and try again.
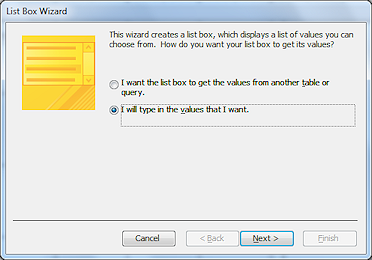
- In the first page, select "I will type in
the values that I want."
- Click on Next >.
-
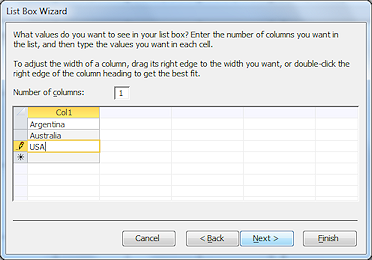 In
the second page, leave the number of columns as 1 and type in the choices:
In
the second page, leave the number of columns as 1 and type in the choices:
Argentina
Australia
USAUse the down arrow key to move to the next row. The ENTER key moves the dialog to the next step.
- Spell check by pressing the F7 key.
Make any corrections that are needed.
- Click on Next.
-
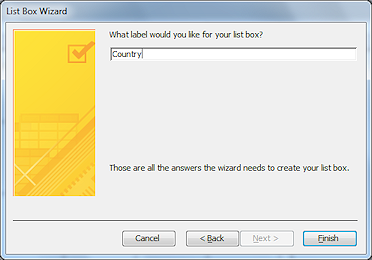 In the
third page, for the label of the control type Country.
In the
third page, for the label of the control type Country.
- Click on Finish.
The list box control is added to your form. -
If necessary, resize the label for the list box and move the control and its label to positions similar to the illustration.
Notice that the new control does not show the actual list while in Design View.
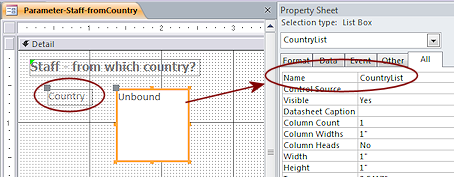 In the Property Sheet, change the Name property for the list box control to CountryList.
This will be important shortly.- Inspect the other properties for the list box control to see what its features are.
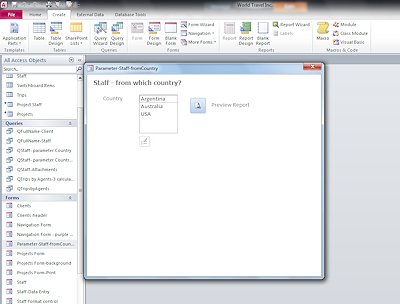
A list box can show more than one column and can be bound to a table or query. The Property Sheet lets you pick which columns shows and which column give the control its current value. - Save the form as Parameter-Staff-fromCountry.
-
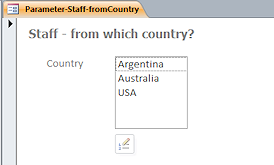
 Switch to Form View.
Now you can pick a country, but nothing happens.You could add a macro to the list to make it create the report when you click on a country. But that becomes very annoying for users who miss their click. A command button is a better method.
Editing the List: Below the list box in Form View there is an Edit button. Click the button to add new values immediately. There is a property for this feature, of course. It's on the Data tab in the Property Sheet- Allow Value List Edits. Changing that property to No would prevent the user from adding a new country to the list from the form. How much do you trust the users of this form? How often might a new country need to be added to the list?
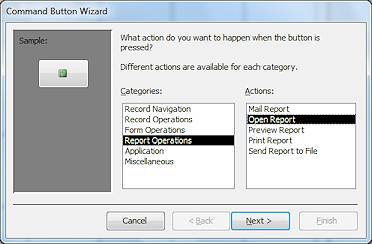
Use Command Button Wizard
Once your user has picked a country, you need a way to open the report and use that choice. A command button is the right control. A wizard helps by creating some code for you! The code will automatically be attached to the OnClick event in the button's Property Sheet.
- Switch to Design View.
- Click on the Command Button tool
 on the Controls palette.
The mouse pointer changes shape .
.
-
 Click on the form to the right of the list box.
The Command Button wizard opens.
If the wizard does not start, go back to the Controls palette and click the Use Control Wizards command.
- In the Categories column, select Report Operations.
- In the Actions column, select Open Report.
- Click on Next >.
-
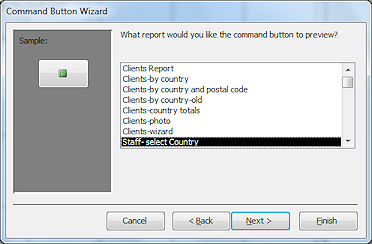 In
page 2 of the wizard, select the report
In
page 2 of the wizard, select the report
Staff-selectCountry.
- Click on Next >.
-
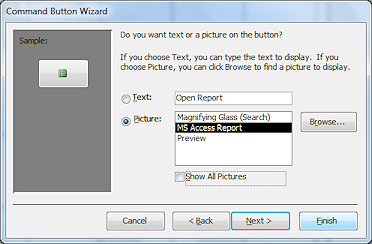 In
page 3 of the wizard, select the picture MS Access Report for your button. This will put an icon on the command button instead of text and will open the report in Print Preview.
In
page 3 of the wizard, select the picture MS Access Report for your button. This will put an icon on the command button instead of text and will open the report in Print Preview.
- Click on Next >.
-
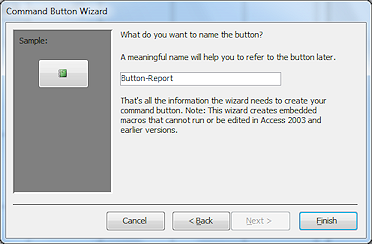 In
page 4 of the wizard, enter as the name of the new button, Button-Report.
In
page 4 of the wizard, enter as the name of the new button, Button-Report.
- Click on Finish.
-
With the button still selected, look at the Property Sheet.
(Open it if necessary by clicking the Property Sheet button on the ribbon tab.)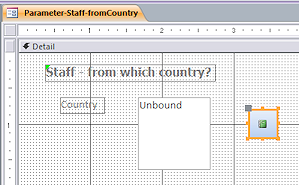
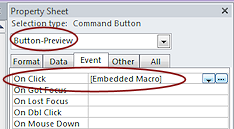
- Click on the Event tab.
In the On Click property, you should see the expression [Embedded Macro].
The command button wizard created this to open the report.
In previous versions of Access the wizard created an Event Procedure.
-
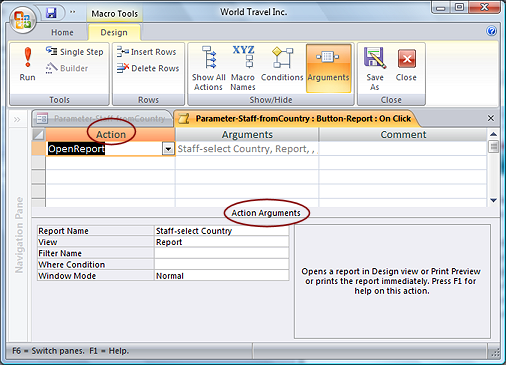
Click on the ellipsis button for the On Click property.
 Access 2007: A dialog opens where each action in the macro shows in a row. The arguments for the action show at the bottom of the dialog but only when that action is selected in the top.
Drop the list of actions beside OpenReport to see what actions are available.
 Access 2010, 2013, 2016:
A new tab opens to show the macro in a stepped outline format. Each action shows its arguments directly below it. The display can be collapsed to show only the actions but the default is to display the arguments.- Inspect this window.
This is a new way to display macros starting with Access 2010.
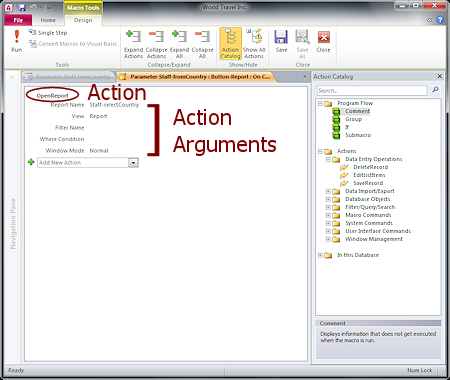
- Expand each of the Actions folders in the Actions Catalog pane.
There are many, many things that you can do with a macro that is attached to a button or to an event.
- Inspect this window.
- Close the tab for the macro by clicking the Close button
 in
the Macro Tools: Design ribbon.
in
the Macro Tools: Design ribbon.
You are back in Form Design View. 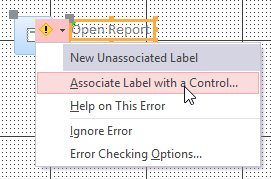 Use the Label tool from the Controls palette to add a label beside the button that reads Open Report.
- Click in a blank area of the form.
The green triangle for errors appears in the upper left corner of the new label and an Info button appears beside the new label.
- Click on the Info button to expand its menu.
- Choose to associate the label with the command button control.
A dialog, Associate Label, appears. There is only one choice! Otherwise you would need to know which name went with which button. Another reason to name controls carefully!
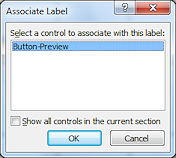 Click on OK to close the Associate Label dialog.
The button now has a lovely label and no error triangle in the label's top left corner.-
 Switch to Form View.
How does your form look? If necessary, make adjustments to the position or size of the controls. (For the illustration the window was reduced in size.)There are some unnecessary parts to this window, including the record selector at the left, the scrollbar to the right, and the navigation buttons at the bottom. You can use the Property Sheet to hide them.
- Switch to Form Design View.
-
 If
necessary, select the form and open the Property Sheet.
If
necessary, select the form and open the Property Sheet.
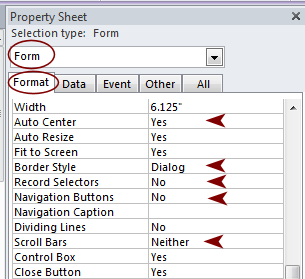
- On the Format tab, change the following properties:
AutoCenter = Yes
Border Style = Dialog
Record Selectors = No
Navigation Buttons = No
Scroll Bars = Neither
The AutoCenter property will center the dialog in the application's window when you open it, but not when switching from Form Design View.
-
 On
the Other tab, make the following changes:
On
the Other tab, make the following changes:
Pop Up = Yes
Modal = Yes
The PopUp property makes the form open as a dialog on top of the Access window instead of in a tab.The Modal property requires the user to make a choice in the popup form before continuing.
-
 Switch to Form View.
Quite a different look! The form is in its own window. It seems to be larger than necessary. - Click one of the ribbon buttons.
Ding! Access will not let you do anything outside the form while this modal form is up.
-
 Select a country on the form. Problem: Cannot select country
Ding. Unknown field. You typed CountryList in the Control Source property instead of the control's Name property.
Solution: Edit the Property Sheet for the list box. - Click the Open Report button.
Hmmm. The full report appears even though a country was selected. The parameter form is still showing even though you don't not need it any more. That's two more things to fix.
-
Right click on the form and select Design View.
The form switches to Design View but the report is still open.Problem:
Switching to Form Design View for a dialog
These changes prevent you from using a ribbon button to switch to Form Design view.
Solution: The right click menu includes that command... unless you right click on a control or label.
 Drag the borders of the form to make it about 4.5" x 2".
- Save and Close All.
[Parameter-Staff-fromCountry]
Edit Query to Use Form Values as Parameters
The query that is the Record Source for the report is currently not using a parameter.
You must make the query look to your new form for the value for the field Country.
- Open the query QStaff-parameter Country in Design View.
-
Right click the Criteria row in the Country column and select Zoom.
The Zoom window opens, giving you a better view of what you are about to type.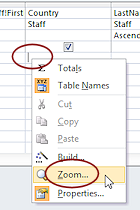
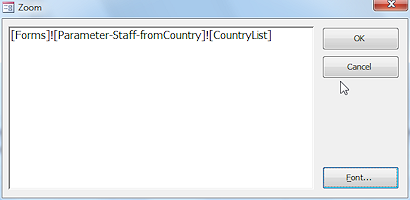
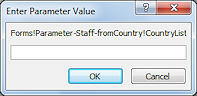
- Type the expression:[Forms]![Parameter-Staff-fromCountry]![CountryList]
No spaces!
This expression tells Access to look at the list of Forms for one named Parameter-Staff-fromCountry and then to look for a control named CountryList. The current value of that control is what Access uses for the Country column in the query. (This is an example of why it's better to not have a space in a name!) - Click the OK button to close the Zoom window.
Your typing shows in the Criteria row. It's not cut off even though part does not show.
- Save the query.
[QStaff-parameter Country]
-
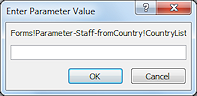 Run the query to see if your expression is working.
Whoops. A normal parameter dialog opens. The query cannot get a current value from a form that is closed! But if the form is open, you cannot run the query because the form is Modal. Yikes! This is a bit complicated! - Click on Cancel to close the dialog.
- Close the query.
You could change the form again so that it's not a Modal form. It may be easier to check it from the report.
Test Query, Form, and Report Interaction
When objects depend on other objects, it is a good idea to close all of them and try from the beginning to see if everything works as you thought it should. To use your new custom form, where must you start??
Start with custom form:
 Close any open tabs inside Access.
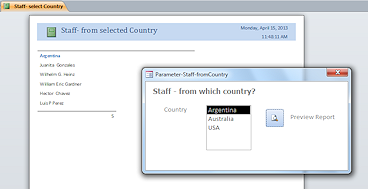
- From the Navigation Pane, open the parameter form again in Form View, Parmeter-Staff-fromCountry.
-
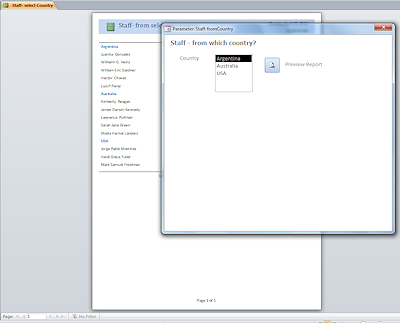
Select the country Argentina and click the button Open Report.
The report opens underneath the form and shows just the staff members in Argentina. Success!
Problem: The report failed.
Your expression has an error.
Solution: Go back to the query and inspect the expression for the Criteria row in the Zoom window (where you can see the whole expression). If necessary, use the Font button in the Zoom window to enlarge the text to make it easier to read. Fix any errors. Look for spaces, which are hard to spot. - Change the selection in the form to Australia and click the Open Report button.
The report does not change! Big problem!!
You need some background actions to handle what to keep open and when to close what you are finished with. That's the next section. - Close the form and the report.
Start with report:
-
 In
the Reports category in the Navigation Pane, double-click on your
newest report, Staff-select Country.
In
the Reports category in the Navigation Pane, double-click on your
newest report, Staff-select Country.
A parameter dialog appears instead of your custom form. Why? The form is closed so there is no current value for the report to use. - Click the Cancel button to close the dialog.
The report does not open.
To open this report directly, you need to change it to automatically open the form first. We can do that with a macro!
Macros to Open Form, Hide Form & Open Report, Close Form
- Report: To be able to open the report but still choose a country, you must make the action of opening the report automatically open the custom form for the parameter.
- Parameter Form: Clicking the button on the form to Open Report must then hide the form, without closing it, as well as opening the report. The report can see the value you selected only while the form is open!
- Report: When the report closes, it must also close the hidden form. That is 3 different macros.
Report: Macro for OnOpen of Report to Open Form for Parameter(s)
- Open the report Staff-select Country in Design View.
 In the Property Sheet for the report itself, find the event OnOpen.
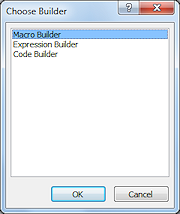
- Click in its text box and then on the ellipsis button.
-
Choose to open the Macro Builder and click on OK.
The Macro Builder opens in its own tab, ready for you to create the first macro.Access 2007 and 2010, 2013, 2016 have different macro windows but the same steps.
-
Click the down arrow at the end of the Action text box to open a list of possible actions.
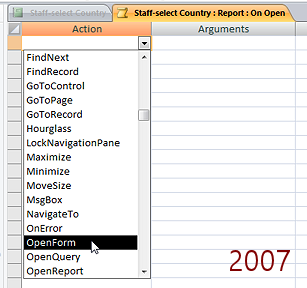
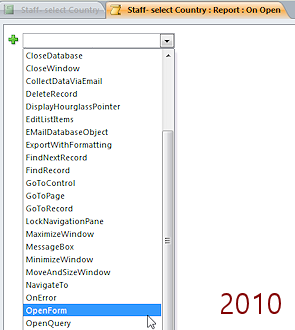
-
Click on OpenForm.
A new entry appears. Scrolling long drop
list:
Scrolling long drop
list:
When you drop the list of actions and type a letter, the long list scrolls to the entries that start with that letter.
-
In the arguments boxes, select the following from each of the drop lists:
Form Name: Parameter-Staff-fromCountry
View: Form
Window Mode: Dialog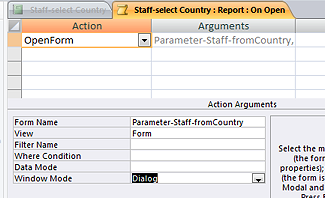
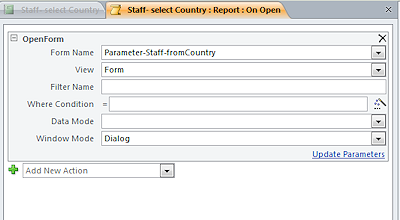
Why set Dialog mode? The Dialog mode sets the Pop Up and Modal properties to Yes. You already did that in the form's
properties. Using Dialog mode here, does something more! It guarantees
that the report will wait for you to enter values before formatting
the report. Very important!
- Close the macro window.
A message box asks if you want to save the changes to the macro. - Click on Yes.
You are returned to the Property Sheet. - Click in a different property in the Property Sheet.
The OnOpen property shows [Embedded Macro], which means the macro that you just created.
Report: Macro for OnClick to Close Form When Report Closes
- In the Property Sheet for the report itself, find the
event OnClose.
- Click in its text box and then on the ellipsis button.
- Choose to open the Macro Builder again.
A dialog appears for you to name the macro right now.
![Property Sheet: On Close = [Embedded Macro] (Access 2010)](customdialog-propertysheet-onclose-2010.png) Drop the list of actions and select Close (Access 2007) or CloseWindow (Access 2010, 2013, 2016).
Drop the list of actions and select Close (Access 2007) or CloseWindow (Access 2010, 2013, 2016).
- In the Arguments for this action, select the following:
Object Type = Form
Object Name = Parameter-Staff-fromCountry/Region
Save = Prompt - Close the macro window and save changes.
The OnClose property shows [Embedded Macro].
- Save and close the report.
Form: Edit Macro for Command Button to Hide Form While Report is Open
The parameter form already has a macro to open the preview of the report. Now you will add a macro to hide the form, while leaving it open. That lets the report fetch the current value for Country.
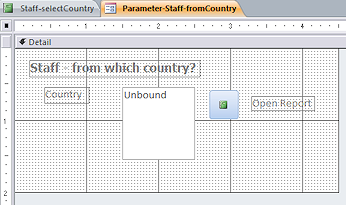
- Open the parameter form, Parameter-Staff-fromCountry, in Design View.
- Select the command button, Button-Report.
- In the On Click property, click the ellipsis button to open the Macro Builder.
-
On the second action line, select SetProperty.
You will use this action to change a property of the parameter form.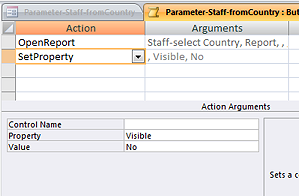
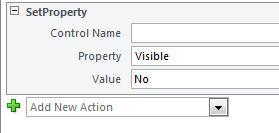
- In the arguments:
Control Name - leave it blank.
This makes the macro apply to the form itself.
Property: Visible
Value: No
-
Access 2007: Drag SetProperty and drop above OpenReport.
This order allows the form to work when it is opened first instead of opening the report first, which then opens the form. No clue as to why! - Close the macro and save changes.
The OnClick property still shows [Embedded Macro].
You cannot tell how many steps the macro has or what they do from the Property Sheet.
- Save and close the form.
Test Macros
Users do not always do things in the order that you planned. Test your new objects by opening the form directly as well as by opening the report directly.
-
Testing the Report:
With the parameter form and the report both closed, double-click the report in the Navigation Pane.
The parameter form appears. Problem: Report shows with 0 records
The report did not wait for a country to be selected. The dialog's mode is incorrect.
Solution: Edit the macro OnOpen for the report and change the Window Mode to Dialog.
- Select a country.
- Click the Open Report button.
The report displays in Report View and the custom dialog vanishes. -
Close the report.
The report and its hidden custom dialog close.How do you know if an
invisible form has closed?
Try to open the report again. If the form already has a value selected in it, then it did not close before!You must close the report before using the parameter form again. The report will not update even if you see the form and make a different selection.
- Testing the Form: Double-click the custom form in the Navigation Pane.
Does it have a country highlighted still? If so, your macro did not close the form when you closed the report. Make corrections before testing again.
- Select a country and click the Open Report button.
The report should open as before.
[In Access 2007 I ran into odd effects and several crashes of the program while working on this lesson. If the SetProperty action was after OpenReport in the macro attached to the form button, opening the report worked correctly to open the custom dialog form and then hide the form and display the correct report. But opening the form directly somehow kept the Open Report button from doing anything at all. When the SetProperty action was before OpenReport, then opening the report still worked. Opening the form directly let the Open Report button work, but the form stayed in view. Very odd.]
- Close the report.
![]() Switching Views: Once your report is open, the custom dialog will appear again if you switch views. But changing the choices does not change anything!
Switching Views: Once your report is open, the custom dialog will appear again if you switch views. But changing the choices does not change anything!
![]() If you set the macro to open Print Preview instead of Open Report, you will get an error about not being able to switch views because code is running. There is some very tricky timing of actions to work with. All of those Events like On Open, On Activate, On Current, etc. come in a particular sequence. Getting your parameter into the sequence and formatting the preview is apparently more complex than going to Report View. Who knew?!
If you set the macro to open Print Preview instead of Open Report, you will get an error about not being able to switch views because code is running. There is some very tricky timing of actions to work with. All of those Events like On Open, On Activate, On Current, etc. come in a particular sequence. Getting your parameter into the sequence and formatting the preview is apparently more complex than going to Report View. Who knew?!
|
|
| © 1997-2017 Jan Smith All Rights Reserved |
Site Map What's New |
Privacy Policy Terms of Service Copyright Acknowledgements |
~~ 1 Cor. 10:31 ...whatever you do, do it all for the glory of God. ~~
Last updated: March 22, 2017