Jan's Working with Databases
Forms & Reports: Special Types:
Switchboard/Navigation Form
Once you have a large number of forms and reports, it would be very useful to have a way to quickly get to just the ones you use the most often. A switchboard form or a navigation form (Access 2010, 2013, 2016) may be just what you need. In fact, a commercial database often opens with just a switchboard in view. This is very useful when users are just going to use the database and not create new tables or forms or reports.
(An alternate approach is to create a custom group for the Navigation Pane.)
Switchboard
The example database, Language Arts Classes, has a switchboard that opens other switchboard pages, which have command buttons that open the most often used forms/reports. This is awkward for just a few forms or reports! For real-life work I would have put all of them on the main switchboard.
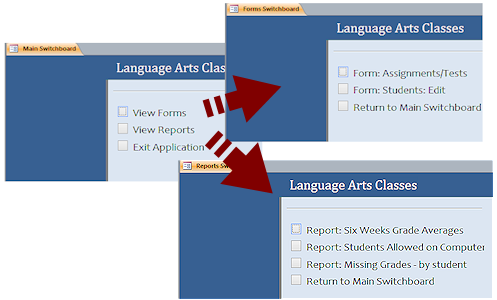
Main Switchboard opens two switchboard pages
which have buttons commonly used objects
Using a Switchboard
It's simple... in concept!
Click a command button to perform an action like opening a form or report or another switchboard page.
In the illustration above the first switchboard page has buttons to open two other pages and one to exit the application, that is, the current database. A secondary page replaces the main switchboard page in the window so you need to include a button to Return to the main switchboard.
Switchboard at Startup
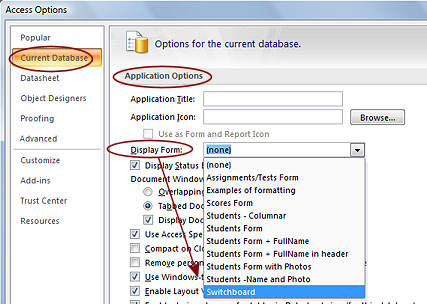 Switchboard forms are usually intended to open automatically when the database opens. In many databases, the ordinary user cannot see the Navigation Pane at all. All they see is what is on the switchboard and what it can open.
You must tell Access that you want the switchboard to open when the database opens. The setting is in Access Options.
![]() Access 2007: Office button
Access 2007: Office button ![]() > Access Options button
> Access Options button
![]()
![]()
![]() Access 2010, 2013, 2016: File tab > Options
Access 2010, 2013, 2016: File tab > Options
Select the Current Database page at the left. In the Application Options section, set the Display Form box to the form you want to show when the database opens.
Notice that if you like overlapping windows instead of the newer tabbed documents, you can change that behavior here.
By the way, if you open a database in the old MDB format, it will use overlapping windows by default. That was the only choice in the older versions of Access.
Switchboard Manager
Access provides a special tool, Switchboard Manager, for creating and managing a switchboard form, which can have several switchboard pages. This is similar to the way the tab control for forms works. The object has several pages but only one page shows at a time. The example above has 3 pages - Main Switchboard, Forms Switchboard, and Reports Switchboard.
A database can have only ONE switchboard created with Switchboard Manager.
Opening the Switchboard Manager:
![]()
![]() Access 2007, 2013: Database Tools ribbon tab
Access 2007, 2013: Database Tools ribbon tab 
![]()
![]() Access 2010, 2016: Not on any of the ribbon tabs by default.
Access 2010, 2016: Not on any of the ribbon tabs by default.
Add to Quick Access Toolbar ![]() :
:
Click down arrow at right of Quick Access Toolbar. Change list of commands from Popular Commands to Commands Not in the Ribbon. Scroll to Switchboard Manager and click it to select it. Click Add>> button to move the command to the right. Use the up and down arrows at the right to position the command among the existing commands. Click OK.
Add to custom tab group or custom ribbon tab 
File > Options. Change list of commands from Popular Commands to Commands Not in the Ribbon. Scroll to Switchboard Manager and click it to select it. Select a ribbon tab on the right and click the Add Group button at the bottom right. Right click the "New Group (Custom)" name and select Rename. Type a name that you like. Now click the Add>> button to move Switchboard Manager to the right to your new tab group. Click OK to save changes and close the dialog. Clearly Microsoft does not think you will be using this feature in Access 2010 or 2016!!
Using Switchboard Manager
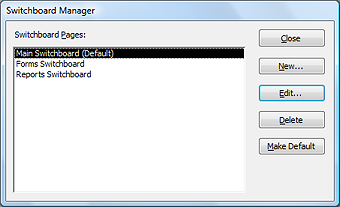 The
first window in the Switchboard Manager shows a list of existing switchboard pages and has several buttons for actions you can perform on
these pages.
- New: Opens a window for creating a new switchboard page.
- Edit: Opens a window for making changes to the selected switchboard page
- Delete: Deletes the selected switchboard page.
This does not remove buttons on other pages that open the switchboard that you are deleting. You must delete those separately. - Make Default: Picks which page shows when you open the
Switchboard form.
If you create several switchboard pages, you need to create an item on the main switchboard page for each of them. You cannot open the other switchboards any other way! All switchboard pages are part of a single object, which just looks like separate forms. Access is being tricky but helpful here!
Create a New Switchboard Page
 When
you click the New button on the Switchboard Manager, a dialog appears for
you to enter a name for the new switchboard page. The default name, New
Switchboard Page, is uninspiring!
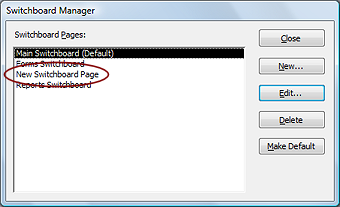 The
new page appears in the list in the Switchboard Manager. You are not automatically sent to edit the blank switchboard page that you just
created! You must select the page and click on Edit so that you can add items to the new
page.
You must also go to the default switchboard and create a button to open
your new switchboard page. Surprisingly, this is not done
automatically for you.
Add/Edit Items on a Switchboard Page
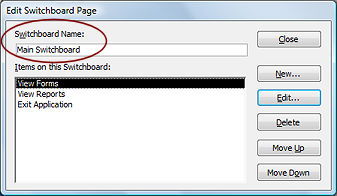 When
you select a switchboard page in the Switchboard Manager and click the
Edit button, the Edit Switchboard Page window opens.
This lists each of the items that are on the switchboard you are
editing. (It will be blank if you just created the switchboard.)
Use the buttons to create new items, edit the existing ones, delete items, and rearrange the order of items (with the Move Up and Move Down buttons).
The Edit and New buttons open a different kind of window,
Edit Switchboard Item. There are three text boxes in this dialog.
 Text:
What you want to see beside the button in the switchboard window.
Be descriptive but short.
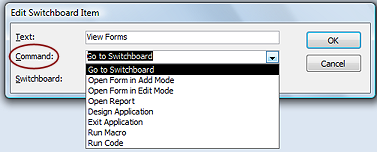 Command:
What should happen when the item is clicked.
There is a drop list of actions - Go to Switchboard, Open Form in Add Mode (for new records), Open Form in Edit Mode (to change existing records), Open Report, Exit Application, etc. If you can write a macro or code segment, you can do more than just open an existing form or report. You are limited only by your imagination and your coding skills!
Open Form in Add Mode opens the form directly to a blank form, ready for you to create
a new record.
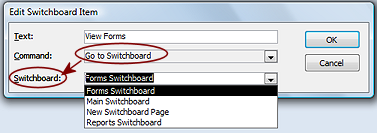 The third text box provides the arguments for
the command that you chose. What shows here depends on what you selected as the command, of course.
For example, if you choose Go to Switchboard, the third box is a drop
list of the switchboards in the database.
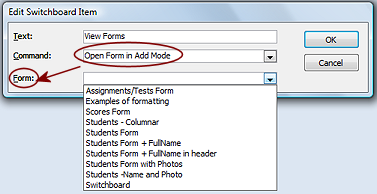 If
you choose Open Form in Add Mode or Open Form in Edit Mode, then the
third text box shows a list of forms in the database.
 If
you choose Exit Application, there is no third box at all. That command
does not require any additional information. In action, this button will close the database but does NOT close Access itself.
![]() Changes
don't show after closing Switchboard Manager:
Changes
don't show after closing Switchboard Manager:
Cause: The Switchboard form was open while you made changes.
Solution: Close and reopen the form or else switch to Form Design
View and back to Form View to refresh the window.
Table for Switchboard
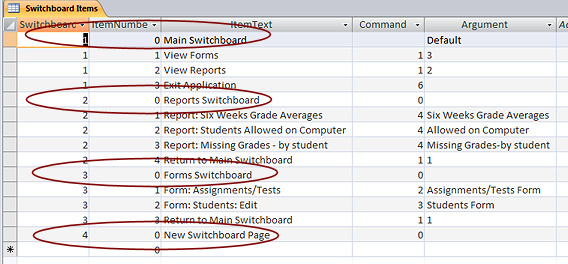 When
you create a switchboard form, Access automatically creates a new table
object called Switchboard Items. This lists all of the pages of the Switchboard AND all of the items on those pages.
Do not edit this table directly or delete it or rename it. You will break your switchboard. Use the Switchboard Manager to make any changes.
- SwitchboardID: Identifies which switchboard page the item is on.
- ItemNumber: Sets the order of items on the page, where 0 is the page itself.
- ItemText: What shows in the title bar of a page or beside the action button on the page.
- Command: A code for the action that you selected in the Command text box.
- Argument: A code or name of the object
that you selected in
the third text box of the Edit Switchboard Item dialog. Value is blank if
there is no argument required.
Switchboard Design View
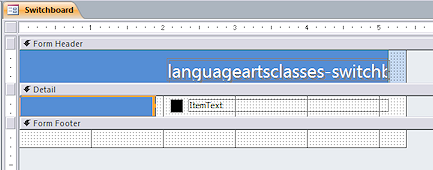 Parts must be edited with the Switchboard Manager instead of Design View.
Design View shows just one button and label, like a normal Detail section should do, plus a Form Header and Footer. You cannot edit the text in the Form Header in Design View.
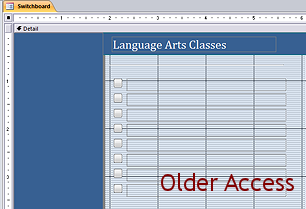 Older Versions: Before Access 2007, the Design View shows a table of eight buttons and labels but you might not have that many on the form. The title text box is in the Detail section instead of a Form Header.
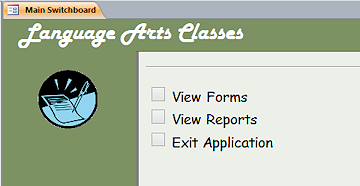 You can change the properties for the Detail
section and the text above the section with the buttons. You can add
other text boxes or shapes or pictures as you wish. Just be aware that they will show in all switchboard pages for this switchboard. You can change colors and fonts, add
pictures.
You cannot put the buttons into two columns since each one is really a Detail section of its own. Only reports can be formatted in two columns.
![]() Editing Design View of a Switchboard created in an older Access version
Editing Design View of a Switchboard created in an older Access version
Be VERY careful! Things can vanish when you get too 'creative' with your design changes.

 Access 2010, 2013: Navigation Form
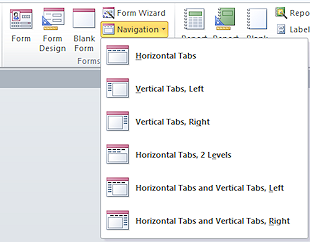 New with Access 2010, the wizard that creates a Navigation Form includes several layout choices that are similar to web page menus. That makes sense because this form is intended primarily for databases that are used through a web interface. The normal Navigation Pane does not show in that situation.
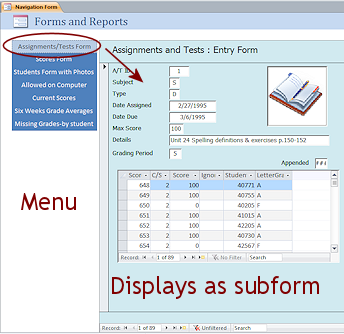 When you click a menu item, the form or report opens in the subform area of the switchboard form. That is great for forms or for viewing reports but not so good for printing.
Printing from Navigation Form: Like with any other form, only what shows prints, even if the object has scrollbars for parts that are out of sight. There are some work-arounds. One is to add a command button to your report and set its Display When property to Screen Only. Design the button so that clicking it opens the report and prints it.
Custom Navigation Form
Of course you can always create your own custom navigation form. It will require uses some macros or VBA code to perform the action you want, like opening a form or report. These lessons don't go that far.
Step-by-Step: Switchboard/Navigation Form |
|
| What you will learn: | to create a switchboard with Switchboard Manager to edit a Switchboard to require the Switchboard to load at startup of database to format a Switchboard to inspect how a switchboard works to create a Navigation Form to customize a Navigation Form |
Start with: ![]() , resource files, worldtravel-Lastname-Firstname.accdb from folder databases project4 as updated in the previous lesson
, resource files, worldtravel-Lastname-Firstname.accdb from folder databases project4 as updated in the previous lesson
Now that you have several forms and reports, you can create a switchboard form for the items that you expect to use the most often.
Create a Switchboard
Oddly, Access 2007 and 2013 have the Switchboard Manager button on the ribbon, but Access 2010 and 2016 do not.
- Start the Switchboard Manager:


 Access 2007, 2013: On
the ribbon tab Database Tools, click on the button Switchboard Manager.

 Access 2010, 2016: Add the Switchboard Manager button to the Quick Access Toolbar by following these steps:
- Click the down arrow at the end of the Quick Access Toolbar.
- Click on More Commands...
The Options dialog opens to the Quick Access Toolbar options. - Change the list of commands from 'Popular Commands' to 'Commands Not in the Ribbon'.
- Scroll down to Switchboard Manager and click on it to select it.
- Click the Add>> button between the two lists to move the selected command to the right list.
- If necessary, use the Up and Down buttons at the far right to change the order of buttons for the Quick Access Toolbar.
- Click on OK to save your changes and close the dialog.
- Click on the new Switchboard Manager button

 .
.
 Since this database does not have any switchboards yet, you see a
message offering to create one.
- Click on Yes.
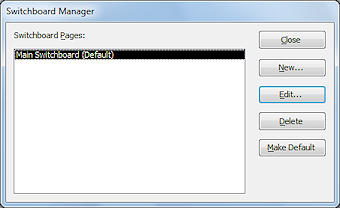 The
Switchboard Manager appears with one switchboard showing,
Main Switchboard, which is the default.
You are ready to add some items to the switchboard.
Edit Main Switchboard
The New... button in the current window is for creating additional switchboard pages. To add items to the switchboard you just created, you must use the Edit button.
-
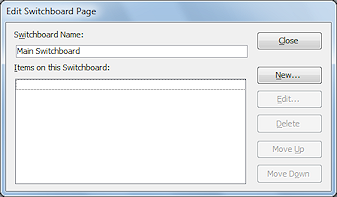 Click on the Edit... button.
The Edit Switchboard Page dialog appears.
In this dialog, the New... and Close buttons are the only buttons available, until you actually add some items to the switchboard.
-
 Click on New...
The dialog Edit Switchboard Item appears with default choices.
-
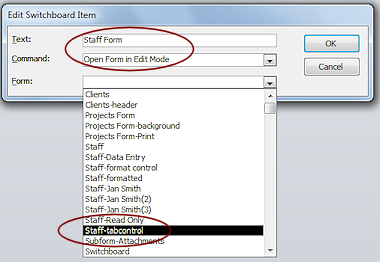 For
Text, type Staff Form.
- For Command, choose Open Form in Edit Mode.
- For Form, select Staff-tabcontrol.
- Click on OK.
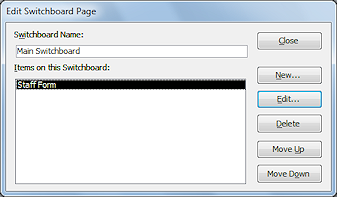 The Edit Switchboard Page dialog now shows your new item.
- Click on New... again.
-
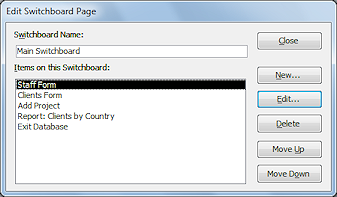 Create the following new items
- Text = Clients Form
- Open Form in Edit Mode
- Clients-header
- Text = Add Project
- Open Form in Add Mode
- Projects Form
- Text = Report: Clients
by Country
- Open Report
- Clients - country totals
- Text = Exit Database
- Exit Application.
- Exit Application.
- Text = Clients Form
- Click on Close and on Close again, to close
all of the switchboard windows.
- Inspect the Navigation Pane to see your new form, Switchboard, and the new table, Switchboard Items.
-
Double-click the new form Switchboard.
The new switchboard opens with your choices as buttons.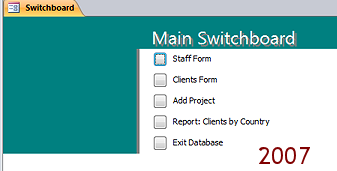
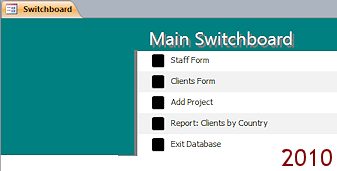
Access 2010, 2013, and 2016 use Alternate Back Color and black buttons.
-
Starting from the top of the list, click each of the buttons to be sure that they do what you expect.
(The text labels are not clickable)
Verify that the buttons work as expected.Notice that the Add Project button opens the form to a new blank record while the other forms open to the first record.
Be warned - the last choice, Exit Database, will close the database. Access will remain open, with no database showing. This is useful only if you plan to open another database right away - like right now! -
Open the database again.
(Hint: Use the 'Recent Databases' list.)The switchboard does not open automatically when you reopen the database! You have to tell Access that you want that to happen.
 Problem: You deleted the Switchboard from the Navigation pane and cannot get it to show again even after making changes through the Switchboard Manager.
A switchboard has two parts - a form named Switchboard and a table named Switchboard Items that stores your choices for the items on the form.
Solution: Delete the table Switchboard Items also. Now the Switchboard Manager will let you create a new main switchboard.
Make Switchboard Load at Startup
You must tell Access that you want the Switchboard form to open when the database opens. That choice is in Access Options for the Current Database.
-
Open the Options dialog:
 Access 2007: Office button
  > Access Options button > Current Database

 Access 2010, 2013, 2016: File > Options > Current Database
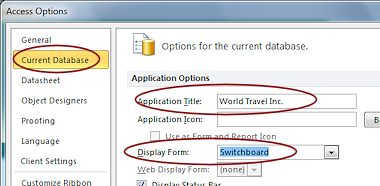 In the Application Options section, change the box Display Form, choose Switchboard from the drop list.
- For Application Title, type World Travel Inc.
- Click on OK.
 A message box opens that says you must close and reopen the database for your changes to be applied.
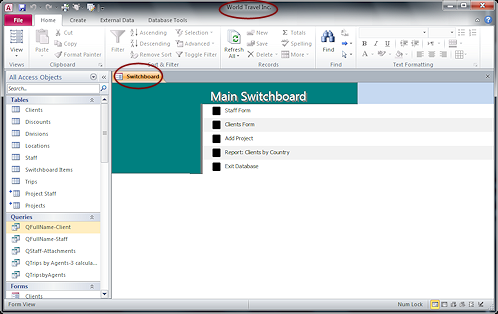 Close the database and reopen it.
This time the switchboard opens automatically.
Form Design View: Switchboard
If you do not like what you see in the Switchboard, you can do some editing in Form Design View. But you must be very careful or you can break the form. The text that you can see on the form is safe to edit.
In Design View of Switchboard, edit only: Title text, labels for buttons
You cannot edit the buttons or the button labels on a switchboard in Form Design View. That must be done from the Switchboard Manager. You cannot format the label text in the header either!
Access 2013 and 2016 has a different set of colors and Quick Styles.

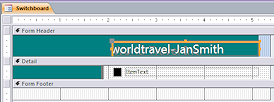 Switch to Form Design View for the Switchboard form.
The only difference between Access 2007 and the other versions is the color of the command button and the alternating background color.The text in the Form Header is not what you see in Form View. Not to panic! The Switchboard Manager handles that. You cannot even edit this text in the Property Sheet.
You can change some formatting, however. Let's change the whole form to use orange. (Sorry if you don't care for the color, but we do need to practice!)
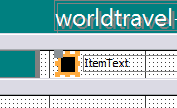 Select the command button in the Detail.
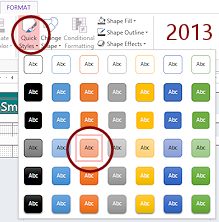
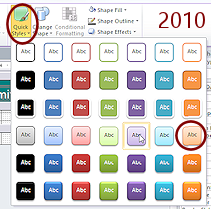 On the Form Design Tools: Format ribbon tab, click the Quick Styles button.
A palette of choices opens.- Click on the style that is 4th from the top in the orange column.
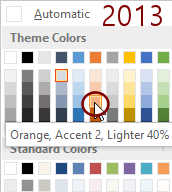
 Click on the colored area in the Form Header but not in the text box.
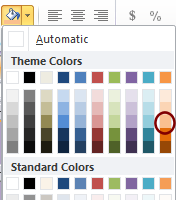
- On the Form Design Tools: Format ribbon tab, click the Background Color button
A palette of colors appears. - Click in the orange column Lighter 40%.
- Repeat for the color section down the left side of the Detail section.
-
 Switch to Form View.
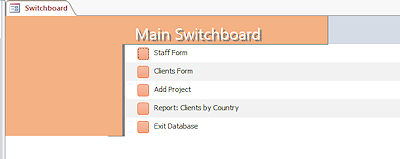
Access 2007 does not use the Alternate Back Color for the Detail section.
 Save your form and close it.


 Access 2010, 2013, 2016: Create a Navigation Form
The new navigation form in Access 2010, 2013, and 2016 is intended mostly for web databases, which do not show the normal Navigation Pane. But you might find one useful anyway. The wizard is easier to use than the Switchboard Manager. Just remember that the forms and reports that open from such a Navigation Form will open inside a subform, so printing is tricky.
 On the Create ribbon tab, click the Navigation button.
A palette of layouts appears. These are like web page menus - horizontal or vertical. The last three layouts have submenus.
-
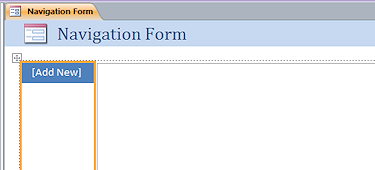 Click the layout Vertical Tabs, Left.
 The form open in Layout View.
The Add New area is where your buttons/links/menu go. This is a drag and drop action! So much easier than the Switchboard Manager's multiple dialogs.
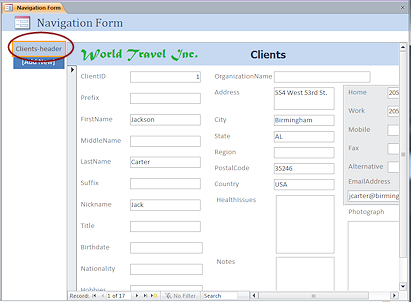 In the Navigation Pane, drag the form Clients-header to the [Add New] area and drop it.
The subform area shows the form and the title Clients-header shows at the left.
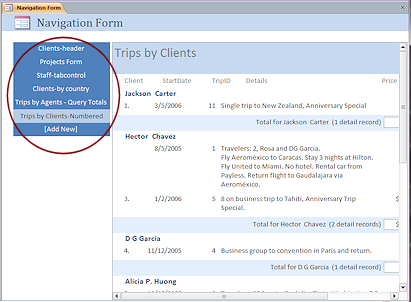 Similarly, add the following forms and reports:
- Projects Form
- Staff-tabcontrol
- Clients-by country
- Trips by Agents-Query Totals
- Trips by Clients - Numbered
 Switch to Form View.
- Click on each item in the menu of your Navigation Form.
Verify that the object opens in the subform.
-
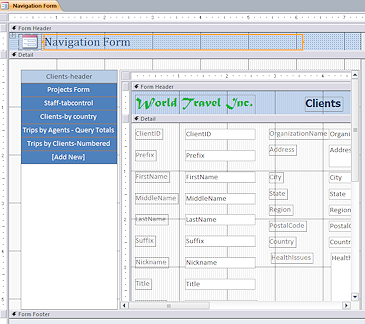
 Switch to Design View.
The first document in the list automatically shows in the subform in Design View.The left side is a Navigation Control, which is a new type of control. The buttons in this control have properties for the colors when the mouse hovers over and when one is 'pressed' by clicking and holding the mouse button down.
The right side is a Navigation Subform.
-
 Save your form as Navigation Form.
Customizing Navigation Form
It is easy enough to format the Form Header, but those clickable buttons cannot be formatted easily. You cannot format the [Add New] button that you see in Layout view. Any changes must be done for each button in turn. Each buttons has color settings for Fore Color (for text) and Back Color, Hover Color, and Pressed Color.
You will make some color changes that may not be the best just so you can practice! The colors are chosen from the Standard palette so that these directions will work for both Access 2007, 2010, 2013, and 2016, not because they are my favorite colors!
Thinking about colors: It should be easy for the user to tell which item in the menu is currently selected (pressed), which one has the mouse pointer over it (hover), and which ones are just sitting there (normal). The background can change or the text color can change or both can change.
 Switch to Design View.
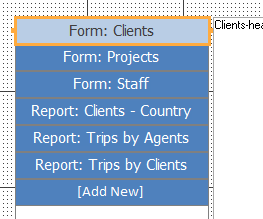 Change the Caption property of each of the buttons:
- Form: Clients
- Form: Projects
- Form: Staff
- Report: Clients - Country
- Report: Trips by Agents
- Report: Trips by Clients
- Select the first navigation button, Form: Clients.
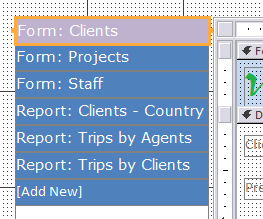 In the Property Sheet, change the following properties, using the Standard Colors part of the color palette:
- Back Color: Purple 4
- Hover Color: Purple 2
- Pressed Color: Purple 3
- Hover Fore Color: Dark Gray 4
- Pressed Fore Color: White
- Font Name = Verdana
- Alignment = Left
- Fore Color = White
-
 Switch over to Form View.
 -
Click on the second button observe how the first one changes. Then hover over the first button and see what that change looks like.
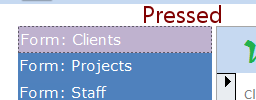
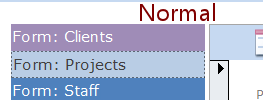
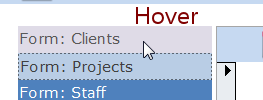
You have now seen all three states for the first button. 'Pressed' is the state after that button has been clicked. The first button of a navigation form is pressed by default when the form opens.Only the selected button has the new formatting. How sad! Each button must be formatted separately. Of course we can think of this as 'flexibility'. Each button can be different. That makes it a 'feature' instead of a problem! Happily there is a quick and easy way to apply all of these formatting changes to a button at once!
 Switch to Design View.
-
Use Format Painter to copy the new formatting from Form: Clients to the other buttons, including [Add New].
(Hint: Double click the Format Painter button on the Home ribbon tab. Click on each button in the Navigation Form. Click the Format Painter button again to turn it off.)
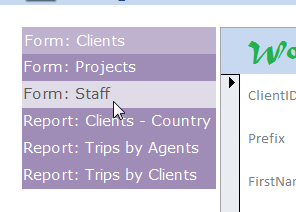
 Switch over to Form View.
- Inspect the menu and try out the different buttons. Verify that all are behaving the same.
 Save your form as
Navigation Form -purple menu.
