
Jan's Working with Databases
Forms & Reports: Forms: Form Wizard
Most of your forms will be used for entering and editing records. In Access Basics you learned how to use the Form button to quickly create an auto form, which got the job done, but it was boring and put all controls into a Stacked Layout in columns. This is an acceptable design only for very short forms!
Methods to Create a Form:
- AutoForm
- Form Wizard
- Design or Layout View - Add controls manually
You already used an AutoForm in Project 2: Access Basics. An AutoForm can use only one table or query.
In this lesson you will learn how to create a form using the Form Wizard, which walks you through a set of choices. The Form Wizard lets you choose fields from more than one table or query. Then you can customize the form.
Form By Wizard
The Form Wizard walks you through the choices you need to make to create a simple form.
- Ribbon tab Create > Form Wizard button

Steps in the Form Wizard:

![]() Click each step below to see the wizard's page at the right.
Click each step below to see the wizard's page at the right.
- Step 1: Source for the data - one or more tables or queries and which fields to include
- Step 2: Layout, one of 4 layouts (shown below)
- Step 3: Title for the form
Form Wizard: Layouts
In the Form Wizard you are offered 4 different layouts. Some are useful only for special situations. You cannot create your own layouts to add to this list.
|
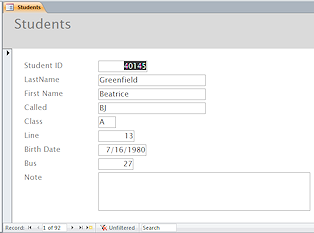
Columnar is the standard layout, with fields in a vertical column. |
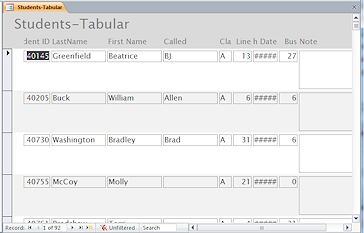
Tabular puts the fields in a single row, |
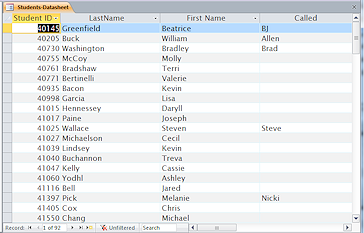
Datasheet looks just like a regular datasheet. |
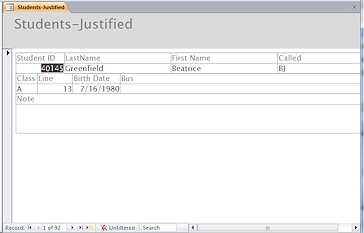
Justified packs the fields tightly together. |
| |
Step-by-Step: Form Wizard |
|
| What you will learn: | to use the Form Wizard to create a form |
Start with: ![]() , resource files, worldtravel-Lastname-Firstname.accdb from the previous project.
, resource files, worldtravel-Lastname-Firstname.accdb from the previous project.
- If necessary, open the World Travel database that you created in the previous project.
- Save As to folder databases project4 folder on your Class disk.
Create this folder if it does not exist. - In
the Navigation Pane, select the table Staff.
- On the Create ribbon tab, click on the button Form Wizard .
The Form Wizard appears with the Staff table selected. Access 2007: Click the More Forms button and then the Form Wizard command.
-
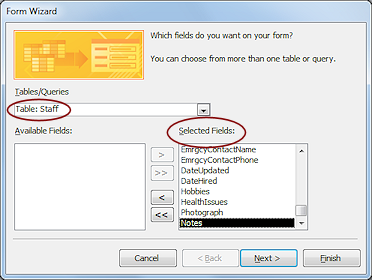 Click on the button >> to move all fields to the list of fields to
the right so that they will be included in the form.
Click on the button >> to move all fields to the list of fields to
the right so that they will be included in the form.
 Additional tables/queries: At this point you could select another table or query from the list and add some
or all of its fields to the Selected Fields list.
Additional tables/queries: At this point you could select another table or query from the list and add some
or all of its fields to the Selected Fields list.
- Click on Next >.
-
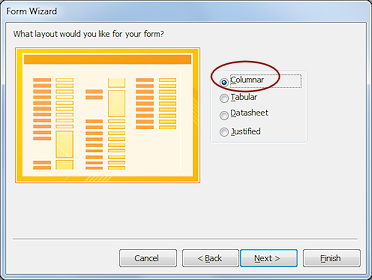 Select Columnar as the layout.
 - Click on Next >.
-
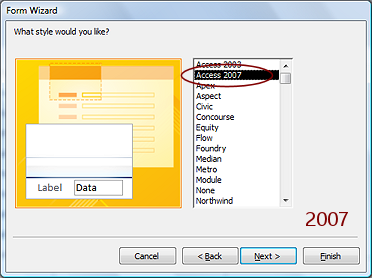 Access 2007: Select the style Access 2007 and click on Next > .
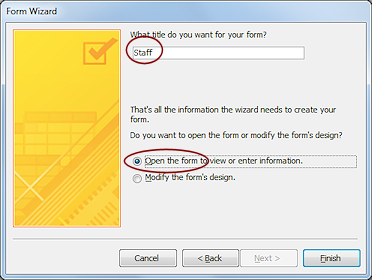 In the last step of the wizard, keep the default choices, title for the form is "Staff" and the option selected is "Open the form to
view or enter information."
In the last step of the wizard, keep the default choices, title for the form is "Staff" and the option selected is "Open the form to
view or enter information."
- Click on Finish.
 The new form opens.
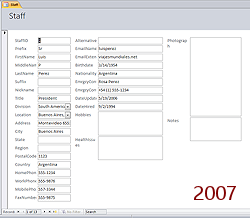
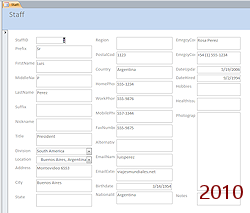
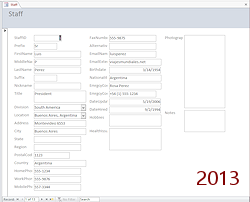
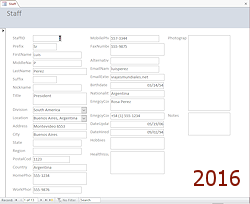
Form Wizard Form - in different versions
Not quite the same.
![]() Evaluate: How usable is this form? How attractive is it?
Evaluate: How usable is this form? How attractive is it?
Usable = Not great.
- Controls and labels are the same size in each column in Access 2007 and 2010. The third column controls are narrower than the other two columns.
- Some labels are cut off like EmailExtension and EmrcyContact.
- A lot of space is wasted, like Prefix, Suffix, and Title.
- Dates are aligned right while the other controls are aligned left.
- Access 2010 has taller default height for controls.
- The form won't fit in smaller size windows.
- Access 2013 and 2016 do a better job with the layout overall.
- Access 2016 uses a taller text box for the Home and Fax numbers but not for other phone numbers. What's with that?
Attractive = Dull!
This form will certainly not win any awards for design! Of course your idea of pretty and mine could easily be different.
This is a start, but it needs a LOT of work! (And thus we
see why we need the next lesson!)
|
|
| © 1997-2017 Jan Smith All Rights Reserved |
Site Map What's New |
Privacy Policy Terms of Service Copyright Acknowledgements |
~~ 1 Cor. 10:31 ...whatever you do, do it all for the glory of God. ~~
Last updated: March 22, 2017