
Jan's Working with Databases
Forms & Reports: Forms: Controls
Whether you create your form with AutoForm, the Form Wizard, or manually, your form is made up of controls and their labels.
Controls
A control is an object on a form or report that displays data, controls an action, displays static text like explanations, or is a decoration like a line or a company logo.
Form View
- Bound control - Shows value from an underlying field
- Unbound control - Not tied to a field. Includes decorative lines and shapes, decorative images, and unbound labels, like a title or directions for using a form.
- Calculated control - Uses an expression as its data source. The expression can only use fields from the table or query that is the form's source. You cannot edit these values since they are calculated.
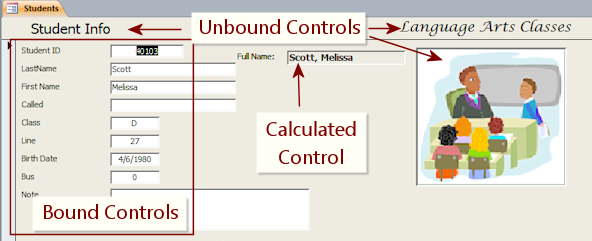
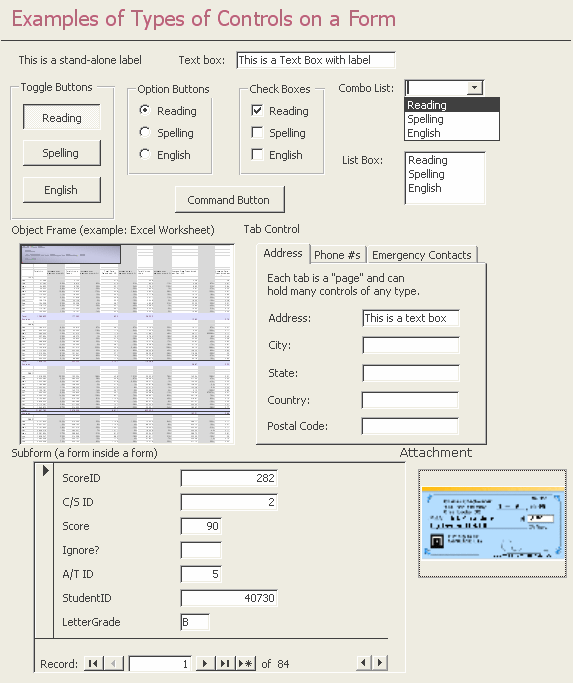
Examples of types of controls, based on
source
The Calculated control Full Name combines fields with an expression:
=IIf([Called] Is Null,[LastName] & ", " & [FirstName],[LastName] & ", " & [Called])
Previously in Access Basics, you did just a little bit of formatting of the controls on an AutoForm:
- Select and move a control in Design View
- Resize a control in Design View
In this lesson you will learn more about how to format controls and their labels.
 Form Design View
In the Form Design View you can change the source, layout, and behavior of the form and each of its parts. You do not change the records themselves in this view, so you are free to play around with everything about the form.
What you can choose:
- Table or query to use as the source for the form as a whole
- Which fields to use
- Type of control for each field: text box, list box, combo box, command button, etc.
- What sections to show:
- Form Header/Footer
- Page Header/Footer (Shows only for printing)
- Detail - the records!
- Format for any part of the form
- Position and size
- Fonts, font colors, font sizes
- Border size, border color
- Effects like shadowed, etched, sunken, etc.
- Background color or image
- Titles and unattached labels
- Decorative lines and images
- Tabbed pages
- Include another form as a subform


 Access 2010, 2013, 2016: Include a report on a form
- Assign responses to events, like clicking on a control, exiting a control, or closing the form.
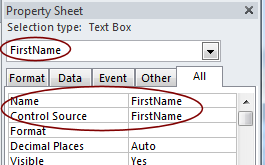
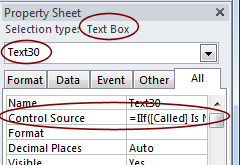
Property Sheet 
The form as a whole, each of its sections, and each control has its own properties, which you can see in the Property Sheet pane. You open the pane while in the Design View or Layout View, using the Property Sheet button on the ribbon tab, Form Tools: Design or Form Layout Tools: Design. The pane will stay open until you close it.

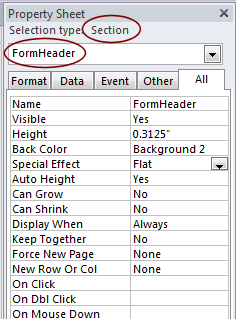
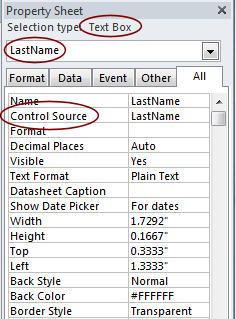
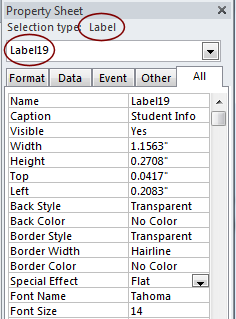
Compare the properties shown: Form as a whole, a section, a text box control, a label
The list of properties will automatically change to match whatever is currently selected in the form.
The Property Sheet shows tabs named Format, Data, Event, Other, and All. For some types of controls, there are no properties on some tabs. The tab All lists all available properties for the selected object, but not in an obvious order. Unhappily, there does not seem to be a way to change the sorting order for the properties. The other tabs show only the properties related to the topic of the tab.
Some properties can also be changed from the ribbon tab or through other dialogs.
What are the dots?
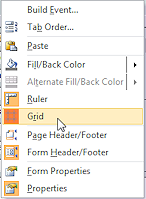 The background of the form in Design View has a grid of dots and lines.
The grid is there to help you get the controls and labels lined up neatly, but
it can be annoying. The
labels are often hard to read in this view! The grid can be toggled on/off by right-clicking the background in Design View and clicking on the command Grid.
The background of the form in Design View has a grid of dots and lines.
The grid is there to help you get the controls and labels lined up neatly, but
it can be annoying. The
labels are often hard to read in this view! The grid can be toggled on/off by right-clicking the background in Design View and clicking on the command Grid.
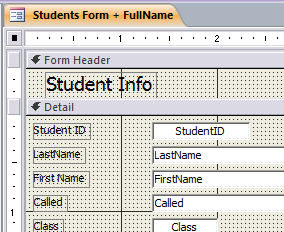
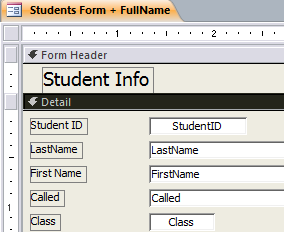
Form Design View with and without grid showing
Types of Controls
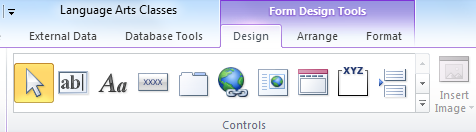 The Controls tab group on the Form Tools: Design ribbon tab and on the Form Layout Tools: Design ribbon tab has a palette of buttons for the controls that you can create.
The choices are nearly the same for Form and Report Design View.
Examples of the types of controls:
Name of Control
The default Name for a data control is the name of the field that is its Control Source, like StudentID or FirstName.
The default name for unbound or calculated controls is the type plus a number, like Image12, Label3, Box25, Option23, or Line52. A control whose source is an expression has a default name like Text29. The number for these names is the count of previously created controls of any type, including any that you deleted.
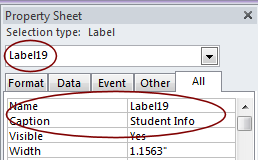
You are not stuck with the default Name value. Change it in the Name property to something more useful. The Caption property for a label is what shows on the form and can be different from the control's name. Handy!
![]() Names for Calculated Controls: The name of a control can not be the same as a field that is
used in the expression that calculates the value of the control. So if the value is calculated with =[Price]+[Tax], then the name of the control cannot be Price or Tax. Doing so creates an error called a circular reference. You must get creative instead, using a creative name like FinalPrice or TotalPrice or PriceWithTax.
Names for Calculated Controls: The name of a control can not be the same as a field that is
used in the expression that calculates the value of the control. So if the value is calculated with =[Price]+[Tax], then the name of the control cannot be Price or Tax. Doing so creates an error called a circular reference. You must get creative instead, using a creative name like FinalPrice or TotalPrice or PriceWithTax.
Labels for Controls:
![]() The default text in the label for a control is the
name of the source field or the value in the Caption property for the field, if there is one.
The default text in the label for a control is the
name of the source field or the value in the Caption property for the field, if there is one.
In Access 2007 and 2010 the text is
followed by a colon by default, but Access 2013 and 2016 leave off the colon. The label has its own Name and Caption properties that you can edit.
![]() Point of Confusion: Name for a label attached to a control
Point of Confusion: Name for a label attached to a control
The name of a label is not the text that you see in the label. The label's Caption property is the name of the attached control, like StaffID, by default. So that is what you see on the form to start with. The label's own Name property is Label5 or similar in Access 2007 and 2010. In Access 2013 and 2016 the name of a control's label is similar to "StaffID_Label". Much better!
Names and values for controls and their labels:
- Control whose source is the field [LastName], Name property = LastName
- Control displays the value of [LastName] field for each record.
- Label for the control whose source is the field [LastName] shows the text "LastName:" in Access 2007 and 2010, but in Access 2013 and 2016, just "LastName" without the colon.
You can edit what shows in a label that is attached to a control, or even delete the label ,without affecting the values that show up in the control.
To edit label text:
- In Form Design View: Select the label; click it again; the cursor appears in the label text; edit the text. This changes the Caption property for the label.
- In the Property Sheet: Edit the Caption property for a label
- In the Table Design View: Edit the Caption property for the associated field. Only new controls will use the new Caption value.
Selecting a Control in Design View
A control is an object that displays data or controls an action or is a decoration like a line or an image. We often refer to a "control and its label", but a label is actually a type of control itself. A label is normally attached to its matching control. But a label can stand alone, like a form title. It's a bit confusing!
 To
select a control:
To
select a control:
- Click on it.
- Use the TAB key to move to it .
- Drag across any part of it.
- Property Sheet: Change the drop list selection at the top
To unselect a control: Click somewhere that is not selected or select something else.
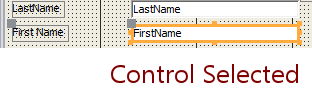
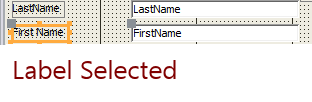
How to tell that a control is selected:
![]() Method 1: Look for a thick orange border with resizing handles and a large gray Move handle on the top left corner. If the control is part of a label-control pair, the matching part will have a large gray Move handle in its top left corner also but will have a normal border.
Method 1: Look for a thick orange border with resizing handles and a large gray Move handle on the top left corner. If the control is part of a label-control pair, the matching part will have a large gray Move handle in its top left corner also but will have a normal border.
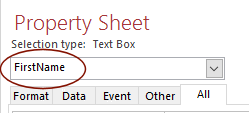 Method 2: The Property Sheet shows at the top what is currently selected.
Handles (squares) appear at the corners and the middle of each side when the object is selected. There are two kinds of handles for two different purposes.
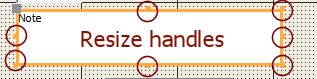 Resize handles: Drag on the smaller handles on the corners or middle of each side to change the width
and/or height of the object.
Resize handles: Drag on the smaller handles on the corners or middle of each side to change the width
and/or height of the object.
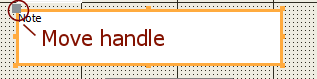 Move handle: Drag the larger, gray upper left handle to move
the selected object separately from other objects in the selection. You don't lose
the selection. A happy difference from most programs! This is the handle
you will use to adjust the space between a control and its attached label.
Move handle: Drag the larger, gray upper left handle to move
the selected object separately from other objects in the selection. You don't lose
the selection. A happy difference from most programs! This is the handle
you will use to adjust the space between a control and its attached label.
Special Case: Control and Its Label
When you select a control, its attached label is
not exactly selected, but it does automatically get a Move handle at its
upper left corner. If you move the control without using the Move handle, the label comes along for the ride, keeping the same relative position. Similarly, if you select a label, the control to which
it is attached automatically gets a Move handle. To move either one separately, drag the Move handle. Of course, you can select
both of them when you need to with one of the methods described the next
lesson Format Multiple Controls.
Moving Controls
You must select a control before you can move it. You can move a selected control along with its associated label or move only the control or label by itself.
The pointer shape is the same in all cases, the Move shape ![]() . What actually moves depends on where the pointer is.
. What actually moves depends on where the pointer is.
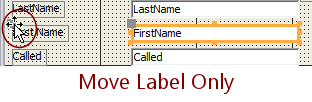
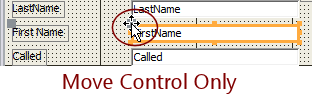 Move Separately :
Put your mouse pointer over the large gray handle at the upper left corner of an
object so that the pointer changes to the Move shape.
Drag to move that object by itself.
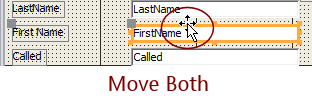 Move Together :
Select control(s). Put your mouse pointer over the border of a selected object so that the pointer
changes to a the Move shape. Drag or use the arrow keys to move the control(s) and
attached label(s) together, even though only one of them is officially "selected".
Alternate method - Arrow Keys: Press the arrow key on the keyboard to move whatever is selected in the direction that the arrow points. Each key press moves half the distance between the default grid dots.
Formatting a Control
 You can change the appearance of a control or a label in many ways.
- Text: font, font size, color, bold, italics, underline, alignment.
- Shape: border style, border thickness, border color, background color, special effects like raised, sunken, shadow.
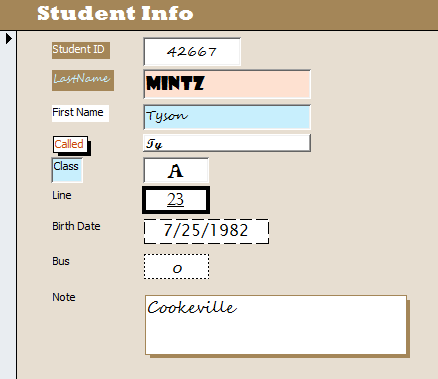
The illustration shows some of the possibilities. Clearly some choices are better than others in the example! Too many different fonts and colors and styles makes for a messy, ugly form.
Where can you find the formatting commands? While you are in Design or Layout view:
- Home ribbon tab
- Form Tools: Format ribbon tab
- Form Layout Tools: Format ribbon tab
- Context menu (right click menu)
- Property Sheet
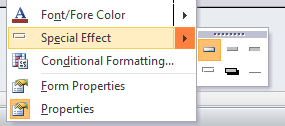 Special Effects: Access has several special effects which affect the appearance of a control. The commands are on the context menu and in the Property Sheet. A special effect can make the control look flat, raised, sunken, etched, shadowed, or chiseled.
The palette on the context menu does not use screen tips to tell you which is which. The order of effects in the Property Sheet drop list is not the same as in the palette.
Special Effects: Access has several special effects which affect the appearance of a control. The commands are on the context menu and in the Property Sheet. A special effect can make the control look flat, raised, sunken, etched, shadowed, or chiseled.
The palette on the context menu does not use screen tips to tell you which is which. The order of effects in the Property Sheet drop list is not the same as in the palette.
Not Shape Effects: Shape Effects on the Format ribbon tabs seem to apply only to command buttons as do the Quick Styles and Change Shape palettes.
Copy Formatting: Format Painter 

Like other Office programs, Access includes the Format Painter tool. This button lets you copy formatting from one control to another. Unlike other Office programs, you cannot drag across what you want to format with the Format Painter pointer shape. You must click on each control separately.
| Properties Copied by Format Painter | |||
|---|---|---|---|
|
|
|
|
How to use Format Painter:
- Format a control (or label)- font, font color, line style, line color, line thickness, special effects, etc.
- Select the formatted object.
-
Click the Format Painter button,
, which is on three ribbon tabs:
Home, Form Design Tools: Format, or Form Layout Tools: Format.The mouse pointer changes shape depending on where you move it:
 over a control or
  over the background
 -
Click the object that you want to change.
The formatting is applied and the mouse pointer returns to the Select shape . ,
. ,You may not see all or any of the differences. For example, applying red font color will not make a visible change to a rectangle with no text in it.
Format Painter does NOT copy the control's size or distance from its label. So sad!
To Change Several Controls: Double-click the Format Painter button. The pointer will stay in the Format Painter shape so that you can click on various objects to paste the copied formatting. Click the button again to return the mouse pointer to normal.
![]() Point of Confusion: Format Painter
Point of Confusion: Format Painter
What gets formatted depends on what was selected when you clicked on the Format Painter button and what you clicked on next. The table below shows the various combinations and what the results look like.

Original controls with labels
| Select | Click |
What gets formatted | Results |
|---|---|---|---|
| Control 1 | Control 2 | Control 2 and Label 2 are formatted like Control 1 and Label 1. |  |
| Control 1 | Label 2 | Label 2 matches Control 1. Control 2 is not changed. |
 |
| Label 1 | Control 2 | Control 2 matches Label 1. Label 2 is not changed. |
|
| Label 1 | Label 2 |
Label 2 matches Label 1. |
 |
| Control 1 | Right click on Control 2 > Paste Formatting. |
Control 2 matches Control 1. [This is the way to copy and paste formatting from one control to another control without formatting the label.] |
 |

| |
Step-by-Step: Format a Control |
|
| What you will learn: | to create a copy in Navigation pane to position and size a controls and labels to format control and label to use Format Painter to create and format an unbound label to format a section, Form Footer |
Start with: ![]() , resource files, worldtravel-Lastname-Firstname.accdb from the previous lesson
, resource files, worldtravel-Lastname-Firstname.accdb from the previous lesson
You will work with the form from the previous lesson, Form Wizard. While the Form Wizard created a formatted form quickly, you will soon see that it can take a lot of work to make the form truly useful. In the next lesson you will do a form by adding all of the controls yourself. That can be easier!
-
If necessary, open the database worldtravel-Lastname-Firstname.accdb in the folder databases project4 on your Class disk.
-
 Open the form Staff, which you created in the previous lesson.
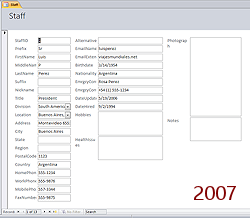
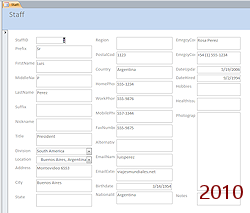
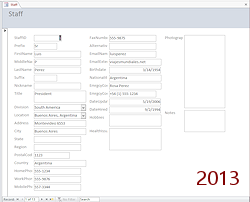
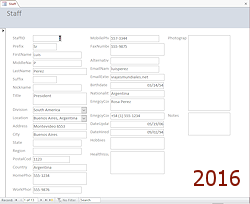
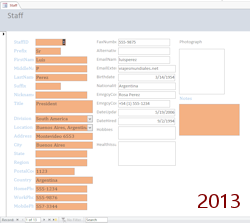
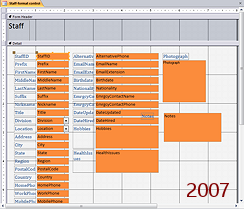
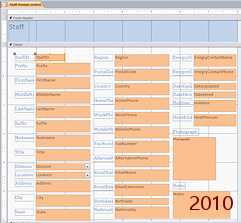
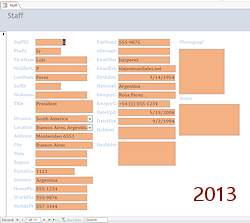
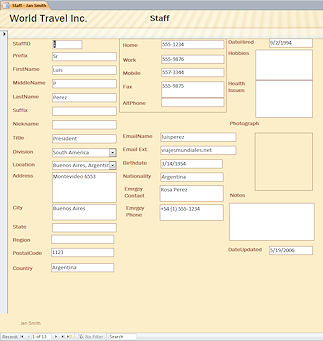
Form Wizard Form - in different versions
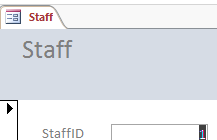
This form needs some help!
- Which controls are too big for the expected data? Wasted space!
- Which labels are too narrow to show the text.
Not acceptable! - Text alignment and control height varies between versions of Access for some data types.
- Close the form.
Create a Copy in Navigation Pane
- In the Navigation Pane, select the Staff form.
- Copy and paste to the Navigation Pane.
Accept the default name Copy of Staff.  Open the new object, Copy of Staff, in Design View.
Position and Size Controls and Labels
Let's experiment a bit with the formatting for just one control. Once you have found a good combination you can apply it to other controls with Format Painter.
Access only remembers the last 20 actions. Before experimenting with formatting, it is a good idea to create a copy of your existing form and do your changes on that. This makes it a lot easier to start over.
 Access 2007: The Form Wizard applied a Stacked Layout, which you need to remove.
- Click in a control in the first column.
- Click the Select Table
 button at the top left of the column.
The whole left column is selected. - In the ribbon tab Form Design Tools: Arrange, click the Remove button
 in the Control Layout tab group.
(If you don't select the whole column, only the selected control is affected.) - Repeat for the other two columns.
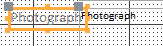 Resize the Photograph label to Best Fit by double-clicking a Resize handle.
 You cannot size controls with
data "to fit", only labels.
You cannot size controls with
data "to fit", only labels.
Access 2007: Resize the label to only one line.
-
 Click on the Photograph control to select it.
Because this field is an Attachment field, Access gave it a larger size.Notice the orange resizing handles for the control and the gray Move handles for both the control and its label.
-
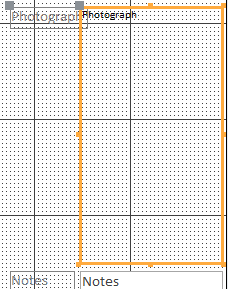
Move the mouse pointer over the Resize handle in the middle of the bottom edge of the control and drag upwards to resize the control to a much smaller height.
- Move control only:
- Move the mouse pointer over the gray handle for the Photograph control.
The pointer shape changes to the Move shape , NOT the resize shape.
- Drag down and to the left, to move the control underneath its label.
Leave only one row of dots between the label and control.
- Move the mouse pointer over the gray handle for the Photograph control.
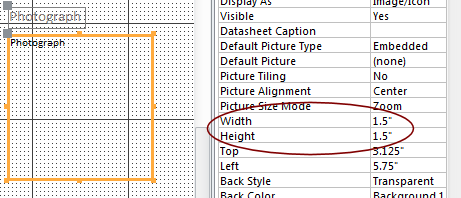 In the Property Sheet for the Photograph control, change the Width and Height to 1.5".
Now there is extra space for the Notes control.
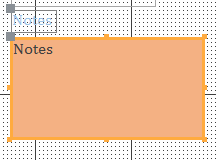
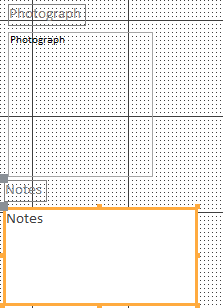 Resize the label for the Notes control to Best Fit.
- Click on the Notes control to select it.
- Move the label only:
- Move the mouse pointer over the Move handle of the Notes label until it changes to the Move shape .
- Drag the label up and drop it just below the Photograph control.
- Move the mouse pointer over the Move handle of the Notes label until it changes to the Move shape
- Resize the Notes control:
The Move handle prevents you from resizing the control up and left.- Move the mouse pointer over the Move handle on the top left corner of the Notes control.
- Drag the control up and left underneath the Notes label and drop.
- Move the mouse pointer over the bottom right corner of the Notes control.
The mouse pointer changes to the Resize Diagonal shape .
. - Drag down and right to enlarge the control to about 2" x 1".
Do not enlarge the form by dragging past the current form border.
Format Control and Label
Next you will change the fonts, colors, and special effects that will change the look of the form. You will choose colors and fonts that are part of the current theme/autoformat so that changing the theme/autoformat will change the colors.
Different versions of Access have different color palettes for their default themes.
-
With the Notes label selected, use the buttons on the Home ribbon tab to apply the following:
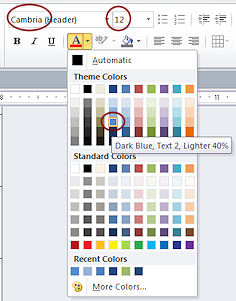
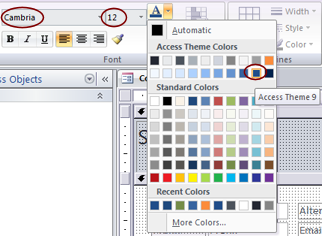 Font: Cambria
- Font Size: 12
-
Color:
Access 2007: Access Theme 9 Access 2010: Dark Blue,Text 2, Lighter 40% Access 2013, 2016: Blue, Accent 1, Lighter 40%
- Resize the Notes label to Best Fit.
The larger font size requires more space. -
 Select the Notes control and apply the following:
 - Font : Cambria
- Font Size: 12
-
Background color:
Access 2007: Highlight (top row, far right) Access 2010: Orange, Accent 6, Lighter 40% Access 2013, 2016: Orange, Accent 2, Lighter 40%
- Save Object As: Staff-format control.
- Inspect the Design View of your new form.
 Inspect the Form View.
![]() Point of Confusion: Object name vs. Tab title
Point of Confusion: Object name vs. Tab title
The form that is open is now the copy that you just
saved, as the tab shows in Design View.
But, in Form View, the title tab still shows what is in the form's Caption property.
More than a little bit confusing!
Format Painter
-
Switch to Form Design View for the new form, Staff-format control.
-
Select the Notes control that you just formatted.
-
Click on the Format Painter button
. -
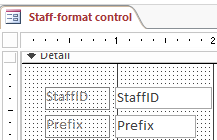
Click on the StaffD control (not the label) at the top left of the form.
The control and its label now match the formatting of the control and label for Notes.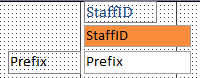 Access 2007: Format Painter copies the position and spacing between the label and the control also. That's not what we want this time.
Move the StaffID label back to its original position.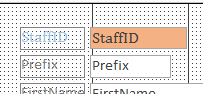 Access 2010, 2013, 2016: Spacing and position are not copied like Access 2007 and earlier versions do.
- Select the StaffID control and double-click the Format Painter button.
The mouse pointer will stay in Format Painter shape until you click the button again. - Click on each of the controls in the left column of controls.
- Click on the Format Painter button to turn it off.
-
 Switch to Form View.
The new font and colors are used in the labels and controls that you clicked on.Compare the first column to the second. Which is easier to read? What would make the form better?
The background color for controls does make them stand out from the labels. Is that a good thing?
There are still a number of problems with the layout. Wasted space, cut-off labels, and inconsistent alignment. More work to do!
-
For consistency, format the rest of the controls to match.
-
 Save your form again, with the same name, Staff-format control.
Create and Format Unbound Labels
Is it clear what this form is for? Will it be as clear to the other users of this database? Will any users be using more than one database? Are there forms that are similar enough to create confusion?
The Form Header can make it clear what database the form is in and what its purpose is. An unbound label lets you type whatever you want. It is not 'bound' to a field.
You will add a label for the company name to the Form Header and one for your own name to the Form Footer.
-
In
Form Design View, inspect the three section bars.
The Form Wizard put controls in the Form Header and Detail sections.You have a section bar, that says "Form Footer", but there is not any space below it. The wizard hid the Form Footer by sizing it to a height of zero.
The Form
Header and Footer are not the same as the Page Header and Footer, which show only when printing. 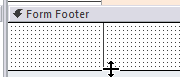
 Move your mouse over the bottom edge of the Form Footer section bar until it changes to the Resize Vertical
shape
Move your mouse over the bottom edge of the Form Footer section bar until it changes to the Resize Vertical
shape  .
. - Drag down to create a ½" tall space.
(Look at the vertical ruler on the left.)
That will enlarge the section vertically.
-
On the Form Tools: Design ribbon tab, click on the Label control button
 or
or  .
. -
 Move the mouse pointer over the Form
Footer section.
Move the mouse pointer over the Form
Footer section.
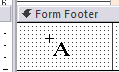
The pointer changes to a new shape, Draw Label .
.  Click in the Form Footer at the left .
A tiny label is created, ready for you to type.
The label will automatically expand horizontally as you type.Draw Label: You can also drag while the pointer is in
the Draw Label shape, to create a label of the size that you want. The size
of the label does not affect the size of the text. If you draw the label, the label will expand vertically as you type but not horizontally.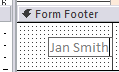 Type your name.
The label automatically resizes in width as you type.
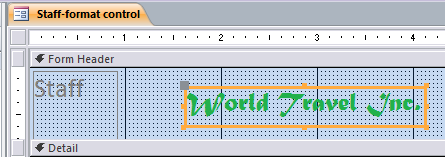
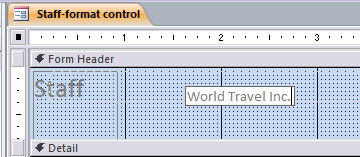 Similarly, create a new label in the Form Header.
-
Type World Travel Inc. in the label.
You cannot format the label while it is in Edit mode.
-
 Click out to deselect the label.
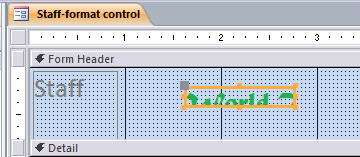
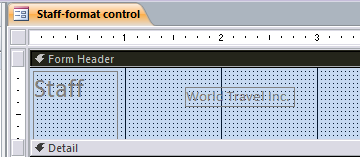
Click the label World Travel Inc. again to select it.
-
From the ribbon, format the label with:
- Font: Matura MT Script Capitals
- Font size: 20
- Color: Green (from the Standard colors)
The label does not automatically resize to hold the text in its new size and font! Of course, you already learned a way to resize the label "to fit".
 Move your mouse pointer over one of the Resize handles and double-click.
The label resizes. The Form Header section will might resize also, depending on exactly where your label was and how large it got. This is a helpful feature!
-
Format the label Staff as:
- Font: Tahoma
- Font size: 16
- Bold
-
Color:
Access 2007: Access Theme 10 Access 2010, 2013, 2016: Blue, Accent 1, Darker 25%
-
 Resize the Staff label to fit.
 -
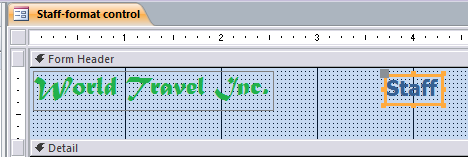
Move the labels so that they are positioned as in the illustration.
(The arrow keys are good to move small distances.)World Travel Inc. is at the left edge of the layout with its top edge on the first row of grid dots.
Staff has its top edge of the second row of grid dots and is centered at the 4" line, which is the middle of the form.
-
Switch to Form View to see how your form is
looking now.
We have not yet fixed the problem of pale label text or of labels that are too narrow.
Form Footer
-
 Experiment: Window sizes vs. Form View
-
 Try different window sizes for your Access window.
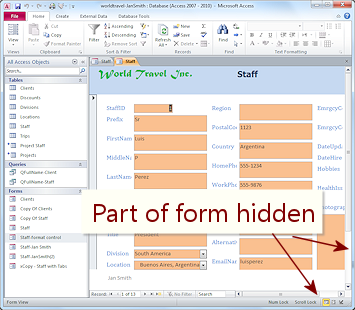
Can you see the whole form at once at less than Full Screen size? -
Make your Access window small enough to show a vertical and a horizontal scroll bar.
The Form Footer has the same white background as the Detail section with no dividing line.
This makes it hard to notice that there are controls at the bottom or sides that are not showing. One way to handle this is to give it a contrasting background. A dividing line across the top of the footer would work, too.
-
 Switch back to Design View.
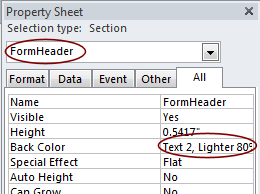
- Click the Form Header bar to select that section.
- If necessary, open the Property Sheet and widen the pane so you can read the Back Color value.
- Copy the value for property Back Color.
- Click the Form Footer.
The Property Sheet changes to match. -
Select the value in the Back Color property and Paste.
The background color now matches the Form Header. Problem: Error message about invalid value
You slipped in your selection. You either did not copy the whole color value or you did not replace all of the original value.
Solution: Examine the value in the property and edit it. 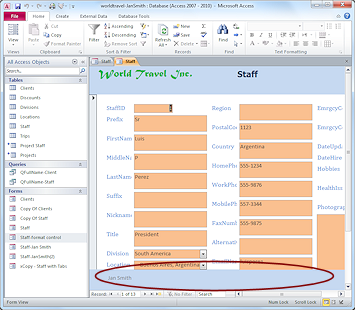 Switch to Form View to see how your form is
looking now.
Switch to Form View to see how your form is
looking now. -
Save your form again, with the same name.
[Staff-format control]
For now, we will leave this version of the Staff form as it is, even
though some controls and labels are not a good size.
Experiment: Format Control and Label
You can change the look of a control or of its label or of both. You have MANY choices for colors, fonts, font sizes, borders, and special effects. It's time for you to play around with it yourself! Many choices are on the Home ribbon tab and on the Form Tools: Format and Form Layout Tools: Format ribbon tab. There are also choices on the context menu (when you right click on a control).
-
Pick a control and its label and experiment with various choices: font, font size, color, special effect, border, background, text alignment, etc. Look for combinations that are readable and attractive.
You may need to resize the label and control for larger font sizes.
You may want to apply some changes to just the label or to just the control. Evaluate:
How is your formatting working out? Is there enough contrast?
Evaluate:
How is your formatting working out? Is there enough contrast?
-
Switch to Form View and navigate to different records to see if your choices work well with the data.
Once you have found a formatting combination that you like...
- Use Format Painter to apply your new formatting to the other labels and controls on the form.
- Change other layout and formatting choices, if you wish.
You might edit the label text to fit the space better. Do whatever you can think of to make this form attractive and useful. - Change the Caption property for the form to Staff-Firstname Lastname, using your own first and last names.
-
Save the form with the name Staff-Firstname Lastname, using your own first and last names.
Your formatting should not be the same as another student's.Examples: Do not try to match the examples below! Be creative.
The fourth example above uses the same layout as the third one but with an AutoFormat applied. The special effect on labels and the formatting for the company in the header are tossed out.
The image background from the AutoFormat is taller than the Form Header, so it laps over into the Detail section. If we had left the Staff label in the Form Header at its original size, the header would have been the correct height for the background image.
In the next lesson you will create a form manually so that you will have more control over the process from the beginning.
|
|
| © 1997-2017 Jan Smith All Rights Reserved |
Site Map What's New |
Privacy Policy Terms of Service Copyright Acknowledgements |
~~ 1 Cor. 10:31 ...whatever you do, do it all for the glory of God. ~~
Last updated: March 22, 2017